Author: Martin Goodnews

  • How to Setup Siri on iPhone 14 Plus

    How to Setup Siri on iPhone 14 Plus

    The iPhone 14 Plus Siri (Apple’s virtual assistant), is an advanced assistant that is by powered artificial intelligence, that is designed to help you manage tasks, get information, and control your device using voice commands to perform tasks, answer questions, and control various features of your iPhone simple voice commands.

    Setup SIRI

    With the iPhone 14 Plus, Siri becomes an indispensable tool for enhancing your user experience, allowing you to interact with your phone hands-free. Setting up Siri is essential for accessing its powerful features quickly and efficiently.

    This comprehensive guide will provide you with the basic processes on how to setup Siri on iPhone 14 Plus. So, read and follow through the process carefully.

    How to Setup Siri on iPhone 14 Plus

    Below is the step-by-step process for setting up your Siri on your iPhone 14plus.

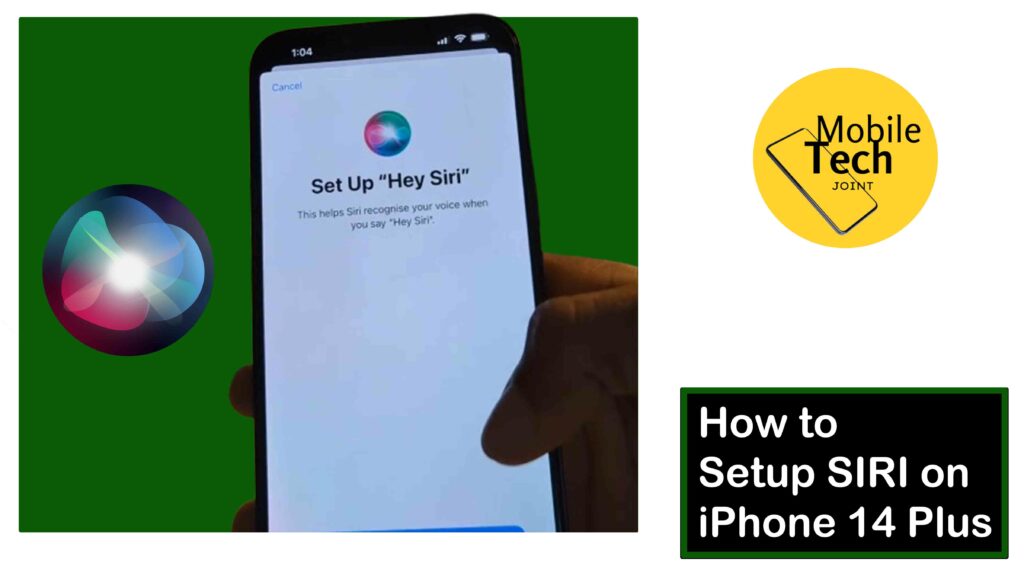
    • First, start by unlocking your iPhone, locate your Settings app, and click on it.
    • Next, scroll down until you see Siri & Search option and click on it to access Siri settings.
    • After that, turn on the switch labeled, Press the Side Button for Siri to proceed.
    • Next, a notification will pop up, telling you to Enable Siri.
    • Click on it, and listen for Hey Siri. To proceed.
    • Now you can follow the onscreen procedures provided to complete setting up Siri on your iPhone 14 Plus.

    These are the required steps, follow through carefully, for positive results.

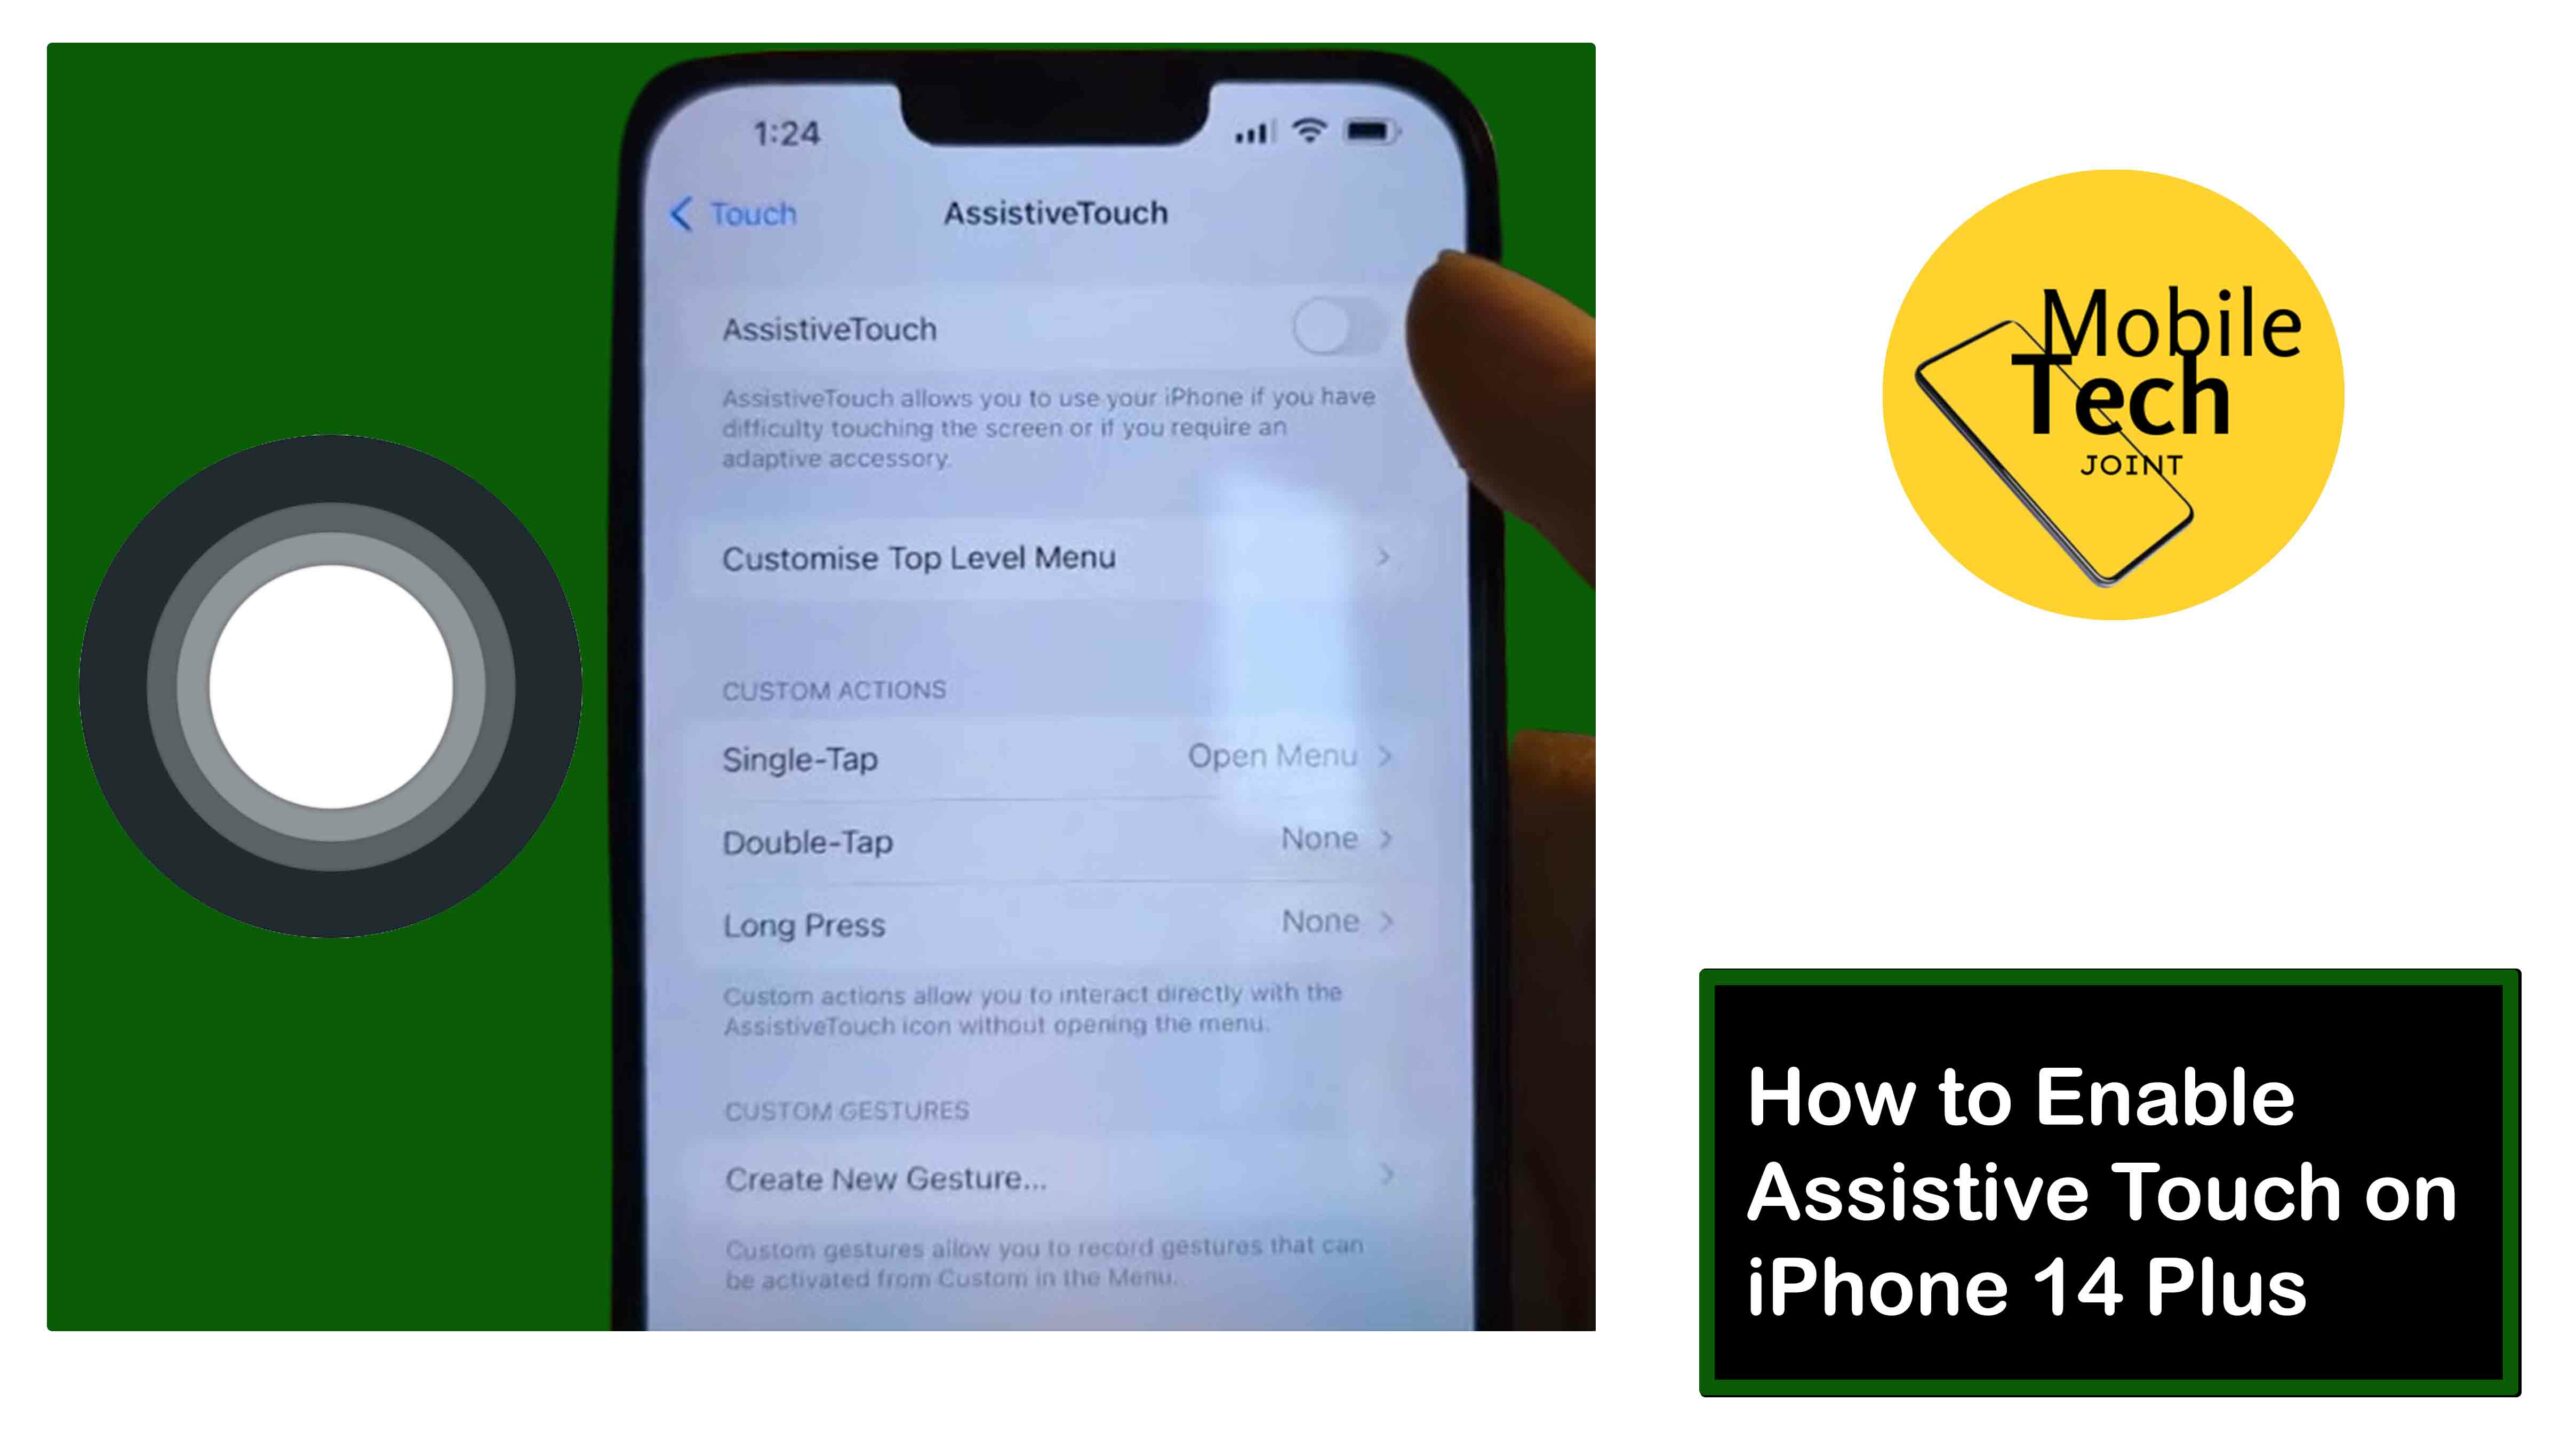
    Related: How to Enable AssistiveTouch on iPhone 14 Plus

    Benefit of Enabling Siri on iPhone 14 Plus

    There are some huge and outstanding benefits to enabling Siri on your iPhone 14 Plus. And some of these benefits are.

    • Siri allows you to perform some outstanding and hands-free tasks, making it easier to multitask and stay productive.
    • Siri can provide rapid information, such as weather reports, news, sports, and more, helping you to save time and effort.
    • To an extent, Siri can also help in Making calls, sending messages, and even sending emails with just your voice commands.
    • Siri can also help with translation with multiple language capacities, whether you are texting or having a conversation with someone.

    Conclusion

    In conclusion, enabling Siri on your iPhone 14 Plus opens a world of convenience, productivity, and entertainment. With this feature, you can perform tasks hands-free, access information quickly, and control your device with ease.

    Siri’s capabilities range from simple tasks like making calls and sending messages to more complex tasks like navigating and controlling your smart home devices.

    By leveraging Siri’s feature, you’ll enhance your iPhone experience and make the most of your device’s capabilities. So, activate Siri today and discover a more intuitive and enjoyable way to interact with your iPhone!

    How Easy is it to Set Up Siri?

    Very Easy! Setting up Siri on iPhone 14 Plus involves a few simple steps in the Settings app. No technical expertise is required, making it accessible for users of all comfort levels.

    How Long Does Siri Setup Take?

    Quick Setup! The entire process of enabling and configuring Siri on your iPhone 14 Plus typically takes less than 2 minutes. You can customize further later if needed.

    Why Use Siri on iPhone 14 Plus?

    Enhanced Convenience! Siri allows hands-free interaction with your iPhone. Use voice commands to make calls, send messages, control music, and more, all without needing to touch your phone.

    For more insights on this article, check out these video tips across our social platforms:

  • How to Access Motion and Gestures on Samsung S23 +

    How to Access Motion and Gestures on Samsung S23 +

    The Samsung Galaxy S23+ goes beyond the typical touchscreen experience, offering intuitive motion and gesture controls to enhance your interaction with the phone.

    To access motion and gestures on your Samsung Galaxy S23+, you can use various intuitive features that make interacting with your device more convenient and efficient.

    Access Motion and Gestures

    These motion and gesture controls enable and give you easy access to navigate your device and perform various functions with simple movements or actions.

    This guide will give you insight into how to access Motion and gestures on Samsung S23 +, empowering you to navigate your phone with a flick of your wrist or a double tap.

    About the Motion and Gestures on Samsung S23+

    Motion and Gestures encompass various functionalities that utilize the built-in sensors in your S23+ to recognize your movements and translate them into actions on the screen. Here are some core functionalities within Motion and Gestures:

    • Lift to Wake

    Picking up your phone wakes the display, eliminating the need to fumble for the power button.

    • Double Tap to Wake/sleep

    Double-tapping the screen quickly turns the display on or off, providing convenient access.

    • Palm Swipe to Capture

    Swiping the edge of your hand across the screen captures a screenshot, offering an alternative to button combinations.

    • Keep Screen on While Viewing

    The phone detects your gaze and keeps the display lit as long as you’re looking at it, preventing accidental timeouts.

    • Alert on Pick Up

    If you miss a call or message, your phone will vibrate when you pick it up, reminding you of the notification.

    Important Note: The availability of specific Motion and Gesture features might vary depending on your software version and phone model.

    How to Access Motion and Gestures on Samsung S23 +

    There are two primary ways to access and manage Motion and Gesture settings on your Samsung Galaxy S23+:

    Using Settings App (Detailed Control)

    • Open the Settings app on your Galaxy S23+.
    • Scroll down and tap on the Advanced Features tab.
    • Within Advanced Features, locate and tap on Motions and Gestures.
    • You’ll see a list of available Motion and Gesture Features with toggle switches to enable or disable them.
    • Tap the toggle switch next to the desired feature to On to activate it.

    (Optional) Explore additional settings for specific features (e.g., adjusting the palm swipe capture area).

    Using Quick Search (Fast Access)

    • Swipe down from the home screen to access the Search Bar.
    • In the search bar, type Motion and Gestures or  just Gestures.
    • Tap on the relevant search result that appears, which will direct you to the Motion and Gestures Settings within Advanced Features.
    • From there, you can follow steps 4-6 from Method 1 to manage your desired Motion and Gestures.

    Those are the required steps needed to successfully access motion and gestures on Samsung S23 +, and modify the one you prefer.

    Related: How to Enable Emergency SOS on Samsung S23 +

    Why Use Motion and Gestures on Samsung S23+?

    There are several compelling reasons to leverage Motion and Gestures on your S23+:

    • Enhanced Convenience

    Motion and gestures provide quicker and more intuitive ways to interact with your phone. Simple movements like raising your phone or swiping your hand can replace button presses, streamlining your experience.

    • Accessibility Benefits

    For users with dexterity limitations, Motion and Gestures can offer alternative control methods, making the phone more accessible.

    • Reduced Wear and Tear

    Utilizing gestures like double-tap to wake/sleep can potentially minimize wear and tear on the power button.

    Conclusion

    By understanding the available features and utilizing the methods outlined in this guide, you can leverage Motion and Gestures on your Samsung Galaxy S23+.

    This functionality empowers you to interact with your phone in a more intuitive and convenient way, enhancing your overall user experience. So, explore the world of Motion and Gestures and discover how these features can streamline your phone usage.

    Can I Activate Gestures on my Samsung S23 +?

    While some gestures like “Lift to wake” are convenient, you might worry about accidental activation.

    Fortunately, Samsung offers customization options for specific gestures. For instance, you can increase the required number of taps for the “Double tap to wake/sleep” function to minimize accidental activations.

    Will Using Motion and Gestures Drain my Battery?

    The impact of Motion and Gestures on battery life is generally minimal. These features utilize the phone’s built-in sensors, and their power consumption is optimized.

    However, if you’re concerned about battery life, you can selectively disable gestures you don’t use frequently.

    Are there any Compatibility Issues with Motion and Gestures on Samsung S23 +?

    Some screen protectors, especially thick or with certain materials, might interfere with the phone’s ability to recognize gestures accurately.

    If you experience issues with Motion and Gestures, try using a different screen protector or temporarily removing it to see if the problem persists.

    For more insights on this article, check out these video tips across our social platforms:

  • How to Enable Emergency SOS on Samsung S23 +

    How to Enable Emergency SOS on Samsung S23 +

    The Samsung Galaxy S23+ prioritizes your safety and well-being. One valuable feature it offers is Emergency SOS, designed to send help quickly in critical situations.

    Emergency SOS

    This guide will help you understand the steps needed to enable Emergency SOS on Samsung S23 +, and it will help you have peace of mind knowing help is just a few taps away in an emergency. So, read and follow the procedures in it carefully.

    About the Emergency SOS on S23 +

    Emergency SOS on your Galaxy S23+ utilizes various functionalities to send an SOS message to your emergency contacts, including:

    • Sending an SOS Message

    Emergency SOS transmits a text message containing your location (coordinates) to your designated emergency contacts upon activation.

    • Sharing Additional Information

    You can configure Emergency SOS to include photos or a short audio recording in your SOS message, providing your contacts with additional situational context.

    • Triggering Emergency Calls

    Emergency SOS can be set to automatically dial emergency services after sending the SOS message.

    Important Note:  Always ensure your emergency contact information is accurate and up-to-date for Emergency SOS to function effectively.

    How to Enable Emergency SOS on Samsung S23+

    There are two primary ways to enable emergency SOS on Samsung Galaxy S23 +:

    Using Settings App (Detailed Control)

    • Open the Settings app on your Galaxy S23+.
    • Scroll down and tap on Safety and Emergency.
    • Within the Safety and Emergency option, locate and tap on Send SOS Messages.
    • You’ll see a toggle switch and various options for Emergency SOS.
    • Tap the toggle switch next to Send SOS Messages to On to activate it.

    Those are the possible required steps needed, to enable emergency SOS on Samsung S23 + from within the settings menu.

    Explore customization options (Optional) :

    • Add Emergency Contacts

    Tap on “Add emergency contact” to create a list of people who will receive your SOS message.

    • Include Additional Information

    Enable Attach Pictures or Attach Audio Recording if you want to include photos or a short audio clip with your SOS message.

    • Trigger Emergency Calls

    Activate “Call emergency services” if you want Emergency SOS to automatically dial emergency services after sending the SOS message.

    • Set SOS Trigger Method

    Choose how you want to activate Emergency SOS. You can opt for pressing the power button rapidly or customize a specific button sequence.

    Using Power Button (Quick Activation)

    • Quickly press and hold the side Power button and the Volume Down button on your S23+ (depending on your settings).
    • A countdown timer will appear on the screen. You can cancel the SOS activation by swiping the Cancel button during the countdown.
    • If the countdown reaches zero or you don’t cancel, your Galaxy S23+ will send an SOS message to your emergency contacts, following your configured settings (including potential photos, audio recordings, or emergency calls).

    That’s all.

    Why Enable Emergency SOS on Galaxy S23+?

    There are several compelling reasons to leverage Emergency SOS on your S23+:

    • Enhanced Safety

    Knowing you can quickly send an SOS message with your location to loved ones in an emergency provides significant peace of mind.

    • Customization Options

    Emergency SOS offers customization options, allowing you to tailor it to your specific needs. You can choose to include additional information like photos or trigger emergency calls automatically.

    • Potential Life-Saving Tool

    In critical situations, every second counts. Emergency SOS can expedite the arrival of help, potentially saving lives.

    Conclusion

    By understanding the benefits and utilizing the methods outlined in this guide, you can effectively leverage Emergency SOS on your Samsung Galaxy S23+.  This valuable feature empowers you to feel more secure, knowing you can send an SOS message with your location to loved ones in an emergency situation.

    Remember to personalize your Emergency SOS settings to ensure it functions optimally for your needs. Be prepared, but hopefully, you’ll never need to use it.

    For more insights on this article, check out these video tips across our social platforms:

  • How to Turn On Mobile Data on Google Pixel Watch

    How to Turn On Mobile Data on Google Pixel Watch

    The Google Pixel Watch offers cellular connectivity on select models, allowing you to stay connected and receive notifications even when your phone is out of range.

    Turn On Mobile Data on Google Pixel Watch

    This guide will unveil the steps on how to turn on mobile data on your Google Pixel Watch, empowering you to enjoy seamless connectivity on your wrist.

    All you need to do to achieve the positive result, you will have to read and follow the steps provided in this blog carefully.

    Important Note:  Mobile data functionality requires a compatible Pixel Watch model with an activated cellular plan from your carrier.

    If you’re unsure about your watch’s compatibility or cellular plan status,  consult your carrier or the official Google Pixel Watch documentation.

    How to Turn On Mobile Data on Google Pixel Watch

    There are two primary ways to activate mobile data on your Google Pixel Watch:

    Using Settings App (Detailed Control)

    • Press the Crown button on your Pixel Watch to access the app list.
    • Scroll through the apps and tap on Settings.
    • Locate and tap on Connectivity.
    • Within Connectivity settings, tap on Mobile.
    • Now you will have to click on the Mobile option again.
    • Select the Automatic option to activate mobile data.
    • Scroll down and click on the tick option to continue.
    • Now finally and easily, you have turn on the mobile data on your Google Pixel Watch.

    Using Quick Settings Panel (Fast and Easy)

    • Swipe down on the watch face to access the Quick Settings panel.
    • Locate the Mobile Data tile.
    • Tap on the Mobile Data tile to toggle it on or off. The tile will turn blue when mobile data is active.

    These are the required steps to activate mobile data on your Google Pixel Watch.

    Related:  How to Enable Sunlight Boost on Google Pixel Watch

    Benefits of Mobile Data on Google Pixel Watch

    There are several compelling reasons to leverage mobile data on your Pixel Watch:

    Untethered Connectivity

    With mobile data enabled, you can receive calls, texts, and notifications on your Pixel Watch even when your phone is not nearby.

    This is ideal for situations where you might leave your phone behind, like during workouts or quick errands.

    Streamlined Experience

    Mobile data allows you to use data-dependent apps directly on your watch, such as music streaming services or fitness trackers that require internet connection for real-time data tracking.

    Peace of Mind

    Knowing you’re connected and reachable through your watch, even without your phone, can provide peace of mind.

    With the benefits provided here, I’m sure you would want to turn on the Mobile data on your Google Pixel Watch.

    Conclusion

    By understanding the benefits and utilizing the methods outlined in this guide, you can leverage mobile data on your Google Pixel Watch to stay connected and receive important notifications even when your phone is not with you.

    Embrace the freedom and convenience of cellular connectivity on your wrist, ensuring you’re never truly out of touch.

    Do I Need a Special Pixel Watch Model to use Mobile Data?

    Yes, it’s functionality is only available on specific Google Pixel Watch models with built-in cellular connectivity.

    You’ll also need an activated cellular plan with your carrier to use mobile data on your watch.

    Will Mobile Data Drain my Pixel Watch Battery Faster?

    Yes, using mobile data will consume more battery power compared to using Bluetooth connection with your phone.

    However, the impact might vary depending on your usage patterns. If you’re concerned about battery life, you can enable mobile data only when needed and utilize Bluetooth connectivity for most everyday tasks.

    Can I Use all my Phone’s Apps on my Pixel Watch with Mobile Data?

    Not all phone apps are directly compatible with the Pixel Watch. However, you can access many popular apps with data connectivity,  including messaging apps, music streaming services, and fitness trackers with live data features.

    For more insights on this article, check out these video tips across our social platforms:

  • How to Enable Eye Comfort Shield on Samsung S24 Ultra

    How to Enable Eye Comfort Shield on Samsung S24 Ultra

    The Samsung Galaxy S24 Ultra boasts a stunning display, but extended screen time can strain your eyes, especially in low-light environments.

    Enable Eye Comfort Shield

    Here’s where Eye Comfort Shield comes in, a valuable feature that helps reduce eye strain by adjusting the color tone of your display.

    This comprehensive guide will give you insights on the steps on how to enable Eye Comfort Shield on Samsung Galaxy S24 Ultra, allowing you to enjoy a more comfortable and relaxed viewing experience.

    About Eye Comfort Shield on Galaxy S24 Ultra

    Eye Comfort Shield utilizes a blue light filter to reduce the emission of blue light from your phone’s display.

    Blue light, while essential for daytime alertness, can contribute to eye strain and disrupt sleep patterns when viewed at night. By filtering out some blue light, Eye Comfort Shield creates a warmer color tone, promoting a more relaxed viewing experience for your eyes.

    Important Note: The exact impact of blue light on sleep patterns is a topic of ongoing research. However, many users find Eye Comfort Shield to be helpful for reducing eye strain, especially during nighttime use.

    Why Use Eye Comfort Shield on Galaxy S24 Ultra?

    There are several compelling reasons to leverage Eye Comfort Shield on your S24 Ultra:

    • Reduced Eye Strain

    Eye Comfort Shield’s blue light filter helps minimize eye strain, especially during extended periods of phone use. This can be particularly beneficial for night owls or those who frequently use their phones in low-light settings.

    • Improved Sleep Quality

    By reducing blue light exposure in the evening, Eye Comfort Shield can potentially promote better sleep quality. The warmer color tone can help signal to your body that it’s time to wind down and prepare for sleep.

    • Customizable Settings

    Eye Comfort Shield offers customization options, allowing you to adjust the intensity of the filter and schedule its activation to suit your preferences.

    How to Enable Eye Comfort Shield on Samsung S24 Ultra

    There are two primary ways to activate Eye Comfort Shield on your Samsung Galaxy S24 Ultra:

    Using Quick Settings Panel

    • Swipe down twice from the top of your screen to fully expand the Quick Settings panel.
    • Locate the Eye Comfort Shield tile. It might be located on the first page of Quick Settings or require swiping left to reveal additional tiles.
    • Tap on the “Eye comfort shield” tile to activate or deactivate it. The tile will become highlighted when active.

    Using Settings App

    • Open the Settings app on your Galaxy S24 Ultra.
    • Scroll down and tap on Display.
    • Within the Display settings, locate and tap on Eye comfort shield.
    • You’ll see a toggle switch and various options for Eye Comfort Shield.
    • Tap the toggle switch next to Eye comfort shield to On to activate it.

    Here are the possible procedures need for possible results.

    Related: How to Enable Battery Protection on Samsung S24 Ultra

    Customization Options:

    • Adjust filter intensity

    A slider allows you to adjust the strength of the blue light filter, offering a spectrum from a subtle to a more pronounced warm tone.

    • Schedule activation

    You can set Eye Comfort Shield to automatically activate and deactivate at specific times based on your preferences (e.g., activate at sunset and deactivate at sunrise).


    Conclusion

    By understanding the benefits and utilizing the methods outlined in this guide, you can effectively leverage Eye Comfort Shield on your Samsung Galaxy S24 Ultra.

    his valuable feature empowers you to create a more comfortable and eye-friendly viewing experience, reducing strain and potentially promoting better sleep.

    So, don’t hesitate to activate Eye Comfort Shield for an enhanced and relaxed viewing experience, especially during extended phone use or in low-light environments.

    Does Eye Comfort Shield Block Blue Light from my Galaxy S24 Ultra?

    No, Eye Comfort Shield utilizes a filter to reduce the emission of blue light, not eliminate it entirely. This creates a warmer color tone but still allows some blue light to pass through.

    Can Eye Comfort Shield Affect Accuracy of Colors on my Phone Display?

    Since Eye Comfort Shield applies a filter that reduces blue light, it can slightly alter the overall color appearance on your screen.

    The colors might appear warmer or less vibrant. This is a trade-off for reducing eye strain, but the impact is usually minimal for everyday use.

    Are there any Ways to Reduce Eye Strain Besides Eye Comfort Shield?

    Absolutely! Here are some additional tips:

    • Adjust Screen Brightness

    Lowering your screen brightness can significantly reduce eye strain, especially in low-light environments.

    • Take Breaks

    Give your eyes a break from the screen every 20-30 minutes. Look away from your phone and focus on a distant object for a few minutes.

    • Adjust the Font Size

    Using a larger font size can reduce eye strain by making text easier to read.

    Enable Dark Mode: If available for your apps, switching to Dark Mode can create a darker overall viewing experience, which some users find more comfortable in low-light settings.

    For more insights on this article, check out these video tips across our social platforms:

  • How to Enable Power Saving Mode on Samsung S24 Ultra

    How to Enable Power Saving Mode on Samsung S24 Ultra

    The Samsung Galaxy S24 Ultra boasts impressive features, but maximizing battery life is always a concern.

    Power Saving Mode

    Thanks to Samsung that has included a powerful Power Saving Mode on the S24 Ultra, which is an easy way for extending battery life when needed.

    This thorough tutorial will guide you through the process on how to enable Power Saving Mode on Samsung S24 Ultra, allowing you to go about your day with confidence knowing you have additional battery capacity when it counts the most.

    About Power Saving Mode on Galaxy S24 Ultra

    Power Saving Mode prioritizes battery conservation by making adjustments to various phone functions. Here’s a breakdown of its effects:

    • Reduced Background Activity

    Background apps and processes are restricted, limiting their ability to drain your battery.

    • Limited Performance

    CPU and processing speeds might be slightly reduced to minimize power consumption. This is usually a minor adjustment and shouldn’t significantly impact daily use.

    • Optimized Display

    Screen brightness might be lowered automatically, and features like Always On Display (AOD) can be disabled to further conserve battery.

    Important Note: The specific adjustments made by Power Saving Mode might vary slightly depending on your customization settings.

    How to Enable Power Saving Mode on Samsung S24 Ultra

    There are two primary ways to activate Power Saving Mode on your Samsung Galaxy S24 Ultra:

    Using Quick Settings Panel

    • Swipe down twice from the top of your screen to fully expand the Quick Settings panel.
    • Locate the Power Saving tile. It might be located on the first page of Quick Settings or require swiping left to reveal additional tiles.
    • Tap on the Power Saving tile to activate Power Saving Mode. The tile will become highlighted, indicating the mode is active.

    Using Settings App

    • Open the Settings app on your Galaxy S24 Ultra.
    • Scroll down and tap on Device care.
    • Within Device care, locate and tap on Battery.
    • You’ll see a toggle switch and various options related to battery management.
    • Tap the toggle switch next to Power saving mode to On to activate it.
    • (Optional) Tap on Details below the toggle switch to access additional customization options for Power Saving Mode. Here, you can choose the level of background activity restriction and adjust other settings to fine-tune your battery conservation.

    Why Use Power Saving Mode on Galaxy S24 Ultra?

    There are several compelling reasons to leverage Power Saving Mode on your S24 Ultra:

    • Extend Battery Life

    When your battery level starts dipping and you need to stretch it further, Power Saving Mode is a lifesaver. It can significantly extend your battery life, allowing you to stay connected and productive for longer.

    • Ideal for Travel or Long Outings

    If you’re travelling or on a long outing with limited access to charging, enabling Power Saving Mode beforehand ensures your phone lasts throughout the day.

    • Peace of Mind

    Knowing you have Power Saving Mode as a backup provides peace of mind. You can use your phone more freely without constantly worrying about battery depletion.

    Related: How to Enable Maintenance Mode on Samsung S24 Ultra

    Conclusion

    By understanding the benefits and utilizing the methods outlined in this guide, you can effectively leverage Power Saving Mode on your Samsung Galaxy S24 Ultra.

    This valuable feature assist you to extend your battery life, ensuring you stay connected and productive throughout your day.

    So, don’t hesitate to activate Power Saving Mode whenever you need that extra boost of battery life, allowing you to navigate your world with confidence.

    Does Power Saving Mode Affect App Performance?

    Power Saving Mode might slightly reduce CPU and processing speeds to conserve battery. However, this is usually a minor adjustment and shouldn’t significantly impact everyday app usage.

    You’ll still be able to use your apps normally, but some complex tasks or games might experience slightly slower performance.

    Can I Customize Power Saving Mode on my Galaxy S24 Ultra?

    Absolutely! You have some control over how Power Saving Mode functions.

    By accessing the settings through the Battery section within Settings or tapping “Details” after enabling Power Saving Mode via Quick Settings, you can adjust the level of background activity restriction.

    This allows you to strike a balance between battery conservation and keeping essential apps running in the background.

    Will Power Saving Mode Disable Internet Access on my Galaxy S24 Ultra?

    No, Power Saving Mode primarily focuses on optimizing battery usage by limiting background activity and reducing processing power. Internet access will still be available.

    However, background data fetching for apps might be restricted to conserve battery. You can still browse the web, stream content, or use social media, but some apps might refresh content less frequently in the background to save battery.

    For more insights on this article, check out these video tips across our social platforms:

  • How to Enable Maintenance Mode on Samsung S24 Ultra

    How to Enable Maintenance Mode on Samsung S24 Ultra

    The Samsung Galaxy S24 Ultra empowers you with a powerful suite of features, but safeguarding your privacy is equally important.

    Enable Maintenance Mode

    Here’s where Maintenance Mode comes in, a valuable tool that protects your personal data when handing your phone over for repairs or service.

    This comprehensive guide provides insights on the steps to enable Maintenance Mode on your Samsung Galaxy S24 Ultra, ensuring your privacy remains secure.

    What is Maintenance Mode on Samsung S24 Ultra?

    Before going into how to enable Maintenance Mode on your Samsung Galaxy S24 Ultra, let’s understand what it actually does.

    Maintenance Mode is a valuable security feature designed to safeguard your privacy when you need to hand over your phone for repairs or service.

    Here’s a breakdown of its functionality:

    • Creates a Separate Environment

    When activated, Maintenance Mode establishes a temporary, isolated space on your phone. This isolated environment restricts access to your personal data, such as photos, messages, contacts, and other files.

    • Protects Your Information

    By shielding your data, Maintenance Mode ensures that service technicians or anyone else using your phone cannot access your private information. This provides significant peace of mind when your phone requires servicing.

    • Customization Options

    While Maintenance Mode restricts access to your personal data, it offers some degree of customization.

    You can choose specific apps and functionalities to remain accessible during Maintenance Mode. This allows you to maintain essential features like making calls or using the camera if needed.

    In essence, Maintenance Mode acts as a digital safeguard, creating a secure environment for your phone when it’s not in your immediate control.

    How to Enable Maintenance Mode on Samsung S24 Ultra

    There are two primary ways to activate Maintenance Mode on your Samsung Galaxy S24 Ultra:

    Using Settings App (Detailed Control)

    • Open the Settings app on your Galaxy S24 Ultra.
    • Scroll down and tap on Device Care.
    • Within Device Care, scroll down to the least and tap on Maintenance Mode.
    • Tap on the Turn on button to enable Maintenance Mode.
    • A pop-up message will appear, informing you that your phone will restart to enter Maintenance Mode. Tap Restart to confirm.

    Your phone will restart, and Maintenance Mode will be active. A watermark will appear on your screen indicating that Maintenance Mode is enabled.

    Using Samsung Members App

    • Open the Samsung Members app on your Galaxy S24 Ultra.
    • Navigate to the Support tab.
    • Within the Support section, tap on Maintenance Mode.
    • You’ll see a screen with information about Maintenance Mode. Tap the Turn on button to activate it.
    • Follow the on-screen prompts, which might involve entering your PIN or Password for security purposes.
    • Your phone will restart, and Maintenance Mode will be enabled.
    • Exiting Maintenance Mode on Galaxy S24 Ultra

    Once your phone is serviced and you’re ready to disable Maintenance Mode, follow these steps:

    • Unlock your phone using your PIN, Password, or Fingerprint.
    • You’ll see a notification prompting you to Exit Maintenance Mode. Tap on the notification.
    • (Optional) If you previously chose specific apps to remain accessible, you’ll be prompted to confirm if you want to keep them accessible after exiting Maintenance Mode. Choose your preference and tap Exit.
    • Your phone will restart, and Maintenance Mode will be deactivated. Your regular phone environment with full access to your data will be restored.

    Related: How to Scan Threats on Samsung S24 Ultra

    Why Use Maintenance Mode on Galaxy S24 Ultra?

    There are compelling reasons to use Maintenance Mode on your S24 Ultra, here are some of them:

    • Enhanced Privacy

    When enabled, Maintenance Mode creates a temporary, isolated environment on your phone. This means your personal data (photos, messages, contacts, etc.) is hidden and inaccessible to service technicians or anyone else using your phone.

    • Peace of Mind

    By utilizing Maintenance Mode, you can hand over your phone for repairs or warranty claims with peace of mind, knowing your private information is shielded.

    • Customization Options

    Maintenance Mode allows you to choose which apps and functionalities remain accessible while the mode is active. This way, you can still access essential features like making calls or using the camera if needed.

    Conclusion

    By understanding the benefits and utilizing the methods outlined in this guide, you can leverage Maintenance Mode on your Samsung Galaxy S24 Ultra to ensure your privacy remains protected whenever your phone requires service.

    This valuable tool empowers you to hand over your device with confidence, knowing your personal information is secure.

    Embrace the peace of mind that comes with Maintenance Mode and enjoy the powerful features of your Galaxy S24 Ultra worry-free.

    What Happens to my Apps when I Enable Maintenance Mode?

    By default, Maintenance Mode restricts access to all your apps and data to protect your privacy. However, it offers customization.

    You can choose specific apps (like phone calls or camera) to remain accessible while Maintenance Mode is active.

    Is there a Way to Access my Personal Data while Maintenance Mode is On?

    No, once Maintenance Mode is enabled, your personal data (photos, messages, contacts, etc.) is hidden and inaccessible.

    This is a security feature to ensure your privacy. To access your data again, you’ll need to exit Maintenance Mode, which requires restarting your phone and verifying your identity with your PIN, password, or fingerprint.

    For more insights on this article, check out this video tips on our social platform:

  • How to Enable 24 Hour Time Format on iPhone 14 Plus

    How to Enable 24 Hour Time Format on iPhone 14 Plus

    The iPhone 14 Plus, a device designed to integrate into your life, offers a high level of customization, including the way you view time.

    For those who prefer the obvious efficiency of the 24-hour clock, the iPhone 14 Plus empowers you to switch from the standard 12-hour format (AM/PM) to a 24-hour display.

    Enable 24 Hour Time Format on iPhone 14 Plus

    This minor adjustment can offer significant benefits, from eliminating confusion when dealing with international colleagues to promoting a more streamlined way of viewing time.

    Whether you’re a seasoned traveler, a business professional working across time zones, or simply someone who appreciates a clear and concise timekeeping system, enabling the 24-hour format on your iPhone 14 Plus can enhance your user experience.

    This guide will enlighten you on simple steps involved in on how to enable 24 hour time format on iPhone 14 Plus, ensuring you can navigate your day with perfect clarity, knowing exactly what time it is, anywhere in the world. So continue reading this article and follow the procedures carefully.

    Why Use 24-Hour Time Format?

    There are several advantages to using the 24-hour time format:

    • Universal Understanding

    It is widely used around the world, eliminating confusion when encountering times in different locations.

    • Clarity and Precision

    The 24-hour format removes ambiguity by explicitly displaying the hour, eliminating the need to decipher between AM and PM.

    • Efficiency

    It can be more efficient for some users, as it requires less mental processing to understand the time.

    Related: How to Enable Dark Mode on iPhone 14 Plus

    How to Enable 24 Hour Time Format on iPhone 14 Plus

    The process for enabling 24-hour time format on your iPhone 14 Plus is straightforward:

    • Open the Settings app on your iPhone 14 Plus.
    • Scroll down and tap on General.
    • Locate the Date & Time section and tap on it.
    • Tap on the 24-Hour Time option to enable the 24-hour time format.

    Exit the Settings app. The clock on your iPhone’s lock screen and throughout the system will now display time in the 24-hour format (e.g., 14:25 instead of 2:25 PM).

    Conclusion

    By enabling the 24-hour time format on your iPhone 14 Plus, you can ensure clear and unambiguous timekeeping.

    This format can be particularly beneficial for frequent travelers or anyone who works with international colleagues.

    With this simple adjustment in your Settings app, you can keep yourself on schedule and avoid any confusion regarding the time of day. So, switch to the 24-hour format and experience a more streamlined and efficient way to view time on your iPhone 14 Plus.

    Can I Use Both 12 Hour and 24 Hour Time Format at Same Time?

    Unfortunately, iPhone 14 Plus doesn’t offer a way to display both time formats simultaneously. You can choose either the 12-hour format with AM/PM or the 24-hour format.

    Will Enabling 24-hour Time Affect How Apps Display Time?

    While the system clock and lock screen will switch to 24-hour format, some apps might retain their own time format settings.  This depends on the individual app’s design and functionality.

    What if I Switched to 24-hour Time and Want to go Back to the 12-hour Format?

    No worries! Simply follow the same steps mentioned in the article.  Navigate to Settings > General > Date & Time.  Under the “Format” section,  choose “AM/PM” to switch back to the 12-hour time format.

    Does Using 24-hour Time Save Battery Life on iPhone 14 Plus?

    The switch to 24-hour time format has a little impact on battery life. Battery usage is influenced by factors like screen brightness, app usage, and cellular connectivity.

    Will Using 24-hour Time Make me Better at Math?

    There’s no direct link between using 24-hour time and improved math skills. However, the 24-hour format can promote familiarity with military time or time zones that use the 24-hour system.

    For more insights on this article, check out these video tips across our social platforms:

  • How to Edit Text Size on iPhone 14 Plus

    How to Edit Text Size on iPhone 14 Plus

    The iPhone 14 Plus boasts a stunning display, but ensuring the text is crisp and comfortable to read is essential for a positive user experience.

    Edit TExt Size

    Thankfully, Apple provides several ways to adjust the text size on your iPhone 14 Plus, allowing you to personalize your view and prevent eye strain.

    This comprehensive guide will explore all the methods for editing text size on your iPhone 14 Plus, empowering you to find the perfect fit for your reading preferences.

    Why Edit Text Size on iPhone 14 Plus?

    There are several compelling reasons to adjust the text size on your iPhone 14 Plus:

    • Enhanced Readability

    For users with farsightedness or those who simply prefer larger text, increasing the text size can significantly improve reading comfort and reduce eye strain.

    • Accessibility

    For users with visual impairments, enlarging the text size is crucial for ensuring they can clearly read content on their iPhone.

    • Personal Preference

    Some users might simply prefer a slightly larger or smaller font size for a more comfortable reading experience, regardless of vision concerns.

    How to Edit Text Size on iPhone 14 Plus 

    There are two primary methods for editing the text size on your iPhone 14 Plus:

    Using Settings App

    • Open the Settings app on your iPhone 14 Plus.
    • Scroll down and tap on Display & Brightness.
    • Locate the Text Size section.  You’ll see a slider bar with a sample text box displaying the current font size.
    • Drag the slider bar to the left to decrease the text size or to the right to increase it.  The sample text box will update in real-time, allowing you to preview the changes.
    • Once you’ve chosen the desired text size, simply exit the Settings app. The new text size will be applied across your entire iPhone system, including apps, menus, and messages.

    Using Zoom Feature (System-Wide Magnification)

    • Open the Settings app on your iPhone 14 Plus.
    • Scroll down and tap on Accessibility.
    • Locate the Zoom option and tap on it.
    • Toggle the switch next to Zoom to turn it On.  This activates the Zoom feature, which magnifies the entire iPhone screen content, including text.
    • You can now use pinch gestures (pinching two fingers together to zoom in and spreading them apart to zoom out) on your iPhone screen to adjust the zoom level. This will magnify all the content on your screen, including text.

    Here are the required procedures.

    Related: How to Access Storage on iPhone 14 Plus

    Choose the Right Text Size for You

    The ideal text size is a matter of personal preference. Here are some tips to help you find the perfect fit:

    • Consider Readability

    Choose a text size that allows you to read comfortably without straining your eyes. Adjust the size until the text appears sharp and clear.

    • Experiment

    Don’t be afraid to experiment with different text sizes using both methods mentioned above. Find the size that feels most comfortable for extended reading sessions.

    • Balance Comfort and Functionality

    While a larger font size might be easier on the eyes, it can also lead to less content being visible on the screen at once. Strike a balance between comfort and functionality.

    Conclusion

    By understanding the methods for editing text size and following the tips provided, you can personalize your iPhone 14 Plus display to ensure a comfortable and enjoyable reading experience.

    Don’t settle for a one-size-fits-all approach. Take control, adjust the text size to your preference, and unlock the full potential of your iPhone 14 Plus display.

    How Can I Make the Text Bigger on my iPhone 14 Plus?

    There are two main ways to increase text size on your iPhone 14 Plus. You can use the Settings app to adjust a dedicated Text Size slider, offering precise control over font size.

    Alternatively, you can activate the Zoom feature within Accessibility settings, which magnifies the entire screen content, including text, using pinch gestures.

    Is there a Way to Set Different Text Sizes for Apps on iPhone 14 Plus?

    Unfortunately, iPhone 14 Plus doesn’t allow you to set individual text sizes for specific apps.  The adjusted text size will be applied uniformly across your entire system, including all apps, menus, and messages.

    What if I Zoomed in Using the Zoom feature and can’t Zoom Back Out?

    If you activated Zoom and can’t see the entire screen, simply tap three times with three fingers anywhere on your iPhone 14 Plus screen. This is a universal zoom shortcut that will toggle zoom on and off.

    Alternatively, you can navigate back to the Zoom settings within Accessibility and turn the toggle switch back to “Off.”

    For more insights on this article, check out these video tips across our social platforms:

  • How to Enable AssistiveTouch on iPhone 14 Plus

    How to Enable AssistiveTouch on iPhone 14 Plus

    The iPhone 14 Plus prioritizes user experience, and AssistiveTouch is a powerful accessibility feature that enhances control and interaction for users with specific needs.

    Enable Assistive Touch on iPhone 14 Plus

    AssistiveTouch creates an on-screen virtual button that acts as a gateway to various iPhone functions, replacing the need for precise physical gestures or button presses.

    This comprehensive guide will explore more on how to enable AssistiveTouch on iPhone 14 Plus and explore its functionalities to empower your user experience. So read and follow the steps carefully.

    Why Use AssistiveTouch on iPhone 14 Plus?

    AssistiveTouch offers a multitude of benefits for iPhone 14 Plus users, including:

    • Simplified Navigation

    For users with limited dexterity or difficulty using certain iPhone gestures, AssistiveTouch provides an alternative way to perform actions like going home, opening the app switcher, or taking screenshots.

    • Accessibility Bridge

    AssistiveTouch acts as a bridge to various accessibility features on your iPhone 14 Plus. You can customize the on-screen button to access features like Voice Control, Siri, or Reachability.

    • Customization Options

    AssistiveTouch is highly customizable. You can choose the functions assigned to the virtual button and even set up custom multi-tap gestures for added convenience.

    How to Enable AssistiveTouch on iPhone 14 Plus

    The process of enabling AssistiveTouch on your iPhone 14 Plus is straightforward:

    • Open the Settings app on your iPhone 14 Plus.
    • Scroll down and tap on Accessibility.
    • Locate Touch and tap on it.
    • Locate AssistiveTouch and tap the toggle switch next to it to turn it On. The switch will turn green, indicating AssistiveTouch is active.
    • A small white dot, representing the AssistiveTouch button, will appear on your screen. You can drag and reposition this dot to a convenient location on your display.

    These are the required steps.

    Explore AssistiveTouch Functions

    Once activated, the AssistiveTouch button acts as a gateway to various functionalities. Here’s a closer look:

    • Single Tap

    By default, a single tap on the AssistiveTouch button opens a menu with various options. You can customize this menu to include frequently used functions like Home, App Switcher, Lock Screen, Volume control, Siri, and more.

    • Long Press, Double Tap, and 3D Touch

    You can assign additional functionalities to the AssistiveTouch button by setting custom actions for long presses, double taps, or even 3D Touch (available on iPhone models that support it). This allows for even more personalized control.

    • Custom Menus

    Delve deeper into customization by creating custom AssistiveTouch menus. You can have multiple menus for different scenarios, each containing the specific functions you need for that situation.

    Advanced AssistiveTouch Features on iPhone 14 Plus

    Beyond basic functionality, AssistiveTouch offers some advanced features on iPhone 14 Plus:

    • Assistive Devices

    Connect Bluetooth® and USB assistive devices like joysticks, trackpads, or even mouse devices to your iPhone and control them through the AssistiveTouch interface.

    • On-Screen Keyboard

    Display the on-screen keyboard directly through the AssistiveTouch menu for easier text input, especially helpful for users with limited mobility.

    • Always Show Menu

    This option ensures the AssistiveTouch menu remains visible even when a pointer device is connected, offering additional control options.

    Related: How to Access Keyboard Settings on iPhone 14 Plus

    Optimizing Your AssistiveTouch Experience

    Here are some tips to get the most out of AssistiveTouch on your iPhone 14 Plus:

    • Personalize Your Menu

    Customize the AssistiveTouch menu to include the functions you use most frequently. This will streamline your interaction and make it more efficient.

    • Explore Custom Gestures

    Experiment with assigning different actions to long presses, double taps, or 3D Touch (if applicable) for a truly personalized and convenient AssistiveTouch experience.

    • Consider Assistive Devices

    If you use assistive devices like joysticks or trackpads, explore how they can integrate with AssistiveTouch to create a control system tailored to your needs.

    Conclusion

    AssistiveTouch on iPhone 14 Plus offers a customizable on-screen button for simplified navigation and access to various functionalities.

    Explore its features to tailor your iPhone experience and unlock a world of accessibility options.

    What Can I Do with AssistiveTouch on iPhone 14 Plus?

    AssistiveTouch provides an on-screen button that acts as a gateway to various iPhone functions.

    You can use it for simplified navigation (going home, opening apps), access features like Voice Control or Siri, and even create custom multi-tap gestures for shortcuts.

    Is AssistiveTouch Difficult to Set up on iPhone 14 Plus?

    No, enabling AssistiveTouch is a straightforward process. It involves opening Settings > Accessibility > Touch > AssistiveTouch and turning on the toggle switch. The on-screen button will appear, and you can customize its functions and placement.

    Can I use AssistiveTouch with Other Accessibility Features on iPhone 14 Plus?

    Absolutely! AssistiveTouch acts as a bridge to various accessibility features. You can customize the menu to include functions like Voice Control or Reachability, allowing you to combine AssistiveTouch with other tools for a personalized and accessible iPhone experience.

    For more insights on this article, check out these video tips across our social platforms: