Author: Martin Goodnews

  • How to Enable Battery Protection on Samsung S24 Ultra

    How to Enable Battery Protection on Samsung S24 Ultra

    The Samsung Galaxy S24 Ultra packs a powerful battery, but optimizing its lifespan is essential for uninterrupted use throughout the day.

    Enable Battery Protection on Samsung S24 Ultra

    Luckily, the S24 Ultra includes a built-in Battery Protection feature that extends battery life by regulating charging cycles. This post will walk you through how to enable Battery Protection on your S24 Ultra.

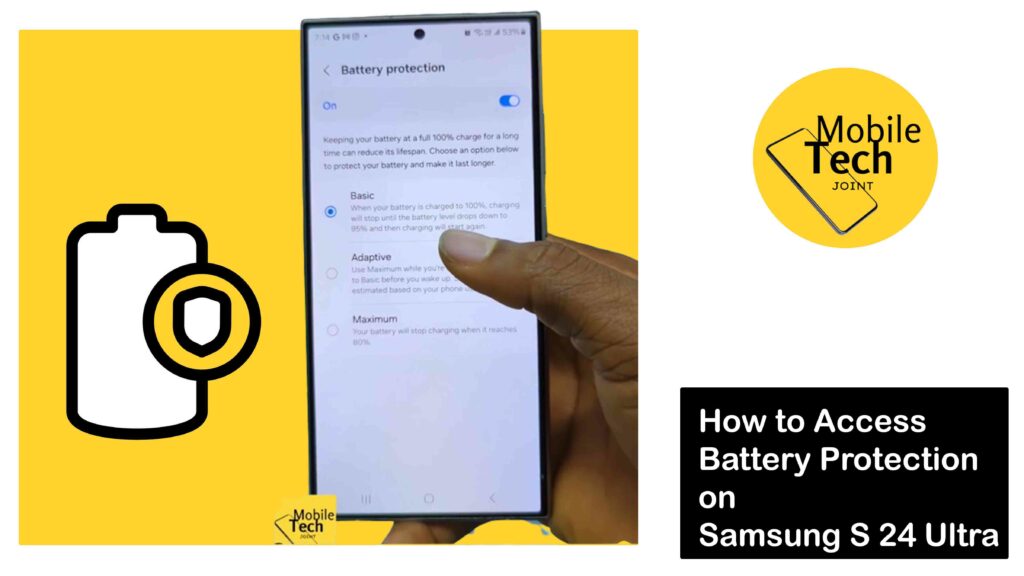
    Battery Protection Samsung S24 Ultra

    Lithium-ion batteries, like the one in your S24 Ultra, can degrade over time, especially when subjected to frequent full charging cycles.

    Battery Protection helps mitigate this by limiting the maximum charge level your phone reaches. This reduces stress on the battery and potentially extends its overall lifespan.

    How to Enable Battery Protection on Samsung S24 Ultra

    Here’s how to enable Battery Protection on Samsung S24 Ultra, follow through carefully:

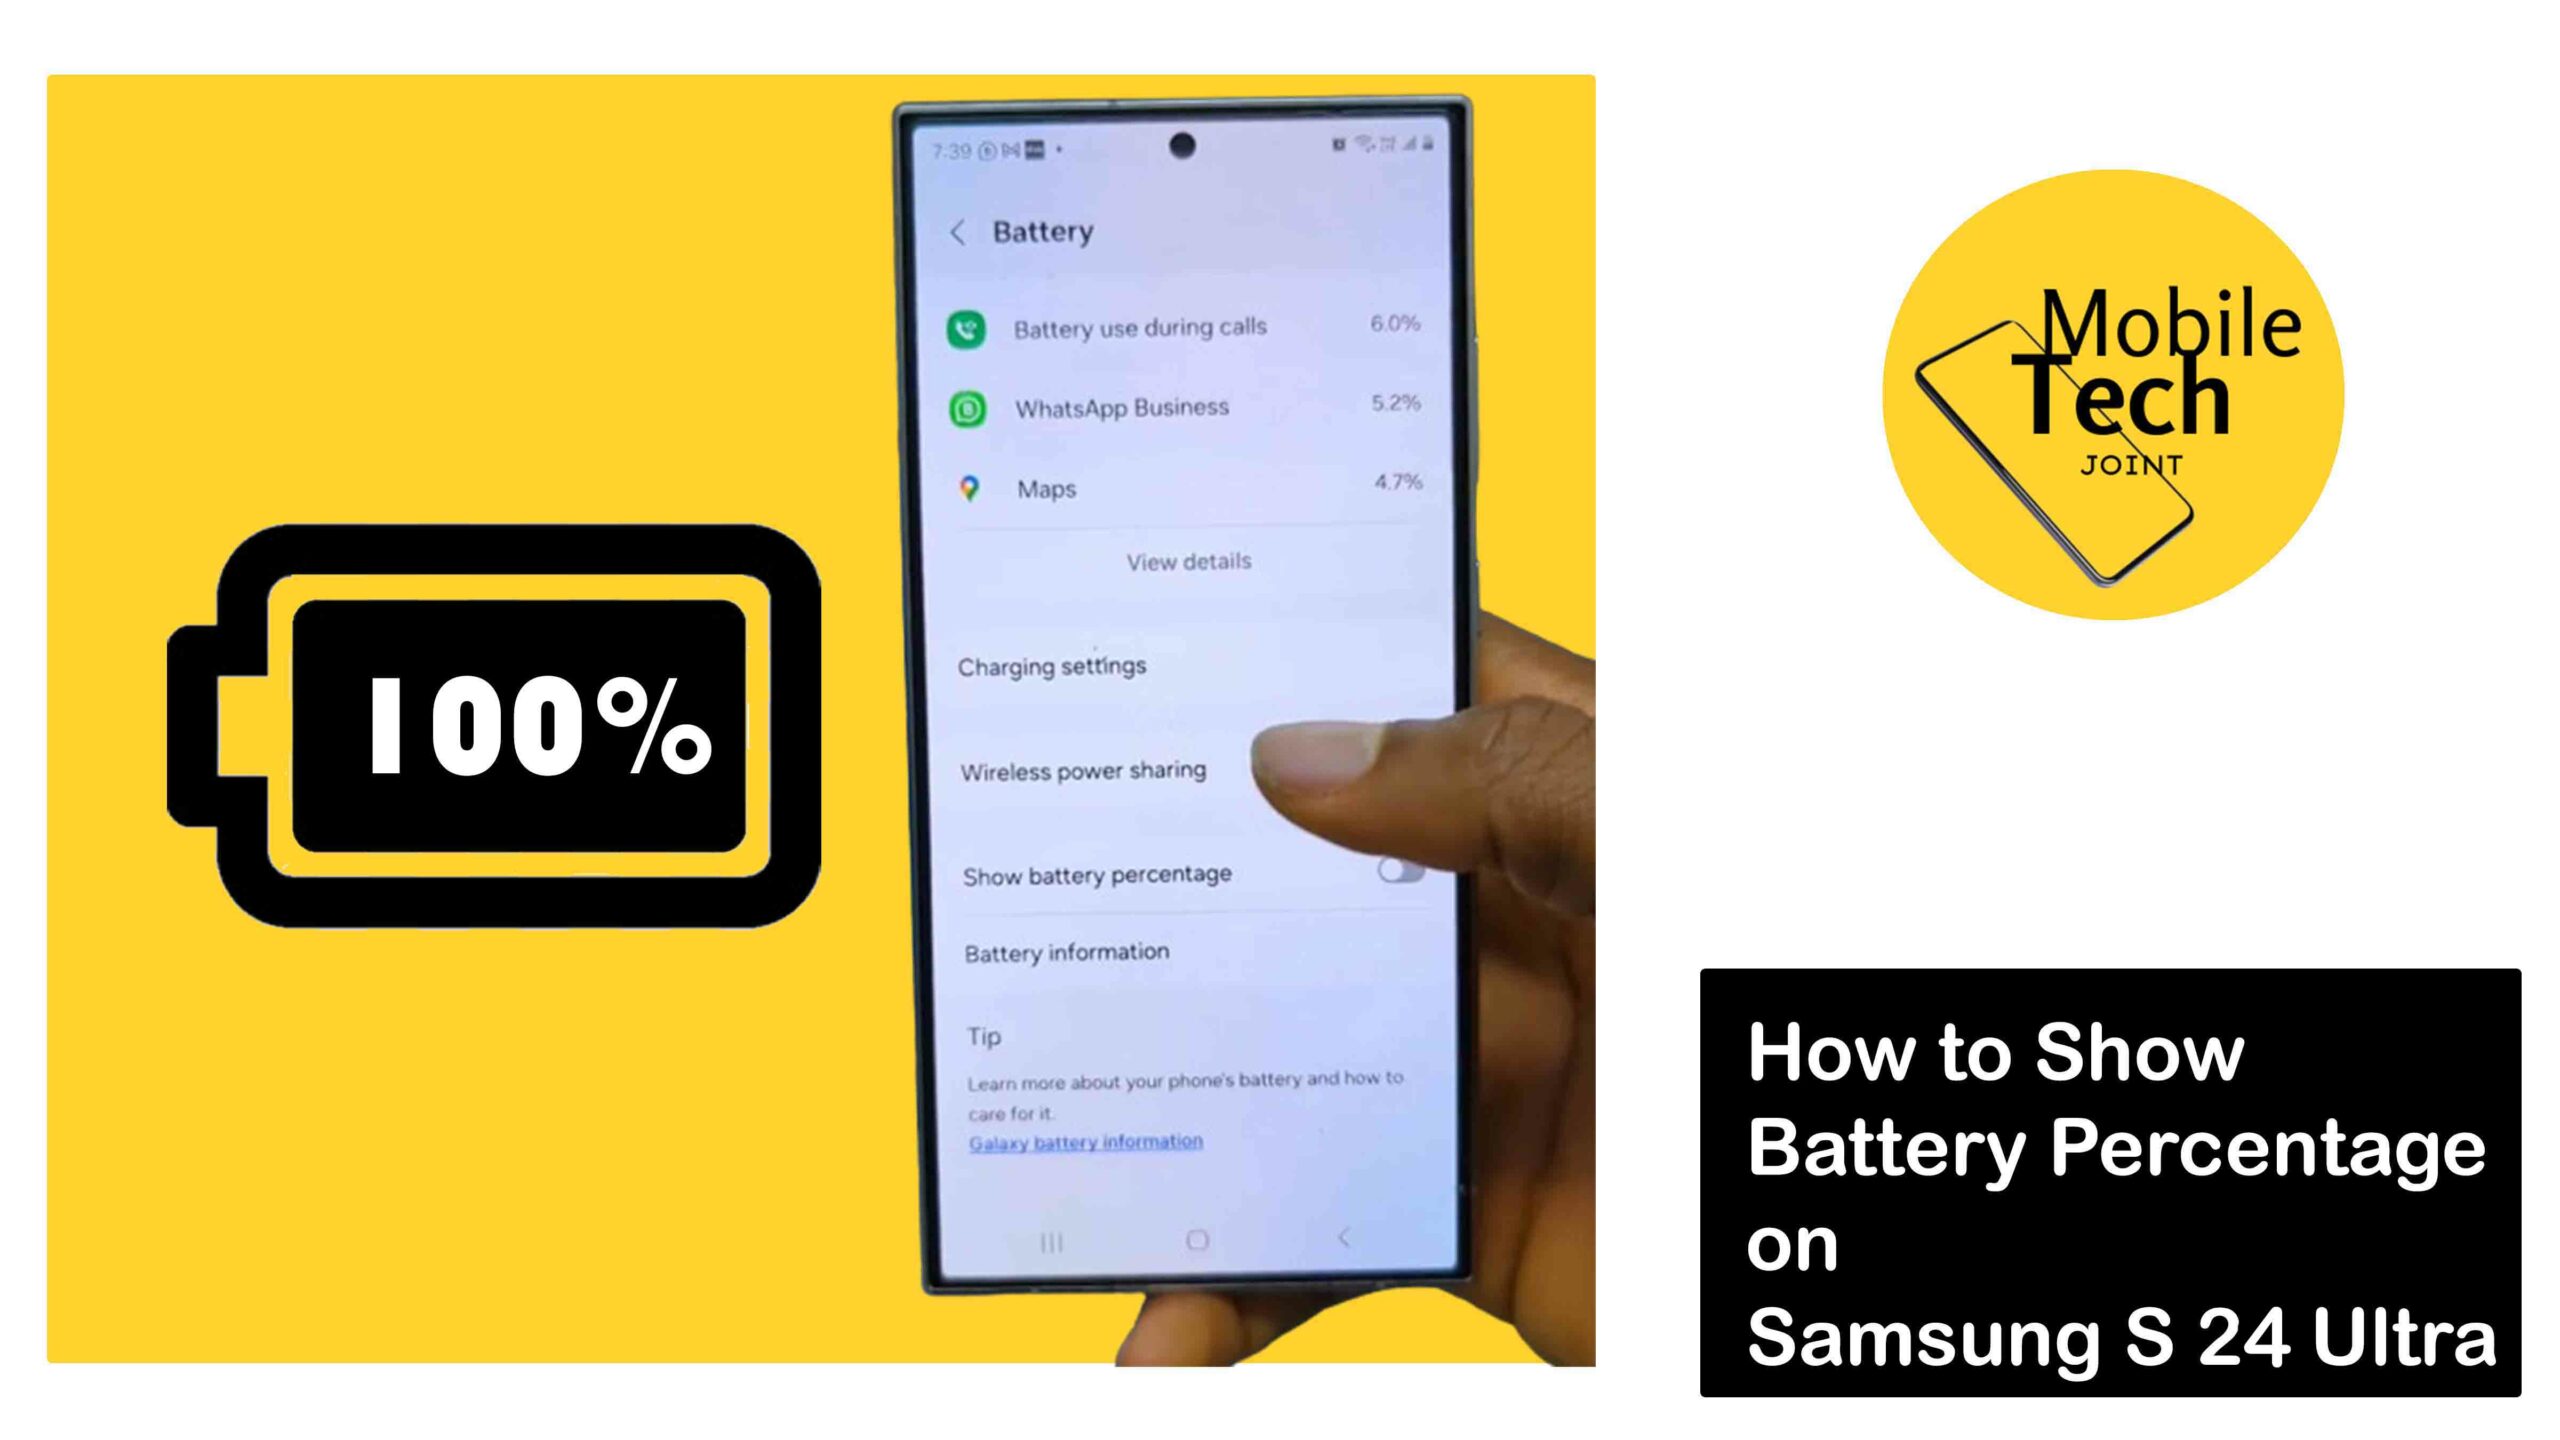
    • Open the Settings app on your S24 Ultra.
    • Scroll down and tap on “Battery and device care”.
    • Locate “Battery” and tap on it.
    • Under the battery settings, you’ll see the “Battery protection” option.
    • Toggle the switch next to “Battery protection” to the on position (usually green or blue).

    Follow through the procedures carefully.

    Choosing the Right Protection Level

    Once enabled, you can further customize Battery Protection by selecting your preferred maximum charge level:

    • Basic

    The battery will stop charging when it reaches 100% and resume charging only when it drops below 95%.

    • Adaptive

    This option utilizes your sleep schedule to optimize charging. It will prioritize reaching 80% charge by your bedtime and then complete the remaining charge before you wake up.

    • Maximum

    This mode limits the maximum charge level to 80%. While offering the most significant battery lifespan benefit, it might not be ideal if you need your phone to be fully charged throughout the day.

    Benefits of Using Battery Protection

    The Samsung S24 Ultra boasts with its powerful battery, but even the most efficient technology can benefit from optimization.

    The built-in Battery Protection offers a range of advantages to help you maximize your phone’s lifespan and keep you powered throughout the day.

    Here are 10 reasons to enable Battery Protection on your S24 Ultra:

    • Reduced Wear and Tear

    Lithium-ion batteries degrade over time, especially when constantly kept at high charge levels. Battery Protection helps by:

    • Limiting Peak Charge

    Choose between Basic (stops charging at 95%) or Maximum (stops at 80%) to prevent the phone from constantly pushing the battery to its limit.

    • Adaptive Charging

    This mode learns your sleep schedule and avoids unnecessary overnight charging, mimicking natural charging patterns.

    • Maintain Battery Capacity

    Over time, your battery’s ability to hold a charge can diminish. Battery Protection helps slow down this degradation.

    • Improve Overall Battery Health

    By keeping the battery operating within optimal temperature ranges, Battery Protection promotes a longer lifespan.

    • Monitor Battery Health

    Keep an eye on your battery’s overall health and identify potential issues early on.

    • Optimize Charging Habits

    Fine-tune your charging behavior to fit your needs, whether prioritizing speed or long-term battery health.

    • Minimize Background App Activity

    Battery Protection can potentially limit background app activity when the phone isn’t in use, reducing overall power drain.

    • Extend Time Between Charges

    By optimizing charging and battery health, you can enjoy extended usage time before needing to plug in again.

    Conclusion

    Battery Protection is a valuable tool on the Samsung Galaxy S24 Ultra, empowering you to take control of your battery health.

    By enabling this feature and choosing the appropriate protection level, you can optimize your phone’s battery life and enjoy extended use throughout the day.

    Remember, a healthy battery translates to a smoother and more enjoyable mobile experience.

    Does Battery Protection Affect my Phone charging?

    Yes, depending on the chosen protection level. With a lower target charge limit (e.g., 80%), your phone will reach full charge faster compared to charging to 100%.

    What if I Need my Phone Fully Charged for a Long Trip?

    You can temporarily disable Battery Protection for specific situations.  Simply toggle the switch back to “off” and your phone will charge to 100%. Remember to re-enable Battery Protection afterward for long-term benefits.

    Can I Set Maximum Charge Level On my Samsung?

    Unfortunately, Samsung’s Battery Protection currently only offers the pre-defined options (Basic, Adaptive, Maximum). You cannot set a specific custom charge level between 80% and 100%.

    For more insights on this article, check out these video tips across our social platforms:

  • How to Show Battery Percentage on Samsung S22 Ultra

    How to Show Battery Percentage on Samsung S22 Ultra

    The Samsung Galaxy S22 Ultra boasts a powerful battery that fuels your day-to-day activities.

    Show Battery Percentage on Samsung S 24 Ultra

    But keeping track of your remaining juice can be crucial, especially when you’re on the go.  While the default status bar on the S22 Ultra might only display a battery icon, fret not!

    There’s a simple way to reveal the exact battery percentage, allowing you to stay informed and manage your power usage effectively.

    Why Show Battery Percentage?

    Knowing your precise battery percentage offers several advantages:

    • Accurate Power Monitoring

    The battery percentage provides a clearer picture of your remaining power, allowing you to plan your phone usage accordingly.

    • Optimized Charging

    By monitoring the percentage, you can avoid overcharging or ensure your phone is adequately charged before heading out.

    • Peace of Mind

    Having the battery percentage readily available eliminates the anxiety of relying solely on the battery icon’s vague representation.

    How to Show Battery Percentage on Samsung Galaxy S22 Ultra

    Here’s how to enable the show battery percentage option on your S22 Ultra:

    • Swipe down from the top of your screen to access the notification panel.
    • Locate the Settings icon in the top right corner and tap on it. This opens the panel options.
    • Scroll down till you see Device Care and click on it.
    • Click on the Battery tab to continue.
    • Scroll down to where it says Show Battery Percentage, toggle it on to enable Battery percentage on your Samsung S 24 Ultra.

    Those are the required steps needed to enable the Show battery percentage option on your Samsung device.

    Tips for Battery Management

    Maximizing your S22 Ultra’s battery life goes beyond just knowing the percentage. Here are some additional tips:

    • Adjust Screen Brightness

    Reducing screen brightness is a significant factor in extending battery life.

    • Enable Power Saving Mode

    This mode restricts background activity and throttles performance slightly, but it can significantly improve battery life.

    • Manage Location Services

    Limit apps that constantly access your location, as this can drain the battery.

    • Monitor Battery Usage

    Within Settings > Battery, you can analyze which apps are consuming the most power and take appropriate actions.

    Conclusion

    By following these steps, you’ve successfully unlocked the battery percentage display on your Samsung Galaxy S22 Ultra.

    By keeping this information readily available and implementing some basic battery management practices, you can optimize your phone’s performance and ensure you have enough power to conquer your day.

    So go forth, explore, and stay connected with confidence!

    Can I Customize the Way the Battery Percentage Looks?

    Unfortunately, Samsung doesn’t offer extensive customization options for the battery percentage display. It typically appears as a simple numerical value next to the battery icon.

    Will Showing the Battery Percentage Drain my Battery?

    No, displaying the battery percentage is a very minimal function and has negligible impact on battery life.

    Does Wireless Charging Affect the Battery Life of my S22 Ultra?

    Both wired and wireless charging methods have minimal impact on battery health if you use approved chargers. However, excessive heat can damage batteries, so avoid wireless charging in hot environments.

    Should I Keep my Phone Plugged in all the Time?

    It’s generally recommended to avoid constantly keeping your phone plugged in. Repeated full charge cycles can reduce battery health over time. Let the battery drain somewhat before plugging it in for charging.

    For more insights on this article, check out these video tips across our social platforms:

  • How to Access Storage on iPhone 14 Plus

    How to Access Storage on iPhone 14 Plus

    The iPhone 14 Plus packs a powerful punch, but storage space is a valuable commodity.  Knowing how to access and manage your storage is crucial for optimizing your iPhone’s performance.

    Access Storage on iPhone 14 Plus

    This article will guide you through accessing storage information on your iPhone 14 Plus and explore some helpful tips for maximizing your storage space.

    About Storage on iPhone 14 Plus

    Your iPhone 14 Plus comes with a set amount of internal storage space to house apps, photos, music, videos, and other files.

    Understanding how much storage you’ve used and what’s taking up the most space empowers you to make informed decisions about managing your iPhone’s content.

    How to Access Storage on iPhone 14 Plus

    Here are the steps to follow if you wish to acces the storage on your iPhone:

    • Launch the Settings app on your iPhone 14 Plus.
    • Scroll down and tap on General.
    • Locate iPhone Storage and tap on it.

    Understand Your iPhone Storage Breakdown

    Once you access iPhone Storage, you’ll see a breakdown of your storage usage. This typically includes categories like Apps, System Data, Photos, Media (music, videos, podcasts), and iCloud Drive.

    Tapping on a specific category will provide more details about what’s using space within that category.

    Related: How to Enable Dark Mode on iPhone 14 Plus

    Tips for Managing Storage on iPhone 14 Plus

    Here are some helpful tips to maximize your iPhone 14 Plus’s storage space:

    • Review and Offload Unused Apps

    Regularly assess your downloaded apps and remove any you no longer use. Offloading an app removes the app itself while keeping its data and documents, allowing you to reinstall it later if needed.

    • Manage Photos and Videos

    Photos and videos can quickly consume significant storage. Utilize iCloud Photos to store your photos and videos in the cloud, freeing up space on your device.

    You can also choose to optimize iPhone storage for photos and videos, automatically keeping high-resolution versions in iCloud and lower-resolution versions on your device.

    • Clear Safari Cache and Browsing Data

    Over time, Safari accumulates cache and browsing data. Clearing this data occasionally can help free up some storage space.

    Within Settings > Safari, you can choose to “Clear History and Website Data” to achieve this.

    • Utilize iCloud Storage

    If you frequently back up your iPhone or store a lot of data in iCloud Drive, consider upgrading your iCloud storage plan for more space.

    Conclusion

    By understanding how to access storage information and implementing these storage management tips, you can ensure your iPhone 14 Plus has enough space for the things you need and enjoy.

    Regularly monitoring your storage and taking appropriate actions will help you maintain a smooth and efficient iPhone experience.

    Can I See which Specific Apps are Using the Most Storage?

    Yes!  Within “iPhone Storage,” tapping on the “Apps” category will display a list of all downloaded apps, ranked by storage usage.

    This allows you to identify apps that are consuming a significant amount of space.

    What’s the Difference Between “Delete App” and “Offload App”?

    “Delete App” removes the entire app and its data from your device. “Offload App” only removes the app itself while keeping its data and documents.

    You can reinstall the offloaded app later without losing your data.

    Is there a Way to Automatically Offload Unused Apps?

    While there’s no built-in option for automatic offloading, iOS can automatically offload unused apps when storage space is low. This feature can be enabled within Settings > App Store.

    How Can I Tell if iCloud Photos is Working Correctly?

    Within “Photos” in the Settings app, you can check if “Optimize iPhone Storage” is enabled. This ensures high-resolution photos are stored in iCloud, freeing up space on your device.

    What Happens if my iPhone Storage is Full?

    A full storage space can impact your iPhone’s performance.

    You might experience difficulties downloading new apps, taking photos or videos, or updating your iOS. Regularly managing storage helps prevent these issues.

    For more insights on this article, check out these video tips across our social platforms:

  • How to Enable Dark Mode on iPhone 14 Plus

    How to Enable Dark Mode on iPhone 14 Plus

    The iPhone 14 Plus boasts a stunning display, but bright interfaces can be harsh on your eyes, especially at night or in low-light environments.

    Enable Dark Mode on iPhone 14 Plus

    Fortunately, the iPhone 14 Plus includes a built-in Dark Mode, which darkens the whole user interface, menus, and supported apps.

    This not only enhances viewing comfort and reduces eye strain but can also potentially contribute to improved battery life.  This article will guide you through enabling Dark Mode on your iPhone 14 Plus and explore its benefits.

    About Dark Mode on iPhone 14 Plus

    Dark Mode on the iPhone 14 Plus utilizes a dark color palette with lighter text, creating a more balanced and visually appealing interface for darker environments.

    This reduces the amount of bright light emitted from the screen, minimizing eye strain and promoting a more comfortable viewing experience.

    How to Enable Dark Mode on iPhone 14 Plus

    There are two primary ways to enable Dark Mode on your iPhone 14 Plus, follow through the steps carefully for positive results:

    Using Control Center

    If you wish to enable the dark mode from your control center, then follow the steps below:

    • Swipe down from the top-right corner of your screen to access Control Center.
    • Locate the Brightness slider. It resemble a sun icon.
    • Hold on the Brightness slider.
    • Look for the Dark Mode toggle next to the brightness bar.
    • Tap the Dark Mode toggle to turn it on (usually turns white).

    Using Settings

    Here are the steps if you wish to enable throuht the settings app:

    • Open the Settings app on your iPhone 14 Plus.
    • Tap on Display & Brightness.
    • Locate the Appearance section.
    • Choose between Light and Dark mode. Selecting Dark will enable Dark Mode.

    Follow through the steps carefully.

    Related: How to Access Keyboard Settings on iPhone 14 Plus

    Benefits of Dark Mode on iPhone 14 Plus

    There are several advantages to enabling Dark Mode on your iPhone 14 Plus:

    • Reduced Eye Strain

    Dark Mode minimizes the amount of bright light emitted from the screen, especially at night.

    This can significantly reduce eye strain and fatigue, making it more comfortable to use your phone in low-light environments.

    • Improved Battery Life

    While the impact might vary depending on usage patterns, studies suggest dark themes can potentially improve battery life on OLED displays like the one found in the iPhone 14 Plus.

    Dark pixels consume less power compared to bright white pixels.

    • Enhanced Readability

    Dark Mode with high-contrast text can improve readability in certain situations, particularly for users with sensitivities to bright light.

    • Aesthetics

    Many users simply prefer the visual appeal of a dark interface. Dark Mode can create a more modern and sleek look for your iPhone 14 Plus.

    Conclusion

    Dark Mode is a valuable feature on the iPhone 14 Plus, offering a combination of visual comfort, potential battery savings, and a touch of aesthetic preference.

    With its ease of use and clear benefits, Dark Mode allows you to personalize your iPhone 14 Plus experience and enjoy a more comfortable and potentially more efficient way to interact with your phone.

    Does Dark Mode Affect all Apps on my iPhone?

    While Dark Mode applies to the system-wide interface, individual apps decide if they support Dark Mode.

    You might need to enable Dark Mode within specific apps for them to adopt the dark color scheme.

    Can I Schedule Dark Mode to Turn on and Off Automatically?

    Yes!  Within Settings > Display & Brightness, look for the “Auto-Brightness” option.

    With this enabled, you can set a schedule for Dark Mode to activate and deactivate based on sunset and sunrise times in your location.

    Is there a Way to Adjust the Intensity of Dark Mode?

    Currently, iPhone doesn’t offer direct control over Dark Mode intensity. However, some apps with built-in Dark Mode might allow customization options.

    Does Dark Mode make it Harder to See Certain Content?

    In rare cases, some content or images within apps might appear less visible with Dark Mode enabled.  If you encounter such situations, you can temporarily disable Dark Mode or adjust app-specific settings if available.

    Will Dark Mode Save Battery Life?

    The impact of Dark Mode on battery life can vary depending on screen brightness, usage patterns, and specific phone model.

    While OLED displays generally benefit more from Dark Mode in terms of battery savings, the results might not be significant in all scenarios.

    For more insights on this article, check out these video tips across our social platforms:

  • How to Access Keyboard Settings on iPhone 14 Plus

    How to Access Keyboard Settings on iPhone 14 Plus

    The iPhone 14 Plus boasts a powerful keyboard that lets you communicate and express yourself with ease.

    Access Keyboard Settings on iPhone 14 Plus

    Did you know you can customize this keyboard to perfectly suit your typing preferences? Don’t bother yourself on how to do so! All you need to do is follow through the steps outlined here carefully.

    This article will guide you through accessing the keyboard settings on your iPhone 14 Plus, allowing you to unlock a world of personalization options.

    About Keyboard Settings on iPhone 14 Plus

    The iPhone’s keyboard settings offer a range of features to enhance your typing experience. You can adjust functionalities like:

    • Autocorrection

    Fine-tune autocorrection behavior or turn it off completely for a more predictable typing experience.

    • Predictive Text

    Control the suggestions offered by QuickType, including enabling or disabling emoji suggestions or turning off predictive text altogether.

    • Keyboard Sounds

    Tweak or disable the clicking sounds that occur with each keypress.

    • Haptic Feedback

    Enable or disable haptic feedback, which provides a subtle vibration when you press a key.

    • Text Replacement

    Create custom shortcuts for frequently used phrases or words, saving you time and effort.

    • Dictation

    Enable or customize dictation settings for voice-to-text functionality.

    • Keyboard Layouts

    Choose from a variety of keyboard layouts, including different languages or one-handed typing options.

    How to Access Keyboard Settings on iPhone 14 Plus

    Accessing the keyboard settings on your iPhone 14 Plus is a simple process, follow the steps below carefully:

    • Open the Settings app on your iPhone 14 Plus.
    • Scroll down and tap on General.
    • Locate the Keyboard section and tap on it.

    Those are the procedures required to access the keyboard settings on your iPhone 14 Plus.

    Exploring Keyboard Settings Options

    Once you’ve accessed the Keyboard settings, you’ll find a variety of options to personalize your typing experience. Here’s a glimpse into some key features:

    • Autocorrection & Suggestions

    Within the “Autocorrection” section, you can toggle autocorrection on or off, adjust capitalization settings, and even add or remove learned words from the autocorrect dictionary. You can also control QuickType suggestions by enabling or disabling emoji suggestions and predictive text functionality.

    • Sounds & Haptics

    The “Sounds” section allows you to enable or disable the clicking sounds that occur with each keypress. Similarly, the “Haptics” section lets you control the haptic feedback that provides a subtle vibration when you press a key. Choose the combination that best suits your preferences.

    • Text Replacement

    This feature allows you to create shortcuts for frequently used phrases or words. For example, you can set a shortcut for “on my way” or your email address, saving you time and effort while typing.

    • Dictation

    Enable dictation to utilize voice-to-text functionality. You can also customize dictation settings like language recognition and enabling/disabling “Automatic Punctuation”.

    • Keyboards

    This section allows you to add or remove keyboard layouts for different languages or enable one-handed typing options for easier typing on the go.

    Conclusion

    The iPhone 14 Plus’s keyboard settings empower you to personalize your typing experience and optimize it for comfort and efficiency.

    By exploring the various options available, you can create a keyboard setup that perfectly aligns with your preferences, making communication and expression on your iPhone 14 Plus a more enjoyable experience.

    So, delve into the keyboard settings and unlock the full potential of your iPhone’s typing capabilities.

    Can’t Find the Keyboard Section in Settings?

    The Keyboard section might be located under a different menu depending on your iOS version. Try searching for “Keyboard” within the Settings app using the search bar at the top.

    How Do I Change the Language on my iPhone Keyboard?

    You can add or remove keyboard layouts for different languages within the “Keyboards” section of the Keyboard settings. Once you’ve added a new language layout, you can switch between languages by tapping and holding the globe icon on the keyboard itself.

    Can I Adjust the Keyboard Size on the iPhone 14 Plus?

    While you can’t directly resize the keyboard, iOS offers one-handed typing options.

    Access the “Keyboards” section in Keyboard settings and choose either “Left-handed” or “Right-handed” to shrink the keyboard and position it on the chosen side of the screen for easier one-handed typing.

    Does Dark Theme Affect the Keyboard on iPhone 14 Plus?

    Yes, enabling Dark Theme will typically apply to the keyboard interface as well, changing it to a darker color scheme for better low-light visibility.

    Can I Customize the Look of the Keyboard Beyond Dark Theme?

    Unfortunately, iOS doesn’t offer built-in options for extensive keyboard customization beyond Dark Theme.

    However, some third-party keyboards available on the App Store might offer additional themes or color scheme options.

    For more insights on this article, check out these video tips across our social platforms:

  • How to Enable Dark Theme on Google Pixel 7

    How to Enable Dark Theme on Google Pixel 7

    The Google Pixel 7 boasts a stunning display, but bright interfaces can sometimes cause eye strain, especially in low-light environments.

    Enable Dark Theme on Google Pixel 7

    However, the Pixel 7 offers a built-in Dark Theme that transforms the entire user interface, menus, and supported apps into a darker color scheme.

    This not only enhances viewing comfort at night but can also potentially contribute to improved battery life. This article will guide you through enabling Dark Theme on your Google Pixel 7 and explore its benefits.

    About Dark Theme on Google Pixel 7

    Dark Theme on the Pixel 7 utilizes a dark color palette with lighter text, creating a more balanced and visually appealing interface for darker environments.

    This reduces the amount of bright light emitted from the screen, minimizing eye strain and promoting a more comfortable viewing experience.

    How to Enable Dark Theme on Google Pixel 7

    There are two primary ways to enable Dark Theme on your Pixel 7:

    Using Quick Settings

    • Swipe down twice from the top of your screen to access the full Quick Settings menu.
    • Locate the Dark Theme tile. It might resemble a drop of paint or have the text Dark theme written next to it.
    • Tap the Dark theme tile to toggle it on.

    Using Settings

    • Open the Settings app on your Pixel 7.
    • Tap on Display option.
    • Locate the Dark theme section.
    • Toggle the switch next to Dark theme to turn it on.

    Those are the steps needed to enable dark theme on your Google pixel 7.

    Benefits of Dark Theme on Google Pixel 7

    There are several advantages to enabling Dark Theme on your Pixel 7:

    • Reduced Eye Strain

    Dark Theme minimizes the amount of bright light emitted from the screen, especially at night. This can significantly reduce eye strain and fatigue, making it more comfortable to use your phone in low-light environments.

    • Improved Battery Life

    While the impact might vary depending on usage patterns, studies suggest dark themes can potentially improve battery life on OLED displays like the one found in the Pixel 7. Dark pixels consume less power compared to bright white pixels.

    • Enhanced Readability

    Dark Theme with high-contrast text can improve readability in certain situations, particularly for users with sensitivities to bright light.

    Aesthetics

    Many users simply prefer the visual appeal of a dark interface. Dark Theme can create a more modern and sleek look for your Pixel 7.

    Related:How to Enable Adaptive Charging On Google Pixel 7

    Conclusion

    Dark Theme is a valuable feature on the Google Pixel 7, offering a combination of visual comfort, potential battery savings, and a touch of aesthetic preference.

    With its ease of use and clear benefits, Dark Theme allows you to personalize your Pixel 7 experience and enjoy a more comfortable and potentially more efficient way to interact with your phone.

    Does Dark Theme Affect All Apps on my Pixel 7?

    While Dark Theme applies to the system-wide interface and many Google apps, individual app developers determine if their app supports Dark Theme. You might need to enable Dark Theme within specific apps for them to adopt the dark color scheme.

    Can I Schedule Dark Theme to Turn on and off Automatically?

    Currently, the Pixel 7 doesn’t offer built-in scheduling for Dark Theme. However, some third-party apps might provide this functionality.

    Is there a Way to Adjust the Intensity of Dark Theme?

    The Pixel 7 doesn’t offer direct control over the intensity of Dark Theme. However, some apps with built-in Dark Theme support might allow customization options.

    Does Dark Theme Make it Harder to see Certain Content?

    In rare cases, some content or images within apps might appear less visible with Dark Theme enabled.  If you encounter such situations, you can temporarily disable Dark Theme or adjust app-specific settings if available.

    Will Dark Theme Save Battery life?

    The impact of Dark Theme on battery life can vary depending on screen brightness, usage patterns, and specific phone model. While OLED displays generally benefit more from Dark Theme in terms of battery savings, the results might not be significant in all scenarios.

    For more insights on this article, check out these video tips across our social platforms:

  • How to Enable Adaptive Charging On Google Pixel 7

    How to Enable Adaptive Charging On Google Pixel 7

    The Google Pixel 7 is a powerful phone, but even the most impressive technology benefits from optimized battery management.

    One way to achieve this is through Adaptive Charging, a feature that helps extend the lifespan of your Pixel 7’s battery.

    Enable Adaptive Charging on Google Pixel 7


    By learning your charging habits, Adaptive Charging delays the final stages of charging until you typically wake up, reducing stress on the battery and potentially extending its overall health.

    However, this article will guide you through enabling Adaptive Charging on your Google Pixel 7 and explore its advantages. All you are required of is go through the procedures carefully for possitive results.

    About Adaptive Charging on Google Pixel 7

    Adaptive Charging utilizes machine learning to analyze your charging routine. It identifies when you typically unplug your phone at night and adjusts the charging pattern accordingly.

    Instead of charging to 100% right away, Adaptive Charging will prioritize reaching 80% by your usual wake-up time.

    The remaining 20% will be delivered gradually throughout the morning, ensuring a full charge by the time you need it.

    How to Enable Adaptive Charging on Google Pixel 7

    Enabling Adaptive Charging on your Pixel 7 is a simple process:

    • Open the Settings app on your Pixel 7.
    • Scroll down and tap on “Battery”.
    • Locate the “Adaptive Battery” section.
    • Toggle the switch next to “Adaptive Battery” to turn it on (usually green or blue).
    • Optional:

    Within the “Adaptive Battery” settings, you might see an option for “Adaptive Charging”. If available, ensure this is also toggled on for optimal battery management.

    Related: How to Enable Quick Share on Google Pixel 7

    Benefits of Enabling Adaptive Charging on Google Pixel 7

    There are several advantages to enabling Adaptive Charging on your Pixel 7:

    • Improved Battery Health

    Lithium-ion batteries, like the one in your Pixel 7, can degrade over time, especially when constantly charged to 100%. Adaptive Charging reduces this stress by limiting the time spent at full capacity, potentially extending the lifespan of your battery.

    • Reduced Wear and Tear

    Constantly reaching 100% charge can cause increased heat and wear on the battery. Adaptive Charging mitigates this by strategically delivering the final 20% when needed, reducing overall strain on the battery.

    • Longer Lifespan

    By promoting better battery health, Adaptive Charging can potentially extend the overall lifespan of your Pixel 7’s battery, allowing you to enjoy optimal performance for a longer period.

    • Peace of Mind

    Knowing your Pixel 7 is charging intelligently and prioritizing battery health can provide peace of mind, especially for users who are concerned about long-term battery performance.

    Conclusion

    Adaptive Charging is a valuable feature on the Google Pixel 7, offering a proactive approach to battery health.

    By intelligently managing your charging routine, it can potentially extend the lifespan of your battery and provide a more efficient charging experience.

    So, enable Adaptive Charging on your Pixel 7 and let your phone take care of the charging process, ensuring optimal battery health and performance in the long run.

    Will Adaptive Charging Slow Down my Charging Speed?

    Yes, Adaptive Charging might slow down the charging speed, especially during the initial stages, as it prioritizes reaching 80% by your wake-up time.  However, the phone will still be fully charged by the time you typically unplug it in the morning.

    What if I Don’t Have a Consistent Sleep Schedule?

    Adaptive Charging can still benefit users with irregular sleep patterns.  The feature learns over time and adjusts the charging schedule based on your charging habits.

    Can I Disable Adaptive Charging if Needed?

    Absolutely! You can easily disable Adaptive Charging by following the same steps mentioned earlier and toggling the switch back to “off”.

    Does Adaptive Charging Affect Wireless Charging?

    Adaptive Charging works with both wired and wireless charging on the Pixel 7.

    Is Adaptive Charging Necessary?

    While Adaptive Charging offers long-term battery health benefits, it’s not mandatory. If you need a quick charge before a meeting or outing, you can disable Adaptive Charging for a specific instance.

    For more insights on this article, check out these video tips across our social platforms:

  • How to Enable Quick Share on Google Pixel 7

    How to Enable Quick Share on Google Pixel 7

    Sharing files between devices can sometimes feel like a chore. Juggling Bluetooth connections, fumbling with cables, or emailing files back and forth can be frustrating and time-consuming.

    Enable Quick Share on Google Pixel 7


    Thankfully, the Google Pixel 7 boasts a stunning feature called Quick Share. This intuitive tool allows you to share photos, videos, documents, and other files with nearby Android devices quickly and seamlessly.

    This article will guide you through enabling Quick Share on your Google Pixel 7 and explore its benefits.

    About Quick Share on Google Pixel 7

    Quick Share leverages a combination of Wi-Fi Direct and Bluetooth to establish a secure and fast connection between your Pixel 7 and other compatible devices.

    When enabled, you’ll see nearby Pixel devices or other Android phones running Android 6.0 (Marshmallow) or later in your sharing menu.

    Simply select the device you want to share with and the file will be transferred wirelessly in a matter of seconds.

    How to Enable Quick Share on Google Pixel 7

    Enabling Quick Share on your Pixel 7 is a breeze, all you need to do is follow through the steps carefully:

    • Swipe down twice from the top of your screen and select the gear icon Settings, access the Settings app from your list of applications.
    • Locate the Connected Device tile and click on it.
    • Click Connection Preferences option.
    • Scroll down and select the Quick Share tab.
    • Now, toggle on the Who Can Share with you option so you could connect with nearby devices.

    Optional:

    • You can also access Quick Share settings by holding your finger on the “Quick Share” tile in the Quick Settings menu from top of the screen.
    • Change the device visibility (visible to all contacts, specific contacts, or hidden)

    Set a device name for your Pixel 7 that will appear when sharing with other devices

    Related: How to Enable Sunlight Boost on Google Pixel Watch

    Benefits of Quick Share on Google Pixel 7

    The Google Pixel 7 boasts a stunning Quick Share feature. Here’s why you should get over the outdated methods and embrace Quick Share for all your transfer needs:

    • Fast and Efficient

    Quick Share utilizes advanced protocols for blazing-fast transfer speeds, especially for photos and videos. No more waiting for large files to trickle through.

    • Intuitive Interface

    The user-friendly interface makes sharing a breeze. Simply select the files you want to send, and a list of nearby devices compatible with Quick Share pops up. Choose the recipient, and the transfer commences effortlessly.

    • Android Ecosystem Integration

    Quick Share isn’t limited to Pixel devices. It seamlessly works with other Android phones running Android 6 or later, eliminating compatibility headaches.

    • Cross-Platform Functionality

    The beauty of Quick Share lies in its ability to bridge the gap between different operating systems. Share files effortlessly between your Pixel 7 and devices running ChromeOS or even Windows with compatible software installed.

    • Secure Sharing

    Rest assured, your precious files are protected. Quick Share utilizes secure connections to transfer data, minimizing the risk of interception.

    • Visibility Control

    Choose who can see your device on Quick Share. You can opt for everyone nearby, only your contacts, or keep it completely invisible, ensuring you share files with intended recipients only.

    • Offline Sharing

    Quick Share isn’t fazed by internet connectivity issues. It allows you to share files offline between nearby devices, perfect for situations where Wi-Fi or data is unavailable.

    • Large File Support

    Unlike some Bluetooth limitations, Quick Share effortlessly handles large files like high-resolution videos or hefty presentations without breaking a sweat.

    By utilizing Quick Share on your Pixel 7, you unlock much of convenience, speed, and security for all your file-sharing needs. So ditch the cables and outdated methods, and embrace the future of effortless file transfer.

    Conclusion

    Quick Share is a valuable feature on the Google Pixel 7, offering a fast, convenient, and secure way to share files with nearby devices.

    With its ease of use and clear benefits, Quick Share eliminates the need for cumbersome file transfer methods, allowing you to share content with ease.

    So, ditch the cables and Bluetooth hassles – activate Quick Share on your Pixel 7 and experience a smoother file-sharing experience.

    Does Quick Share Require an Internet Connection?

    No, an internet connection isn’t necessary for the actual transfer of files using Quick Share. However, both devices need to be within Wi-Fi Direct range to establish a connection.

    Can I Share Files with Non-Android Devices Using Quick Share?

    Currently, Quick Share primarily works for sharing files between Pixel devices and other Android phones running Android 6.0 (Marshmallow) or later.  There might be limited functionality for sharing with other operating systems.

    Is Quick Share Secure for Transferring Sensitive Files?

    Quick Share utilizes encryption to ensure the security of your files during transfer. However,  it’s always recommended to exercise caution when sharing sensitive information.

    What Happens if the Recipient Doesn’t Have Quick Share Enabled?

    If the recipient’s device doesn’t have Quick Share enabled, you might be prompted to use other sharing methods like Bluetooth or email.

    Is there a Limit to the File Size I Can Share Using Quick Share?

    There isn’t a specific file size limit for Quick Share. However, very large files might take longer to transfer depending on the Wi-Fi Direct connection speed.

    For more insights on this article, check out these video tips across our social platforms:

  • How to Enable Sunlight Boost on Google Pixel Watch

    How to Enable Sunlight Boost on Google Pixel Watch

    Ever blink at your Google Pixel Watch screen on a bright day?  Sunlight can often blank out the display, making it difficult to see the time, notifications, or other information.

    Sunlight Boost On Google Pixel Watch

    Thankfully, the Pixel Watch comes equipped with a clever feature called Sunlight Boost. This ingenious function temporarily increases the screen’s brightness, ensuring optimal readability even under the harshest sun.

    In this article, you will gain insigts how to enable Sunlight Boost on your Google Pixel Watch and explore its advantages.

    About Sunlight Boost on Google Pixel Watch

    Sunlight Boost leverages the Pixel Watch’s display technology to automatically adjust its brightness based on ambient light conditions.

    When activated, the screen pushes its brightness to a higher level, effectively counteracting the glare from sunlight.

    This ensures clear and crisp visuals, allowing you to stay informed and connected even during outdoor activities.

    How to Enable Sunlight Boost on Google Pixel Watch

    Enabling Sunlight Boost on your Pixel Watch is a straightforward process:

    • Swipe down on the watch face to access the Quick Settings menu.
    • Locate the Display option.
    • Look for the Sunlight Boost tab.
    • Tap the toggle to switch Sunlight Boost on or off.

    Those are the steps required for you to successfully enable sunlight boost on your Google Pixel Watch, follow the steps carefully for positive results.

    Benefits of Sunlight Boost on Google Pixel Watch

    Sunlight Boost offers several advantages for Pixel Watch users who frequently spend time outdoors:

    • Enhanced Readability

    By boosting the screen’s brightness, Sunlight Boost ensures clear visibility of the watch face and other information displayed, even in direct sunlight.

    • Improved User Experience

    Being able to see your watch screen clearly allows you to stay connected and informed without straining your eyes. This enhances the overall user experience when outdoors.

    • Automatic Adjustment

    Sunlight Boost operates automatically, eliminating the need for you to constantly adjust the brightness settings manually.

    • Battery Optimization

    While Sunlight Boost increases brightness, it’s designed to be energy-efficient. However, keep in mind that extended use under very bright conditions may slightly impact battery life.

    Conclusion

    Sunlight Boost is a valuable feature for Google Pixel Watch users who enjoy spending time outdoors.

    By automatically boosting screen brightness in bright environments, it ensures optimal readability and a seamless user experience.

    With its ease of use and clear benefits, Sunlight Boost is a must-try feature for getting the most out of your Pixel Watch on sunny days.

    Is Sunlight Boost Always Necessary Outdoors?

    Sunlight Boost is a valuable tool, but its necessity depends on the situation.  On moderately bright days or in shaded areas, the Pixel Watch’s automatic brightness controls might be sufficient.

    However, if you frequently encounter intense sunlight, especially during outdoor activities like hiking, cycling, or running, enabling Sunlight Boost is highly recommended.

    The increased screen visibility it provides can be crucial for checking time, monitoring fitness data, or navigating with GPS.

    Are there any Alternatives to Sunlight Boost?

    While Sunlight Boost offers an automatic solution, there are alternative methods for enhancing outdoor visibility on your Pixel Watch.

    One option is to manually adjust the screen brightness through the Quick Settings menu.  However, this requires constant vigilance, especially if light conditions change frequently.

    Another approach is to invest in a screen protector specifically designed for anti-glare. These protectors can help reduce sunlight reflection, improving readability to some extent.

    Can Sunlight Boost be Dimmed Manually When Activated?

    Yes, even with Sunlight Boost enabled, you can still manually adjust the screen brightness on your Pixel Watch.  Simply swipe down on the watch face to access Quick Settings and tap the brightness icon.

    A slider will appear, allowing you to adjust the brightness level to your preference. This provides some flexibility, letting you balance readability with battery conservation based on the specific situation.

    How Do I Enable Sunlight Boost on my Pixel Watch?

    Enabling Sunlight Boost is simple. Swipe down on the watch face to access Quick Settings, then locate the brightness icon (sun symbol).

    ap and hold the icon to expand the brightness controls and find the “Sunlight Boost” toggle. Tap the toggle to switch it on or off.

    Does Sunlight Boost Affect Battery Life?

    Sunlight Boost is designed to be energy-efficient, but any increase in screen brightness will have some impact on battery life.

    The extent of this impact depends on how long you use Sunlight Boost and the overall brightness conditions.

    Is Sunlight Boost Automatic?

    Yes, Sunlight Boost functions automatically. Once enabled, the Pixel Watch will detect bright light environments and adjust the screen brightness accordingly.

    Can I Adjust the Level of Sunlight Boost?

    Currently, the Pixel Watch doesn’t offer manual control over the Sunlight Boost intensity.

    It operates with a pre-set level designed to optimize visibility while balancing battery efficiency.

    For more insights on this article, check out these video tips across our social platforms:

  • How to Adjust Font Size on Google Pixel Watch

    How to Adjust Font Size on Google Pixel Watch

    The Google Pixel Watch boasts a beautiful display, but for some users, the default font size might be a little too small.

    Adjust Font Size On Google Pixel Watch

    Fortunately, the Pixel Watch allows you to adjust the font size to improve readability and personalize your watch experience.

    This article will guide you through the simple steps on how to adjust the font size on your Google Pixel Watch and explore the benefits of doing so.

    About Font Size Adjustment on Google Pixel Watch

    The Pixel Watch offers a range of font sizes to cater to individual preferences and visual needs.

    Whether you prefer a larger and bolder font for better readability or a slightly smaller size for a more condensed display, the Pixel Watch allows you to find the perfect balance.

    This level of customization ensures a comfortable and enjoyable viewing experience for everyone.

    How to Adjust Font Size on Google Pixel Watch

    Adjusting the font size on your Pixel Watch is a straightforward process outlined below:

    • Swipe down on the watch face to access the Quick Settings menu.
    • However, unlike some other settings, the font size option isn’t readily available in Quick Settings.
    • Therefore, tap on the Settings icon to access the full settings menu.
    • Scroll down the menu and locate the Display section.
    • Within the Display options, look for Font Size.
    • Tap on Font Size.
    • You’ll see a slider that allows you to adjust the font size. Click on the + or – button on the bar to adjust the font size.
    • The changes will be reflected in real-time on the screen, allowing you to preview the adjusted font size.
    • Once you’re happy with the chosen size, you may slide back to your homescreen to save the changes.

    Follow throught the procedures carefully.

    Benefits of Adjusting Font Size on Google Pixel Watch

    There are several advantages to adjusting the font size on your Pixel Watch:

    • Improved Readability

    A larger font size can significantly improve readability, especially for users with visual impairments or those who prefer a less cluttered display. This makes it easier to view notifications, messages, and other information on the watch face.

    • Personalized Experience

    The ability to adjust the font size allows you to personalize your Pixel Watch to your specific needs and preferences. You can choose a font size that feels comfortable and visually appealing for you.

    • Accessibility

    Font size adjustment promotes accessibility for users with varying visual abilities. A larger font size can be particularly helpful for those with farsightedness or presbyopia.

    • Reduced Eye Strain

    A larger font size can reduce eye strain, especially for prolonged use. This is beneficial for users who frequently check their watch throughout the day.

    Conclusion

    The Google Pixel Watch’s font size adjustment feature allows you to personalize your watch experience and optimize readability.

    Whether you require a larger font for better visibility or prefer a more compact display, the Pixel Watch empowers you to find the perfect fit.

    With its ease of use and clear benefits, adjusting the font size is a valuable option for getting the most out of your Pixel Watch.

    Can I Make the Font Size on my Pixel Watch Big?

    Yes, the Pixel Watch offers a range of font sizes, including a larger option for improved readability. You can adjust the font size using the steps mentioned in this article.

    Will Adjusting the Font Size Affect Other Aspects of the Watch?

    Adjusting the font size primarily affects the size of text displayed on the watch face, notifications, messages, and other apps. It shouldn’t significantly impact other visual elements on the Pixel Watch.

    Does a Larger Font Size Drain the Battery Faster?

    The impact of font size on battery life is minimal. The Pixel Watch utilizes an efficient display technology, and font size adjustments are unlikely to cause a noticeable difference in battery performance.

    Is there a Way to Change the Font Style on the Pixel Watch?

    Currently, the Pixel Watch doesn’t offer the option to change the font style itself. However, you can adjust the font size for a more personalized look and improved readability.

    What if I Accidentally Make the Font Size too Small and Can’t see Anything?

    Don’t worry! Simply follow the same steps mentioned earlier and adjust the font size slider back to a larger size. You can always preview the changes before saving them.

    For more insights on this article, check out these video tips across our social platforms: