Category: More

  • How to Change the Navigation Bar on Samsung S 24 Ultra

    How to Change the Navigation Bar on Samsung S 24 Ultra

    The Samsung S24 Ultra boasts a stunning display and a user-friendly interface. But what if you could personalize the way you interact with your phone even further? Enter the Navigation Bar, a customizable on-screen control panel that provides quick access to essential navigation functions.

    How to Change the Navigation Bar on Samsung S 24 Ultra
    How to Change the Navigation Bar on Samsung S 24 Ultra

    This guide empowers you to take control of your S24 Ultra’s navigation experience by exploring how to change the Navigation Bar layout and functionality.

    About the Navigation Bar on Samsung S24 Ultra

    The Navigation Bar sits at the bottom of your S24 Ultra’s display, typically displaying three buttons

    By default, the Samsung S24 Ultra, offers three on-screen buttons (Back, Home, Recent Apps) that you can customize the order of (if desired). Feeling fancy? Ditch the buttons and switch to intuitive swipe gestures – swipe up for home, swipe left/right for back, and swipe up and hold for recent apps.

    The Navigation Bar settings, found in Display within Settings, give you the flexibility to choose between button or gesture navigation, creating a navigation experience that perfectly suits your style.

    How to Change the Navigation Bar on Samsung S 24 Ultra

    Changing the Navigation Bar on your S24 Ultra is a quick and straightforward process, and here is how to go about it.

    • First, Locate the “Settings” icon on your home screen and tap on it to launch the Settings app.
    • Then, scroll down the Settings menu and tap on “Display.”
    • Then, look for a section labeled “Navigation Bar” or “Navigation bar” (the exact wording might vary slightly depending on your software version).  Tap on it to access the navigation bar settings.
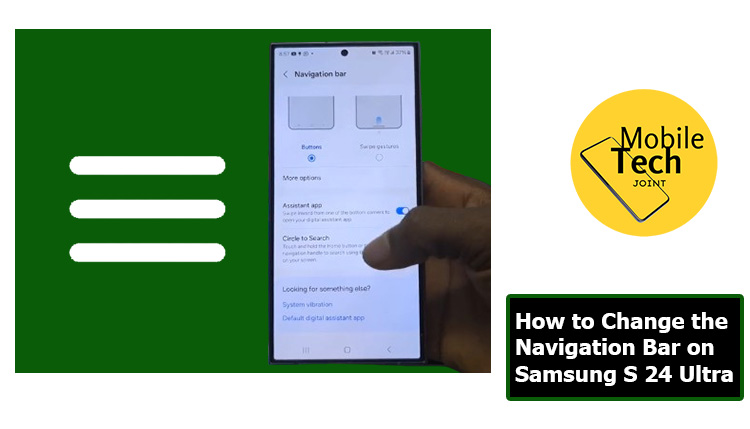
    • At the top of the Navigation bar settings, you’ll see options for “Buttons” and “Swipe gestures.”  Buttons is the default setting, displaying the navigation buttons.  Swipe gestures remove the buttons and rely on swipe actions for navigation.
    • Once you’ve made your desired adjustments, review the settings to ensure everything is configured as you prefer.
    @mobiletechjoint_

    Navigation Bar on Samsung S 24 Ultra 📱🤌 Navigate like a pro with the Samsung S24 Ultra! 🌟 Discover the customizable navigation bar for seamless and intuitive control. Personalize your experience and make every swipe count. Watch our latest guide to unlock the full potential of your device! #samsungs24ultra #navigationbar #techtips #howto #samsung #navigate @Samsung

    ♬ Taste – Tyga

    Also Check: How to Ignore an App Limit on iPhone 15 Pro

    Benefits of Changing the Navigation Bar on Samsung S24 Ultra

    Customizing your Navigation Bar offers several benefits.

    • Enhanced User Experience: Tailoring the navigation layout to your preferences can make interacting with your phone feel more intuitive and efficient.
    • Improved Accessibility: Rearranging button positions or adding an extra button for frequently used functions can improve accessibility for users with specific needs.
    • A More Minimalist Look: Replacing buttons with swipe gestures creates a cleaner and more streamlined aesthetic on your phone’s display. This aligns with the current design trend of minimalism.
    • Increased Efficiency (Swipe Gestures): For users who find swipe gestures more intuitive, switching to gesture navigation can potentially increase navigation efficiency.

    Conclusion

    The Navigation Bar on your Samsung S24 Ultra goes beyond just a control panel – it’s a gateway to a personalized phone experience.  By understanding its functionalities and exploring the simple customization options, you can tailor the Navigation Bar to your preferences, and optimize your interaction with your S24 Ultra.

    Whether you prefer the classic comfort of buttons, the sleek minimalism of swipe gestures, or a customized button layout, the S24 Ultra empowers you to take control.  So, embrace the power of customization and unlock a navigation experience that perfectly suits your style and needs.

    Frequently Asked Questions (FAQs)

    Will changing the Navigation Bar affect the functionality of my apps?

    No, changing the Navigation Bar layout or using swipe gestures typically doesn’t affect the functionality of your apps. Apps are designed to adapt to different navigation methods.

    Can I accidentally activate swipe gestures with my hand in my pocket?

    The sensitivity of swipe gestures can be adjusted within the Navigation Bar settings.  Finding the right balance between responsiveness and accidental activation is key. Experiment with different sensitivity levels to find the sweet spot for your needs.

    Is there a way to get more than three buttons on the Navigation Bar?

    While the standard layout offers three buttons, some Samsung S24 Ultra models (depending on the software version) might allow adding an extra button through the “More options” menu within the Navigation Bar settings.  This extra button offers limited functionality options for screenshots, specific app launches, or voice assistant activation.

    Will using swipe gestures drain my battery life?

    While swipe gestures require some sensor activity, the overall effect on battery consumption is considered minimal compared to other phone functions like display brightness or intensive app usage.

    For more insights on this article, check out these video tips across our social platforms:

    On Instagram

    On TikTok

  • How to Enable Motion and Gestures on Samsung S23 +

    How to Enable Motion and Gestures on Samsung S23 +

    The Samsung S23+ isn’t just a phone, but a powerhouse of innovation designed to seamlessly integrate.  Sure, it boasts a stunning display, unparalleled processing speed, and a camera that captures breathtaking moments. But what truly elevates the S23+ experience is its focus on intuitive interaction.

    How to Enable Motion and Gestures on Samsung S23 +
    How to Enable Motion and Gestures on Samsung S23 +

    This is where Motion and Gestures come into play.  Imagine a world where simple hand movements and gestures replace the use of buttons, and waking your phone becomes a smooth lift-and-go action. Capturing a screenshot involves a quick swipe of your palm. Silencing an incoming call? A discreet hand gesture does the trick.  Motion and Gestures on your Samsung S23+ transform the way you interact with your phone, making it more natural, efficient, and personalized than ever before.

    This guide will equip you with the knowledge to enable Motion and Gestures on your Samsung S23+. We’ll delve into what this feature offers, guide you through the activation process, and explore the numerous benefits and reasons why incorporating this functionality into your daily routine can streamline your interaction with your phone.

    About Motion and Gestures on Samsung S23+

    Motion and Gestures is a collection of features that leverage the capabilities of your Samsung S23+ to move beyond traditional touch controls. Here’s a glimpse of what it offers.

    • Lift to Wake: Picking up your phone instantly wakes it up, eliminating the need to fumble for the power button.
    • Double Tap to Wake/Sleep: Tap the screen twice to wake your phone or put it to sleep, providing a quick and convenient alternative to the power button.
    • Mute with Gestures: Place your hand over the screen or turn your phone face down to silence incoming calls or alarms, ideal for those moments when fumbling for buttons isn’t an option.
    • Finger Sensor Gestures: Swipe up or down on the fingerprint sensor to navigate through your notifications or access Samsung Wallet (availability may vary based on model).
    • Important Note:  These are some of the core functionalities offered by Motion and Gestures on the Samsung S23+.  The specific features and their settings might vary slightly depending on your device model and software version.

    How to Enable Motion and Gestures on Samsung S23 +

    Below are the Steps on How to Enable Motion and Gestures on Samsung S23+

    • Enabling Motion and Gestures is a quick and straightforward process
    • First, Locate the “Settings” app on your home screen and tap on it to launch the Settings app.
    • Then, Scroll down the Settings menu and tap on “Advanced Features.”  On some models, this might be labeled as “Motions and gestures” or a similar variation.
    • Next, locate the “Motion and Gestures” section and tap on the toggle switch next to it. This will turn the overall feature on (it will turn green).
    • Then tap on each gesture within the “Motion and Gestures” menu to customize its behavior or disable functionalities you don’t prefer.

    Also Check: How to Ignore an App Limit on iPhone 15 Pro

    Benefits of Motion and Gestures on Samsung S23+

    Incorporating Motion and Gestures into your interaction routine offers a multitude of benefits:

    • Enhanced Convenience: Motion and Gestures provide quicker and more intuitive ways to perform everyday actions like waking your phone or capturing screenshots, streamlining your workflow.
    • Improved Accessibility: Features like “Mute with Gestures” offer accessibility benefits for users who might have difficulty reaching the power button or volume controls.
    • Reduced Button Wear: By relying less on the physical buttons, Motion, and Gestures can minimize wear and tear, potentially extending the lifespan of your device’s hardware.
    • Personalized Experience: The ability to customize individual gestures allows you to tailor the experience to your preferences and optimize interaction for your needs.
    • Modern Touch: Motion and Gestures embrace a modern approach to phone interaction, adding a sleek and innovative feel to your experience with the Samsung S23+.

    Conclusion

    The Samsung S23+ goes beyond a powerful device, it’s a gateway to a more intuitive and convenient user experience.  Enabling Motion and Gestures unlocks a world of possibilities, allowing you to interact with your phone using simple hand movements and gestures. From effortless screen wake-up to intuitive screenshot capture and convenient muting options, Motion and Gestures enhance usability, streamline workflows, and personalize your connection with the S23+.

    So, embrace the power of motion and gestures, and discover a whole new way to experience your Samsung S23+.

    Frequently Asked Questions (FAQs)

    Will enabling Motion and Gestures drain my battery life?

    The impact on battery life is generally minimal. While Motion and Gestures utilize sensors to detect movements, their overall effect on battery consumption is considered negligible compared to other phone functions like display brightness or intensive app usage.

    Can I accidentally activate gestures with my hand in my pocket?

    The sensitivity of gestures like “Palm Swipe to Capture” can be adjusted within the settings. Finding the right balance between responsiveness and accidental activation is key. Experiment with different sensitivity levels to find the sweet spot for your needs.

    Are Motion and Gestures compatible with all apps?

    Motion and Gestures primarily affect system-wide functionalities like waking the phone or capturing screenshots. Their compatibility with specific app features might vary depending on the app’s design and implementation.

    What if I don’t like a particular Motion and Gesture feature?

    The beauty of Motion and Gestures lies in its customization options.  You can disable any individual gesture within the settings menu that you find unnecessary or inconvenient. This allows you to tailor the experience to your preferences and interaction style.

    For more insights on this article, check out these video tips across our social platforms:

    On Instagram

    On TikTok

  • How to Enable Dark Mode on Samsung S 24 Ultra

    How to Enable Dark Mode on Samsung S 24 Ultra

    The Samsung S24 Ultra is a technological powerhouse, a gateway to a world of information and entertainment at your fingertips. Its vibrant display showcases photos, videos, and games in stunning detail. But as the sun sets, and you transition to a calmer state, the phone’s brilliance can sometimes become a source of eye strain.

    How to Enable Dark Mode on Samsung S 24 Ultra
    How to Enable Dark Mode on Samsung S 24 Ultra

    Fortunately, there’s a solution that can be used to counter this situation, the Dark Mode feature on your Samsung S24 Ultra. This isn’t just a cosmetic change, but a transformative feature that creates a nighttime oasis for your eyes.  Dark Mode bathes your phone’s interface in a soothing darkness, offering a multitude of benefits that go far beyond aesthetics.

    This comprehensive guide empowers you with the knowledge to enable the Dark Mode feature on your Samsung S24 Ultra, exploring its benefits and delving into the simple activation process.

    Why Enable Dark Mode on Samsung S24 Ultra?

    Your Samsung Galaxy S24 Ultra’s Dark Mode goes beyond just aesthetics. It can be a friend to your eyes, battery, and even your sleep. Staring at a bright screen, especially at night, can cause eye strain.

    Dark Mode swoops in with a darker color scheme, making screen time easier on your eyes. AMOLED displays, like the one in your S24 Ultra, benefit from Dark Mode too, as dark pixels use less power, potentially extending your battery life. Plus, who can resist a sleek and stylish phone interface?

    Dark Mode delivers that in spades. It can even minimize screen glare in bright environments and potentially promote better sleep by reducing overall screen brightness before bed. So, enable Dark Mode and experience a world of benefits for your eyes, phone, and well-being.

    How to Enable Dark Mode on Samsung S 24 Ultra

    Below are the steps to take on How to Enable Dark Mode on Samsung S24 Ultra

    • Enabling Dark Mode on your Samsung S24 Ultra is a quick and straightforward process
    • First, swipe down twice from the top of the screen to fully expand the Quick Settings panel.
    • Then look for the “Settings” icon (it might appear as a gear symbol) within the Quick Settings panel, and click on it.
    • After that, scroll down, look for the “Display” option, and click on it.
    • Then Look for the “Dark Mode” icon, within the “Display” Settings and click on it. It is beside the “Light” mode icon.
    •  You can also automatically schedule Dark Mode to turn on and off at specific times.
    @mobiletechjoint_

    Enable Dark Mode on Samsung S 24 Ultra 📱 Dive into the elegance of Dark Mode on Samsung S24 Ultra! 💥 Transform your screen for a sleek, eye-friendly experience. 🤌 Discover how to activate it effortlessly and elevate your device’s style.💯💫 #samsungs24ultra #darkmode #howto #samsung #fyp @Samsung @makeoverarena

    ♬ original sound – mobiletechjoint

    Also Check: How to Set App Limit on iPhone 15 Pro

    Benefits of Enabling Dark Mode on Samsung S24 Ultra

    Enabling Dark Mode on your Samsung S24 Ultra offers several advantages.

    • Reduced Eye Strain: As mentioned earlier, Dark Mode minimizes bright light emission, promoting eye comfort and potentially reducing strain during extended phone use.
    • Improved Battery Life: While the exact impact depends on factors like usage patterns and display brightness, Dark Mode can potentially lead to improved battery life on devices like the S24 Ultra due to the lower power consumption of dark pixels on AMOLED displays.
    • Enhanced Readability in Low-Light: Dark Mode creates a higher contrast between text and background in low-light environments, making content easier to read and reducing eye fatigue.
    • Personalized Look and Feel: Dark Mode allows you to personalize the visual aesthetic of your phone, creating a more modern and stylish interface that suits your preferences.
    • Reduced Blue Light Exposure: Some research suggests that reducing blue light exposure in the evenings can improve sleep quality. By reducing overall screen brightness and blue light emission, Dark Mode might offer indirect benefits for sleep patterns.

    Beyond the specific benefits outlined above, enabling Dark Mode on your Samsung S24 Ultra offers several compelling reasons

    • Enhanced User Experience: Dark Mode creates a more comfortable and visually appealing user experience, especially when using your phone for extended periods or in low-light environments.
    • Modern and Sleek Aesthetics: Dark Mode aligns with the current design trends of minimalism and sophistication, offering a modern and stylish look for your phone’s interface.
    • Potential Health Benefits:  While more research is needed, reducing blue light exposure through Dark Mode might indirectly promote better sleep patterns. This is because blue light exposure in the evenings can suppress melatonin production, a hormone crucial for regulating sleep-wake cycles.
    • Improved Focus:  Dark Mode can potentially minimize visual distractions by reducing overall screen brightness and creating a more focused reading experience. This might be beneficial for activities like reading ebooks or working on documents.
    • Compatibility and Customization:  Samsung offers robust Dark Mode compatibility with most built-in apps and allows for some level of customization through scheduling or app-specific adjustments, catering to individual preferences.

    Conclusion

    Dark Mode on your Samsung S24 Ultra is more than just a visual preference – it’s a valuable tool for enhancing your user experience.  From reducing eye strain and potentially improving battery life to creating a more comfortable and stylish interface, Dark Mode offers a multitude of benefits.

    The simple activation process makes it a feature worth exploring.  So, embrace the comfort and style of Dark Mode, and unlock a whole new way to experience your Samsung S24 Ultra.

    Frequently Asked Questions (FAQs)

    Does Dark Mode eliminate blue light emission from my phone?

    No, Dark Mode doesn’t eliminate blue light emission.  However, it significantly reduces the overall amount of blue light emitted from the display, potentially offering indirect benefits for sleep patterns (further research is ongoing).

    Can I schedule Dark Mode to turn on and off automatically?

    Absolutely!  The Samsung S24 Ultra offers Dark Mode scheduling options within the Quick Settings panel. This allows you to customize when Dark Mode activates and deactivates based on your preferences.

    Will Dark Mode work with all apps on my phone?

    While Dark Mode compatibility with most built-in apps is excellent, some third-party apps might not fully support Dark Mode yet.  These apps might still display a light interface even with Dark Mode enabled on your phone.

    Can I adjust the intensity of Dark Mode on my Samsung S24 Ultra?

    Unfortunately, the Samsung S24 Ultra doesn’t currently offer built-in options to adjust the intensity of Dark Mode. However, some third-party apps might offer additional customization options for Dark Mode appearance.

    For more insights on this article, check out these video tips across our social platforms:

    On Instagram

    On TikTok

  • A Deal You Can’t Miss: These Status Between Pro Earbuds Offer Audiophile-Grade Sound for Uner $100

    A Deal You Can’t Miss: These Status Between Pro Earbuds Offer Audiophile-Grade Sound for Uner $100

    Looking for true wireless earbuds that deliver premium sound quality without breaking the bank? The Status Between Pro True Wireless Earbuds might be just what you need. Available now for $99.00 (down from $169.00), these earbuds offer a stellar audio experience with a host of features designed to meet all your listening needs.

    A Deal You Can't Miss: These Status Between Pro Earbuds Offer Audiophile-Grade Sound for Uner $100

    Superior Sound with Hybrid Triple Drivers

    The Status Between Pro earbuds feature a unique Hybrid Triple Driver system, combining two balanced armature drivers and one dynamic driver in each earbud. This configuration ensures a rich and balanced sound profile with powerful bass, warm mids, and crisp treble. Whether you’re a music aficionado or a casual listener, you’ll appreciate the clarity and depth these earbuds provide.

    Advanced Noise Isolation for Clear Calls

    Equipped with four external microphones and Qualcomm cVc noise cancellation technology, these earbuds filter out background noise to deliver crystal clear call quality. Whether you’re taking calls on a busy street or in a noisy office, you can be confident that your voice will come through loud and clear.

    Long-Lasting Battery Life

    One of the standout features of the Status Between Pro earbuds is their impressive battery life. You get up to 12 hours of continuous playtime on a single charge, with an additional 36 hours provided by the compact charging case. This means you can enjoy your music all day without worrying about recharging.

    Built to Withstand the Elements

    With an IPX5 water-resistant rating, these earbuds are designed to handle sweat and rain, making them perfect for workouts and outdoor activities. You can listen to your favorite tunes while running in the rain or sweating it out at the gym without any worries.

    Seamless Connectivity

    Featuring Bluetooth 5.2 and a Qualcomm chipset, the Status Between Pro earbuds ensure a fast and stable connection with minimal latency. Whether you’re streaming music, watching videos, or playing games, you can expect a seamless and interruption-free audio experience.

    Sleek and Comfortable Design

    The ultra-sleek styling of these earbuds not only looks great but also ensures maximum comfort for extended listening sessions. The noise-isolating fit further enhances your listening experience by blocking out ambient noise, allowing you to immerse yourself fully in your music.

    Conclusion

    At $99.00, the Status Between Pro True Wireless Earbuds offer an exceptional combination of sound quality, battery life, and comfort. With over 4,000 ratings and a solid 4.2 out of 5 stars, these earbuds are a proven favorite among users.

    Elevate your listening experience today with the Status Between Pro Earbuds and enjoy audiophile-grade sound, clear calls, and a design that fits your active lifestyle.

    Also Check:

  • This Xumee Adapter Keeps your iPhone 15 Pro Max and Galaxy S23 Juiced and Jammin’

    This Xumee Adapter Keeps your iPhone 15 Pro Max and Galaxy S23 Juiced and Jammin’

    In the world of sleek, modern smartphones, losing the headphone jack has been a common trend. But if you’re like many who miss the good old days of wired headphones, the Xumee USB Type C to 3.5mm Headphone and Charger Adapter is here to save the day. Priced at $18.99, this 2-in-1 adapter is a must-have for those who want to enjoy their favorite tunes while keeping their devices charged.

    This Xumee Adapter Keeps Your iPhone 15 Pro Max and Galaxy S23 Juiced and Jammin'

    Hi-Res Audio for a Superior Listening Experience

    The Xumee adapter is equipped with a smart DAC chip, ensuring high-fidelity audio playback. This means you can enjoy crystal-clear sound whether you’re listening to music, watching movies, or taking calls. The 3.5mm female port is compatible with both CTIA and OMTP standards, making it versatile for different headphone types.

    Fast Charging On-the-Go

    One of the standout features of this adapter is its fast charging capability. It supports up to 60W PD charging, allowing you to charge your phone while using your headphones. However, it’s worth noting that it may not support QC for some newer phones, so using a PD wall charger is recommended for faster charging speeds.

    Wide Compatibility

    The Xumee adapter is designed to work seamlessly with a wide range of devices. It is compatible with the iPhone 15 Pro Max, 15 Pro, 15 Plus, and 15, as well as most USB Type C devices, including:

    • Google Pixel 5, 4, 3, 2 XL
    • Samsung Galaxy Z Flip 3 5G, S21, S21+, S21 Ultra 5G, S20 FE, S20 Ultra, Z Flip, S20+, S10, S9, S8 Plus, Note 20 5G Ultra, Note 10, 9, 8
    • iPad Pro
    • Huawei Mate 30, 20, 10 Pro, P30, P20

    Multi-Function Dongle for Convenience

    This compact USB-C to aux adapter not only lets you listen to music but also allows you to answer phone calls with your headphones. It supports wire control functions, adding to its convenience and functionality. Whether you’re on a call or jamming to your favorite playlist, this adapter has got you covered.

    Plug-and-Play Simplicity

    The Xumee adapter boasts a super slim design, making it ultra-portable and easy to use. There’s no need for drivers or complex setups. Just plug it into your device, and you’re ready to go. Its lightweight design, at just 4.99 grams, ensures that it won’t add any bulk to your daily carry.

    Final Thoughts

    At $18.99, the Xumee USB Type C to 3.5mm Headphone and Charger Adapter offers an affordable and effective solution for anyone missing the headphone jack on their modern smartphones. With its high-fidelity audio, fast charging capabilities, wide compatibility, and easy plug-and-play functionality, it’s a small investment for a big convenience. Upgrade your audio experience and keep your devices powered up with this handy 2-in-1 adapter from Xumee.

    Also Check:

  • This $16 Stouchi Adapter is a Must-Have for iPhone 15 and Galaxy S22 Users

    This $16 Stouchi Adapter is a Must-Have for iPhone 15 and Galaxy S22 Users

    In a world where smartphones keep getting sleeker, the Stouchi USB C to 3.5mm Headphone and Charger Adapter is a game-changer. At just $15.99, this Amazon’s Choice adapter offers dual functionality with high-res audio and fast charging capabilities, making it a must-have accessory for your USB-C devices.

    This $16 Stouchi Adapter is a Must-Have for iPhone 15 and Galaxy S22 Users

    Dual Functionality in One Compact Design

    The Stouchi adapter is designed to simplify your life by allowing you to charge your device and listen to music simultaneously. Whether you’re using an iPhone 15, a Samsung Galaxy S22, or any other USB-C device, the plug-and-play feature makes it incredibly user-friendly. Just connect your 3.5mm headphones and charger, and you’re good to go.

    Rapid Charging to Keep You Connected

    One of the standout features of this adapter is its built-in multi-functional PD fast charging chip, which supports up to 30W of power. This ensures that you can quickly charge your device at 9V/3A, even while using it for calls, gaming, or streaming. Say goodbye to battery anxiety with the Stouchi adapter.

    Crystal Clear Hi-Res Audio

    Sound quality is not compromised with the Stouchi adapter. It supports DAC with 24bit/96KHz, providing high-fidelity audio transmission. Compatible with both CTIA and OMTP standards, it ensures you enjoy clear and crisp sound whether you’re listening to music, podcasts, or videos.

    Broad Compatibility

    This versatile adapter works seamlessly with a wide range of USB-C devices, including:

    • iPhone 15
    • Google Pixel 8/7/6/5/4/3/2/XL
    • iPad Air 5th/4th generation, iPad Pro 2021/2020/mini 6
    • Samsung Galaxy S22, S21, S21+, S21 Ultra, S20+, S20, S20 Ultra, S10, S10+, Note20 Ultra, Note20, Note10
    • Huawei P40 Pro, P40, Mate 40 Pro, Mate 40, Mate 30 Pro, Mate 30

    This extensive compatibility ensures you can use the adapter with multiple devices without any issues.

    Sleek, Durable, and Portable

    Despite its powerful capabilities, the Stouchi adapter is compact and lightweight, making it easy to carry around. Its sleek design doesn’t compromise on durability, ensuring it withstands daily wear and tear. Plus, Stouchi provides lifetime technical support, offering peace of mind with your purchase.

    Final Thoughts

    The Stouchi USB C to 3.5mm Headphone and Charger Adapter is an affordable yet highly functional accessory for anyone with a USB-C device. Priced at just $15.99, it delivers high-res audio, fast charging, wide compatibility, and a sleek, portable design. Enhance your smartphone experience with this versatile adapter and keep your devices powered and your music playing wherever you go.

    Also Check:

  • Asus Zenbook 14 OLED review: A Powerhouse Ultraportable with AI Ambitions

    Asus Zenbook 14 OLED review: A Powerhouse Ultraportable with AI Ambitions

    Asus has once again raised the bar with its latest offering, the Zenbook 14 OLED. As a part of the renowned Zenbook ultrabook lineup, this sleek and powerful machine promises to deliver an exceptional computing experience, bolstered by cutting-edge artificial intelligence (AI) capabilities and a stunning OLED display.

    Asus Zenbook 14 OLED review

    SHOP NOW


    Whether you’re a professional seeking a portable powerhouse or a tech enthusiast craving the latest innovations, the Asus Zenbook 14 OLED is poised to captivate.

    Key Takeaways:

    • Ultra-slim and lightweight design for ultimate portability
    • Gorgeous 2.8K OLED touchscreen with HDR and 120Hz refresh rate
    • Powered by Intel’s 13th Gen Core CPUs with AI acceleration
    • Impressive battery life and fast SSD storage options
    • AI capabilities show promise but limited use cases currently

    Asus Zenbook 14 OLED review

    The Asus Zenbook 14 OLED is a premium ultraportable laptop that seamlessly blends style, performance, and innovation. Crafted with meticulous attention to detail, this ultrabook boasts a striking aluminum unibody design, coupled with a breathtaking OLED display that promises to elevate your visual experience. But what truly sets the Zenbook 14 OLED apart is its incorporation of Intel’s latest processors, featuring dedicated AI acceleration capabilities, hinting at the future of computing.

    Sleek and Portable Design:

    The Asus Zenbook 14 OLED encapsulates the essence of modern ultraportable design. Weighing a mere 1.28kg and measuring just 14.9mm thick, this laptop effortlessly slips into any backpack or briefcase, making it the perfect companion for professionals on the go. The aluminum unibody construction exudes a sense of premium quality, while the sleek blue finish adds a touch of sophistication to the overall aesthetic.

    Despite its svelte dimensions, the Zenbook 14 OLED doesn’t compromise on connectivity. It features a thoughtful selection of ports, including Thunderbolt 4 for high-speed data transfer and external display support, a USB-A port for legacy devices, and an HDMI port for seamless connectivity with larger displays or projectors.

    Gorgeous 2.8K OLED Touchscreen:

    At the heart of the Asus Zenbook 14 OLED lies a stunning 14-inch OLED touchscreen display with a remarkable 2880 x 1800 resolution. This panel is a true masterpiece, delivering vivid HDR colors, perfect blacks, and exceptional contrast ratios that will leave you in awe. Whether you’re editing photos, watching movies, or working on creative projects, the OLED display ensures that every detail is rendered with unparalleled accuracy and vibrancy.

    The 120Hz refresh rate further enhances the visual experience, providing buttery-smooth motion and reducing blur during fast-paced action or scrolling. Additionally, the wide viewing angles of the OLED panel ensure that the image remains crisp and consistent, no matter your viewing position.

    While the glossy finish adds a touch of elegance, it can also be a double-edged sword, as it may create annoying reflections in bright environments. However, Asus has thoughtfully included wide tilt adjustments, allowing you to find the perfect angle to minimize glare and maximize your viewing comfort.

    Solid Inputs but Mediocre Audio:

    The Asus Zenbook 14 OLED excels in terms of user input, thanks to its backlit keyboard and responsive glass touchpad. The keyboard offers a satisfying typing experience, with good key travel and a layout that promotes productivity. The touchpad is equally impressive, featuring smooth and accurate tracking, as well as support for multi-touch gestures.

    One notable feature of the touchpad is its ability to convert into a numpad with a simple tap gesture, allowing for efficient data entry and calculations. This functionality can be particularly useful for professionals who frequently work with numbers or spreadsheets.

    However, the audio experience on the Zenbook 14 OLED isn’t quite as impressive as its visual counterpart. The down-firing speakers, while capable of delivering clear sound at moderate volumes, lack the punchiness and stereo separation that audiophiles crave. If you’re an avid music listener or prefer immersive audio experiences, you may want to consider investing in a pair of high-quality headphones or external speakers.

    Powerful Ultrabook Performance:

    Under the hood, the Asus Zenbook 14 OLED packs a serious punch, thanks to Intel’s latest 13th Gen Core processors. These processors not only offer exceptional performance for everyday tasks but also feature dedicated Neural Processing Units (NPUs) designed specifically for AI acceleration.

    With up to 16GB of RAM and lightning-fast SSD storage options ranging up to 1TB, the Zenbook 14 OLED can handle even the most demanding workloads with ease. Whether you’re multitasking between multiple applications, editing high-resolution videos, or tackling complex data analysis, this ultrabook delivers smooth and responsive performance without breaking a sweat.

    For those who enjoy casual gaming on the go, the integrated Intel Arc graphics capabilities of the Zenbook 14 OLED are a welcome addition. While not intended for hardcore gaming, the Intel Arc graphics can handle many popular titles at moderate settings, providing a delightful gaming experience on the stunning OLED display.

    AI Acceleration Still Niche:

    One of the standout features of the Asus Zenbook 14 OLED is its support for AI acceleration, courtesy of the dedicated Neural Processing Units (NPUs) found in Intel’s latest processors. These NPUs are designed to offload AI-related tasks from the main CPU, enabling faster and more efficient processing of AI workloads.

    Currently, the most practical application of this technology is in video call enhancement features. The Zenbook 14 OLED can leverage its AI capabilities to provide background blur and noise cancellation during video calls, ensuring that you look and sound your best, even in less-than-ideal environments.

    However, it’s important to note that while AI acceleration holds immense potential, the ecosystem of AI-optimized applications and software is still in its infancy. As more developers embrace this technology, we can expect to see a broader range of AI-enhanced features and capabilities integrated into our everyday computing experiences.

    Heat and Fan Noise Concerns:

    As with most powerful ultraportable laptops, the Asus Zenbook 14 OLED isn’t immune to thermal and noise concerns. While the slim and lightweight design is undoubtedly appealing, it also means that there is less room for effective cooling solutions.

    Under sustained heavy workloads, such as video rendering or intense gaming sessions, the Zenbook 14 OLED can run a bit toasty, with the underside becoming noticeably warm. Additionally, the fan can kick into high gear more frequently than one might expect, even during relatively basic tasks like web browsing or video playback.

    It’s worth noting that this isn’t a unique issue to the Zenbook 14 OLED; it’s a trade-off inherent in most ultraportable designs. However, Asus has implemented measures to mitigate these concerns, such as intelligent thermal management and performance throttling when necessary, to prevent overheating and maintain system stability.

    Verdict: Excellent Ultraportable for Productivity:

    The Asus Zenbook 14 OLED is a remarkable ultraportable laptop that excels in several key areas. Its stunning OLED display, coupled with a premium aluminum build and impressive performance capabilities, make it an excellent choice for professionals and power users seeking a portable yet powerful computing solution.

    While the AI acceleration features are still in their infancy, the inclusion of dedicated NPUs demonstrates Asus’s commitment to embracing the latest technological advancements. As the AI ecosystem continues to evolve, we can expect the Zenbook 14 OLED to unlock even more exciting capabilities and use cases.

    Certainly, the thermal limitations and fan noise may be a concern for some users, but these are common trade-offs in the realm of ultraportable computing. For most daily tasks and productivity workflows, the Zenbook 14 OLED delivers an exceptional experience, combining style, performance, and cutting-edge technology in a sleek and portable package.

    Read: How to Enable Data Saver on Google Pixel 7 Pro

    If you’re in the market for a premium ultraportable that offers a stunning visual experience, powerful performance, and a glimpse into the future of AI-enhanced computing, the Asus Zenbook 14 OLED is undoubtedly worthy of consideration.

    How to Buy

    To get your hands on this amazing device, simply head over to Amazon using our special affiliate link. By using our link, you’re not only getting the device you want, but you’re also supporting us at the same time. Happy shopping.

    Buy now on Amazon: https://www.amazon.com/ASUS-Platform-i7-1360P-Graphics-UP3404VA-DS74T/dp/B0C839RTS1?crid=389E2ZN223SU3&dib=eyJ2IjoiMSJ9.N89C8my5YxWhvtQGSzrIpKhpoZLI17zb2wMrHpnhPn5M6f0_XZMJT0xK9I1-4KNy7Gt6qrWninTsm66Hm0yNtF3283u1c94uJNp0hiaytMsPS0Jgys_8SFsRHR1NlymlRudi3melxrkWhfTBCbE3QgqyucyPYx27Jo4mCrKfGGSme7NqYICyBxQZkSl_32MQYY_b45vFYY7P-WNMa3Lw_EflgzKP_vkJXUdL9BVdFVE.Vo4KvROgEcO1pyTZk55_RW668UIE7kAh6PagJElFyjk&dib_tag=se&keywords=Asus%2BZenbook%2B14%2BOLED&qid=1718802988&sprefix=asus%2Bzenbook%2B14%2Boled%2Caps%2C546&sr=8-4&th=1&linkCode=ll1&tag=0813570315404-20&linkId=9ee9a1444a53ef5cb7e511360b01175b&language=en_US&ref_=as_li_ss_tl

    Conclusion

    The Asus Zenbook 14 OLED is a compelling ultraportable laptop that showcases the best of what modern computing has to offer. With its stunning OLED display, ultra-slim design, and powerful performance capabilities, it delivers a premium computing experience that caters to the needs of professionals and tech enthusiasts alike.

    Follow Us on

    Instagram: https://www.instagram.com/mobiletechjoint/

    TikTok: https://www.tiktok.com/@mobiletechjoint_

  • How to Enable Driving Monitor on Samsung S23 +

    How to Enable Driving Monitor on Samsung S23 +

    The Samsung S23+ is a technological marvel, offering seamless connectivity, powerful performance, and a sleek design.  And juggling calls, texts, and navigation apps while driving can be tempting but incredibly dangerous. The split-second glance at a notification, the urge to answer a call, or the temptation to adjust your navigation app. These seemingly harmless actions can have devastating consequences.

    How to Enable Driving Monitor on Samsung S23 +
    How to Enable Driving Monitor on Samsung S23 +

    Thankfully, the Samsung S23+ equips you with a valuable tool to combat distracted driving and promote safety on the road, a driving monitor. This innovative feature acts as your virtual copilot, gently nudging you to stay focused and minimize phone interactions while driving.

    This guide will equip you with the knowledge to enable Driving Monitor on your Samsung S23+. We’ll delve into what Driving Monitor is, explore the steps required to activate it, and discuss the numerous benefits and reasons why incorporating this feature into your routine can make a significant difference on the road.

    About Driving Monitor on Samsung S23+

    Driving Monitor acts as your virtual copilot, monitoring your phone usage while driving and encouraging safe driving practices. Here’s what it offers.

    • Distraction Detection: Utilizes the front-facing camera to detect if you’re looking away from the road while your phone is unlocked. If detected, the Driving Monitor displays a gentle reminder to refocus on the road.
    • Alerts and Notifications: Provides audio and visual alerts when you receive calls, texts, or app notifications while driving. You can silence these alerts entirely or allow hands-free options like voice replies.
    • Driving Statistics: Tracks your driving behavior and generates reports on factors like phone usage while driving, allowing you to monitor your progress and identify areas for improvement.
    • Important Note:  Driving Monitor is a helpful tool but not a substitute for responsible driving.  Always prioritize safety by keeping your eyes on the road and avoiding phone use that requires your attention.

    How to Enable Driving Monitor on Samsung S23 +

    Here’s a step-by-step guide on enabling Driving Monitor on your Samsung S23+.

    • First, Locate the “Settings” icon on your home screen and tap on it to launch the Settings app.
    • Then, scroll down the Settings menu and tap on “Digital Wellbeing” (may also be titled “Digital Wellness” on some models).
    • After that, Under the “Digital Wellbeing” section, tap the “Driving Monitor” option.
    • Next, click on the “Start” at the bottom of the screen to turn on the Driving Monitor. And include the apps you want to exclude when driving.
    • Tap on “Settings” within the Driving Monitor menu to customize your experience.


    Benefits of Enabling Driving Monitor on Samsung S23+

    Implementing a Driving Monitor offers a multitude of benefits for your safety and overall well-being on the road.

    • Reduced Distractions: Distraction alerts and notification management minimize the temptation to glance at your phone while driving, keeping your focus on the road.
    • Enhanced Road Safety: By reducing phone interactions, Driving Monitor helps create a safer driving environment for you and others on the road.
    • Increased Awareness: Post-drive summaries provide valuable insights into your phone usage habits, allowing you to identify areas for improvement and become a more mindful driver.
    • Improved Focus: The gentle reminders to refocus on the road help you maintain your attention, leading to a more controlled and enjoyable driving experience.
    • Peace of Mind: Knowing Driving Monitor is actively assisting you in minimizing phone-related distractions can provide peace of mind on your journeys.

    Conclusion

    In today’s fast-paced world, staying connected even while driving can be tempting. However, the risks associated with distracted driving are simply too high.  Enabling a Driving Monitor on your Samsung S23+ is a proactive step toward promoting safe driving habits.  This valuable feature empowers you to minimize distractions, enhance your focus on the road, and promote a safer driving experience for yourself and others.

    So, the next time you get behind the wheel, remember – your phone can wait, but a safe journey can’t.

    Frequently Asked Questions (FAQs)

    Will the Driving Monitor completely prevent me from using my phone while driving?

    No. The Driving Monitor acts as a responsible copilot, not a complete blocker. You can still access navigation apps or use voice commands for hands-free calling and texting. The goal is to minimize distractions that require your visual attention.

    What happens if I get a notification while the Driving Monitor is on?

    Driving Monitor will display an alert (either audio or visual depending on your settings) notifying you of the incoming call, text, or app notification. You can choose to ignore it, respond with a pre-written message (if available), or silence notifications entirely.

    Can I customize the sensitivity of the distraction alerts?

    Unfortunately, no.  The Driving Monitor utilizes the front-facing camera to detect if you’re looking away from the road and cannot be adjusted for sensitivity.  However, the gentle nature of the alerts is designed to be informative without being overly disruptive.

    Does the Driving Monitor work when connected to Bluetooth?

    Yes!  Driving Monitor can be configured to automatically activate when connected to your car’s Bluetooth, ensuring seamless integration into your driving routine.

    For more insights on this article, check out these video tips across our social platforms:

    On Instagram

    On TikTok

  • How to Ignore an App Limit on iPhone 15 Pro

    How to Ignore an App Limit on iPhone 15 Pro

    The iPhone 15 Pro is a seamless integration of communication, entertainment, and productivity tools into a sleek and powerful device.  However, with great features comes great responsibility, the responsibility to manage your screen time effectively. We’ve all been there. Were you mindlessly scrolling through social media, lose yourself in a captivating game, or get sucked into the endless vortex of online browsing, only to realize hours have vanished.

    How to Ignore an App Limit on iPhone 15 Pro
    How to Ignore an App Limit on iPhone 15 Pro

    This is where Screen Time, a built-in feature on your iPhone 15 Pro, steps in.  Screen Time empowers you to set healthy boundaries for app usage, promoting a more balanced relationship with your phone. But what happens when you genuinely need to exceed those limits?  Perhaps you’re on the verge of completing an urgent work task, or an unexpected event requires immediate attention within a limited app category.

    This guide will explore ways to bypass app limits on your iPhone 15 Pro. However, it’s crucial to emphasize responsible phone usage. We’ll discuss alternative strategies to manage screen time and highlight situations where temporarily ignoring an app limit might be justified

    About Ignoring an App Limit on iPhone 15 Pro

    Before diving into methods for bypassing app limits, it’s important to understand their purpose. Screen Time allows you to set daily time restrictions for app categories like “Social Networking” or “Games.” Once you reach your limit for a specific category, you won’t be able to use any apps within that group unless you choose to ignore the restriction.

    Important Note:  Ignoring app limits too frequently undermines the purpose of Screen Time.  Use these methods sparingly and prioritize healthy phone habits whenever possible.

    How to Ignore an App Limit on iPhone 15 Pro

    Below are the Steps to follow on How to Ignore an App Limit on iPhone 15 Pro.

    • When you encounter the “App Limit Reached” notification, you’ll see options to “Ignore Limit” for one minute or 15 minutes. This is a quick way to access the app for a short while before the limit kicks back in. You can also temporarily disable screen time, although it is not recommended not recommended.
    • Open the “Settings” app on your iPhone 15 Pro.
    • Tap on “Screen Time.”
    • Enter your Screen Time passcode if prompted.
    • Scroll down and tap on “Turn Off Screen Time.”
    • Confirm your selection.

    Remember: Disabling Screen Time entirely removes all app limits and removes the potential for accountability.  Use this option cautiously and only as a last resort.

    @mobiletechjoint_

    Ignore an App Limit on iPhone 15 Pro Need more time on your favorite apps? 📱 Learn how to ignore app limits on your iPhone 15 Pro for uninterrupted usage. Discover the steps to extend your screen time without hassle. #iPhone15Pro #AppLimits #TechTips #howto #fyp #tech #apple #iphone @apple

    ♬ original sound – mobiletechjoint – mobiletechjoint

    Related: How to Use Stop Watch on iPhone 15 Pro

    Benefits of Ignoring an App Limit

    There can be situations where temporarily bypassing an app limit might be beneficial:

    Urgent Tasks: You might need to exceed your limit for a short period to complete an urgent work task or follow up on a critical message.

    Unexpected Events: An unexpected event requiring immediate attention on a specific app could necessitate ignoring the limit.

    Educational Purposes: Limited access to educational apps might hinder your learning process. Briefly surpassing the limit can be helpful for research or completing online assignments.

    Conclusion

    Ignoring app limits on your iPhone 15 Pro can be helpful in specific situations.  However, responsible phone usage should always be prioritized.  Utilize Screen Time features to establish healthy phone habits and consider alternative strategies like setting reminders or scheduling dedicated times for specific apps.

    Remember, the goal is to maintain a balanced relationship with your iPhone 15 Pro, maximizing its benefits while promoting well-being and productivity.

    Frequently Asked Questions (FAQs)

    Will I get penalized for ignoring app limits?

    There’s no penalty for ignoring app limits, but the real consequence lies in potentially disrupting your healthy phone habits.  Screen Time is a tool to promote mindful phone usage, and bypassing limits too frequently can defeat its purpose.

    What if I forget my Screen Time passcode?

    Unfortunately, if you forget your Screen Time passcode, there’s no way to retrieve it directly on the iPhone.  However, you can reset your Screen Time settings entirely by erasing your iPhone and restoring it from a backup where Screen Time wasn’t enabled or a backup with a different passcode.  This is a drastic measure, so consider using a passcode you’ll remember or writing it down securely.

    Can I set app limits for someone else’s iPhone?

    Yes!  If you’re the Family Organizer in iCloud Family Sharing, you can set Screen Time limits for your child’s iPhone.  This allows you to manage their app usage remotely and ensure they develop healthy phone habits.

    Are there any third-party apps that can help me manage screen time?

    There are several third-party apps available that offer additional functionalities for managing screen time.  However, it’s crucial to choose reputable apps with strong privacy practices.  The built-in Screen Time features on your iPhone 15 Pro offer a robust set of tools for most users, but exploring third-party options can be beneficial if you require more advanced features.

    For more insights on this article, check out these video tips across our social platforms:

    On Instagram

    On TikTok

  • How to Set App Limit on iPhone 15 Pro

    How to Set App Limit on iPhone 15 Pro

    In today’s digital age, our iPhones often feel like extensions of ourselves. While they offer endless possibilities for communication, entertainment, and productivity, it’s easy to get caught in a scroll-hole, losing precious time to social media or games.  This is where Screen Time, a built-in feature on your iPhone 15 Pro, comes in.  Screen Time empowers you to set healthy boundaries for app usage with a powerful tool, App Limits. Its allows users to set daily time limits for specific apps or categories of apps.

    How to Set App Limit on iPhone 15 Pro
    How to Set App Limit on iPhone 15 Pro

    This guide will equip you with the knowledge to set app limits on your iPhone 15 Pro. We’ll explore what App Limits are, delve into the steps required to set them, and discuss the benefits and reasons why incorporating them into your daily routine can be a game-changer.

    About App Limits on iPhone 15 Pro

    App Limits allow you to designate a specific amount of time you can spend on certain app categories (e.g., “Social Networking”) or individual apps within those categories. Once you reach your set limit for a category or app, you’ll receive a notification and won’t be able to access those apps unless you choose to ignore the limit or request more time.

    Important Note:  Setting effective App Limits requires self-awareness and realistic goals.  Start with moderate limits and adjust them as needed to find a healthy balance for your phone usage.

    How to Set App Limit on iPhone 15 Pro

    Here’s the step-by-step guide on how to set App Limits on your iPhone 15 Pro.

    • Locate the “Settings” icon on your home screen and tap on it to launch the Settings app.
    • Then, scroll down the Settings menu and tap on “Screen Time.”
    • If you haven’t used Screen Time before, you’ll be prompted to “Turn On Screen Time.” Tap on “Turn On Screen Time” and proceed to set a Screen Time passcode.  This passcode will be required to make any future changes to your Screen Time settings.
    • Access App Limits:  Under the “Screen Time” section, tap on “App Limits.”
    • Add a Limit:  Tap on “Add Limit.” Here, you can choose between setting a limit for an entire app category (e.g., “Games”) or for individual apps within a category.
    • Setting a Category Limit: Select the desired category from the list (e.g., “Social Networking”).
    • Setting an Individual App Limit: Tap on “All Apps & Categories” and select the specific app you want to limit.
    • Once you’ve selected the category or app, set the desired time limit using the up and down arrows. You can choose a daily limit ranging from 1 minute to 23 hours and 59 minutes.
    • Once you’ve set the desired limits for your chosen apps or categories, tap on “Add” to confirm and activate them.

    Related: How to Set an Alarm on iPhone 15 Pro

    Benefits of Setting App Limits on iPhone 15 Pro

    Implementing App Limits offers a multitude of benefits for your overall well-being:

    • Increased Productivity: By limiting time spent on distracting apps, you’ll gain valuable time to focus on work, studies, or personal projects.
    • Improved Focus: Reduced app usage can lead to better concentration and fewer interruptions, leading to more efficient task completion.
    • Enhanced Digital Well-being: App Limits promote healthier phone habits, allowing you to disconnect and reduce digital dependence.
    • Greater Self-Awareness: Setting limits encourages you to monitor your app usage patterns and identify areas for improvement.
    • Boosted Sleep Quality: Excessive screen time before bed can disrupt sleep patterns. Limiting app usage in the evenings can contribute to better sleep hygiene.

    Conclusion

    Taking control of your iPhone 15 Pro’s influence on your daily routine starts with setting App Limits.  This powerful feature within Screen Time empowers you to establish healthy boundaries for app usage, promoting productivity, focus, and well-being. By following the outlined steps and understanding the benefits and motivations behind setting App Limits, you can unlock a more balanced and fulfilling relationship with your iPhone 15 Pro.

    Remember, technology should enhance your life, not control it. Utilize App Limits to reclaim your time, focus, and digital well-being!

    Frequently Asked Questions (FAQs)

    What happens when I reach my App Limit for an app or category?

    Once you reach your set limit, you’ll receive a notification informing you that your time for that particular category or app is up. You’ll still be able to access essential phone functionalities like calls, messages, and maps (depending on your settings). However, you won’t be able to use the limited apps until the daily limit resets at midnight or until you choose to.uk,z,

    Request More Time (One Minute or 15 Minutes): A limited option to extend your usage for a short period.

    Ignore Limit: This bypasses the limit for the remainder of the day, but consider using it sparingly to maintain healthy phone habits.

    Can I set different App Limits for weekdays and weekends?

    Absolutely!  During the initial setup of an App Limit (step 6), you can tap on “Customize Days” to set varying time limits for specific days of the week.

    What if I forget my Screen Time passcode?

    Unfortunately, there’s no way to directly recover a forgotten Screen Time passcode on your iPhone. You’ll need to erase your iPhone and restore it from a backup where Screen Time wasn’t enabled or a backup with a different passcode. This is a drastic measure, so consider using a memorable passcode or writing it down securely.

    Can I set App Limits for someone else’s iPhone

    Yes!  If you’re the Family Organizer in iCloud Family Sharing, you can set Screen Time limits, including App Limits, for your child’s iPhone. This allows you to manage their app usage remotely and ensure they develop healthy phone habits.

    For more insights on this article, check out these video tips across our social platforms:

    On Instagram

    On TikTok