The world of smartwatches has been dominated by the circular design for a long time, but Huawei’s latest offering, the Watch Fit 3, takes a bold step in a different direction. This fitness-focused smartwatch boasts a square design that draws obvious comparisons to the Apple Watch, but it’s not just about the looks.
The Huawei Watch Fit 3 packs a punch with its impressive battery life, accurate fitness tracking, and sleek build quality.
Key Takeaways:
- Squarish design takes cues from Apple Watch but with a more angular, iPhone-inspired look
- Impressive 10-11 day battery life in real-world testing
- Comprehensive fitness tracking with over 100 workout modes
- Responsive performance and vibrant AMOLED display
- Limited third-party app support and proprietary strap attachment mechanism
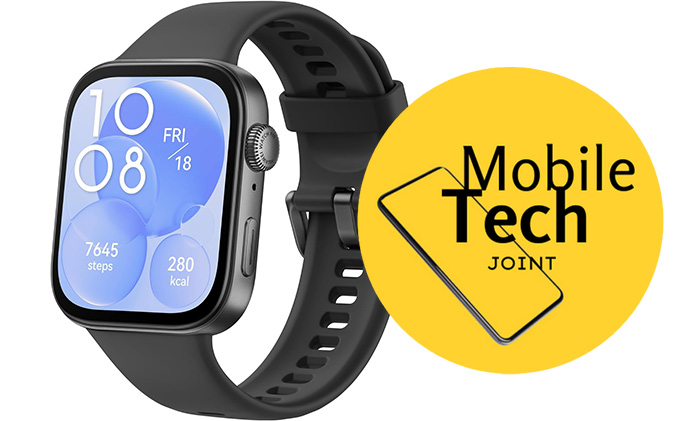
Huawei Watch Fit 3 Review
Huawei’s Watch Fit line has evolved from basic fitness trackers to a more premium, Apple Watch-inspired square design with the new Watch Fit 3. This smartwatch delivers excellent battery life, thorough fitness tracking, and an attractive build quality at a reasonable price, though its squarish design may not appeal to everyone.
Design and Hardware:
The Huawei Watch Fit 3 sports a flat, angular aluminum body that immediately gives off iPhone vibes. At just 9.9mm thick and 26g in weight, it’s remarkably slim and lightweight, making it comfortable to wear all day. The watch is available in various color and strap options, including fluoroelastomer, nylon, and leather, catering to different style preferences.
One unique aspect of the Watch Fit 3 is its proprietary strap attachment mechanism. While this may limit customization options initially, Huawei promises an accessory to use standard watch straps in the future. The mechanism itself is straightforward, allowing you to swap straps with a simple push, ensuring a secure fit.
Display:
The Huawei Watch Fit 3 features a 1.82-inch AMOLED display with a peak brightness of 1500 nits, ensuring visibility even in direct sunlight. The minimal bezels and 2.5D curved glass seamlessly blend into the frame, creating a sleek and modern look.
While the always-on display mode is available, it’s worth noting that it can significantly impact battery life, so you’ll need to weigh the convenience against the reduced battery longevity.
Software and Features:
Running on Huawei’s Harmony OS, the Watch Fit 3 offers a familiar user experience for those acquainted with the brand’s other smartwatches. The app icons and UI are consistent with previous models, making it easy to navigate for existing Huawei users.
Compatibility is a strong suit for the Watch Fit 3, as it can connect to both iOS and Android devices. However, Android users may need to sideload the companion app, as Huawei’s absence from the Play Store can make the setup process slightly more complicated.
While third-party app support is limited, the Watch Fit 3 shines when it comes to fitness tracking. With over 100 workout modes available, it caters to a wide range of activities, from running and cycling to weightlifting and yoga. Fitness enthusiasts will appreciate the additional features, such as fitness guides, an AI-powered running coach, and the ability to broadcast heart rate data to compatible fitness equipment.
Read: How to Clear App Cache on Samsung S23 +
Beyond exercise tracking, the Watch Fit 3 also offers comprehensive health monitoring capabilities. It can track sleep quality, blood oxygen levels (SpO2), and even provide insights into women’s health cycles.
Performance and Battery:
One of the standout features of the Huawei Watch Fit 3 is its exceptional battery life. In real-world testing, the watch consistently delivered 10-11 days of usage on a single charge, which is impressive for a smartwatch. This remarkable longevity can be attributed to the 400mAh battery and Huawei’s power-efficient software optimization.
Despite its focus on battery life, the Watch Fit 3 doesn’t sacrifice performance. The user interface is responsive, with smooth animations and quick app loading times. However, it’s worth noting that the watch uses a proprietary charging cable, which may be inconvenient for those who prefer universal charging solutions.
How to Buy:
If you’re interested in purchasing the Huawei Watch Fit 3, you can use our Amazon affiliate link to get yours today. The watch is available in multiple color and strap options, with pricing starting at £139/€159 for the base models and going up to £160/€179 for the Pearl White variant with a leather strap.
By now on Amazon: SHOP NOW
Conclusion
The Huawei Watch Fit 3 is a compelling choice for those seeking a smartwatch that excels in both style and functionality. Its sleek, premium design, elevated from previous Watch Fit models, is a refreshing change from the traditional circular watch face. While the squarish, Apple Watch-inspired looks may not appeal to everyone, the Watch Fit 3 more than makes up for it with its class-leading battery life, accurate fitness and health tracking capabilities, and responsive performance.
If you’re in the market for a smartwatch that can keep up with your active lifestyle while maintaining a stylish presence on your wrist, the Huawei Watch Fit 3 is definitely worth considering, especially given its attractive price point. Just be prepared to embrace the squarish design or look elsewhere if that’s a dealbreaker for you.
Follow Us on