Category: Tricks/Tips

Unlock your tech’s full potential with practical hacks and tips. From speeding up your devices to mastering hidden features, simplify your digital life with our expert guidance.

  • How I Turn on or Off Assistance Touch on my iPhone

    How I Turn on or Off Assistance Touch on my iPhone

    If you’ve ever wondered how to turn on or off Assistive Touch on your iPhone, this article is for you. Assistive Touch is a helpful accessibility feature that provides on-screen controls for those with difficulty using physical buttons or gestures. Whether you want to enable or disable this feature, the process is straightforward.

    How I Turn on or Off Assistance Touch on my iPhone
    How I Turn on or Off Assistance Touch on my iPhone

    What Is Assistive Touch and Why Use It?

    Assistive Touch is an accessibility feature on iPhones and other Apple devices. It allows users to perform common tasks like taking screenshots, opening the control center, or activating Siri without using physical buttons. This feature is especially useful if:

    • Your iPhone’s physical buttons are broken or unresponsive.
    • You find it difficult to perform gestures like swiping or pinching.
    • You prefer on-screen shortcuts for convenience.

    Whether you want to turn it on or off, follow the steps below to customize your iPhone experience.

    How I Turn on or Off Assistance Touch on my iPhone

    Follow the steps indicated below:

    • Unlock your iPhone and locate the Settings app. The icon looks like a gear. Tap it to open.
    • In the Settings menu, scroll down until you see Accessibility. This section contains various features to help customize your iPhone for ease of use. Tap on it.
    • Within the Accessibility menu, you’ll find the Touch option under the Physical and Motor section. Tap on it to access more touch-related features.
    • On the Touch menu, look for Assistive Touch. It will have a toggle switch next to it. Tap this option to open the Assistive Touch settings.
    • To enable assistive touch, toggle the switch to the right. You’ll see a small, circular button appear on your screen.
    • To disable assistive touch, toggle the switch back to the left. The on-screen button will disappear.

    That’s it! You’ve successfully turned Assistive Touch on or off.

    Customizing Assistive Touch

    Once Assistive Touch is enabled, you can customize its features to suit your needs. Here’s how:

    Custom Actions

    You can assign specific functions to single taps, double taps, long presses, or 3D Touch. For example:

    • Single Tap: Open the Control Center.
    • Double-tap: Lock the screen.
    • Long Press: Open Siri.
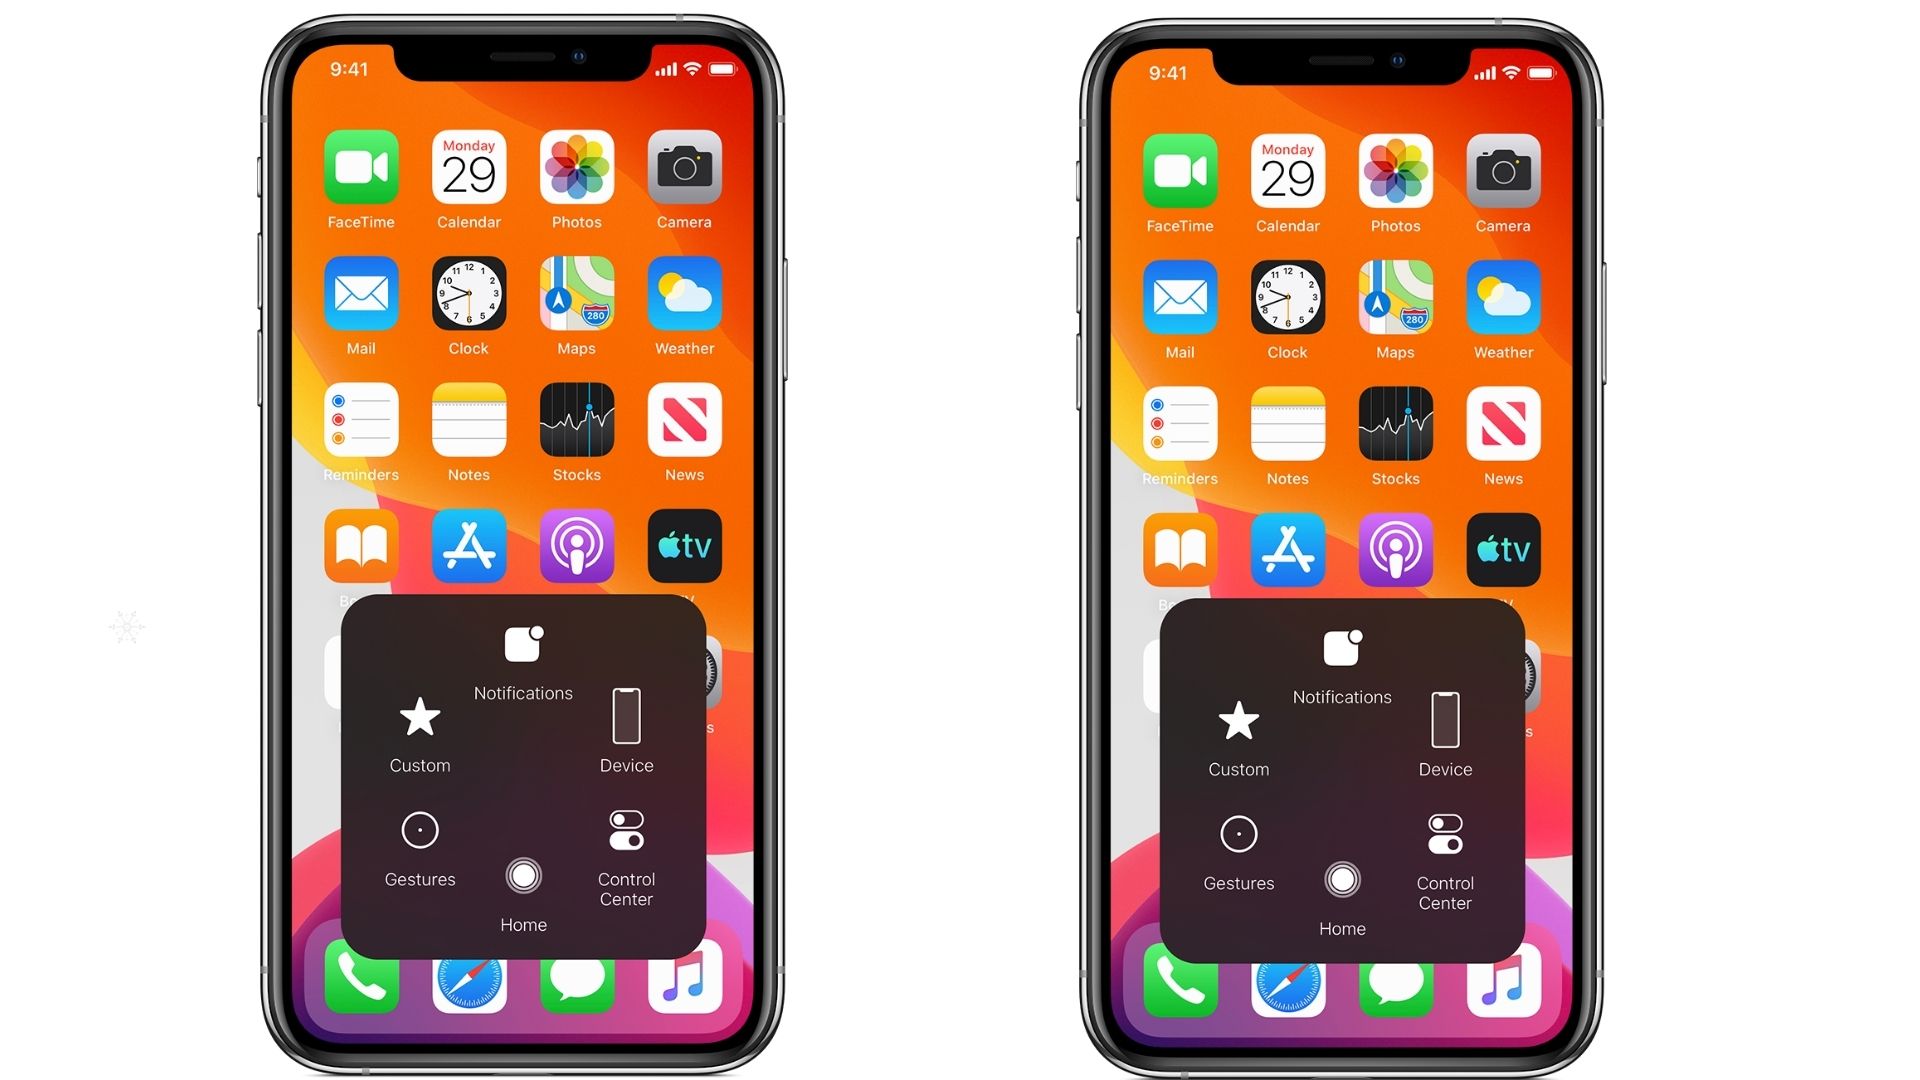
    Top-Level Menu

    Assistive Touch has a customizable menu with default options like Home, Siri, and Device. You can add or remove functions or rearrange the icons.

    Steps to customize the menu:
    • Go to Settings > Accessibility > Touch > Assistive Touch.
    • Tap Customize Top Level Menu.
    • Use the + or buttons to add or remove actions.

    Adjust Idle Opacity

    You can control how transparent the Assistive Touch button becomes when not in use. Lower opacity makes it less distracting.

    Steps to adjust opacity:
    • In the Assistive Touch menu, look for Idle Opacity.
    • Use the slider to adjust the transparency level.

    Frequently Asked Questions (FAQs)

    What is the assistive Touch button, and how does it work?

    The Assistive Touch button is a virtual on-screen control that lets you perform tasks like taking screenshots, locking the screen, or adjusting volume without using physical buttons.

    How do I get rid of the assistive touch button?

    To remove the button, turn off assistive touch by going to Settings > Accessibility > Touch > Assistive Touch and toggling it off.

    Can I use Assistive Touch to replace broken buttons?

    Yes, Assistive Touch is an excellent alternative if your Home button, volume buttons, or power button is not working.

    Is Assistive Touch available on all iPhones?

    Assistive Touch is available on all iPhones running iOS, including older models. Ensure your device has the latest iOS update for the best functionality.

    How can I reset Assistive Touch to default settings?

    To reset, go to Settings > Accessibility > Touch > Assistive Touch > Customize Top Level Menu and select Reset.

    Can I change the size of the Assistive Touch button?

    While you cannot change its size, you can adjust its transparency using the Idle Opacity setting.

    How do I take a screenshot using Assistive Touch?

    Once assistive touch is enabled, tap the button, go to Device, and select More > Screenshot.

    Final Thoughts

    Enabling or disabling Assistive Touch on your iPhone is quick and easy. Whether you’re using it as an accessibility feature or to replace faulty buttons, it offers a practical solution for many tasks. Customize it to fit your preferences and make your iPhone experience smoother.

    For a visual tutorial, kindly click on the link below:


    where we’ve broken down every step into simple, easy-to-follow instructions, by understanding how to manage Assistive Touch, you can unlock your iPhone’s full potential and enjoy a more personalized experience.

    More Related Content:

    How to Share a Calendar on iPhone

     Connect Samsung Galaxy Watch 5 Pro to Wi-Fi

    How to Turn Off App Notification on iPhone 15 Pro

  • How to Enable Adaptive Charging on Google Pixel

    How to Enable Adaptive Charging on Google Pixel

    If you’re looking for a way to maximize your Google Pixel’s battery life, enabling adaptive charging on Google Pixel is one of the best steps you can take. This feature helps extend the lifespan of your phone’s battery by optimizing how it charges overnight.

    Adaptive Charging on Google Pixel
    Adaptive Charging on Google Pixel

    With adaptive charging enabled, your Pixel learns your daily routine and charges intelligently, reaching 100% just before you wake up. This article explains how to enable Adaptive charging on Google Pixel in simple terms and ensures you’re making the most of this feature.

    What Is Adaptive Charging?

    Before diving into the steps, let’s understand what adaptive charging does and why it’s useful. Adaptive charging is a feature available on Pixel phones that slows down the charging process when your device is plugged in overnight. Instead of charging rapidly to 100%, it charges at a steady pace, aiming to reduce battery wear and overheating.

    Adaptive charging can help you keep your phone functioning well over time by preserving battery health and avoiding the need for expensive repairs or replacements.

    How to Enable Adaptive Charging on Google Pixel

    Here’s how you can turn on adaptive charging on your Google Pixel device:

    • Open the Settings app on your Google Pixel.
    • Scroll down and tap Battery.
    • Select adaptive preferences (sometimes labeled as adaptive charging).
    • Toggle the switch next to Adaptive Charging to turn it on.

    The Adaptive Charging feature works best when the phone has access to your daily alarm or wake-up time. To improve its accuracy, ensure you have set an alarm in the default Clock app.

    How to know if this feature is available on your Google pixel

    Adaptive charging is available on Google Pixel 4 and newer models running Android 12 or later. If your phone doesn’t support this feature, you might not see it in the settings. Ensure your device is updated to the latest software version:

    To check for updates on your device, follow these steps:

    • Open the Settings app on your device.
    • Scroll down and tap on System to access system-related options.
    • Within the System menu, look for and select System Update.

    Once in the System Update section, tap on the option to check for any available updates to ensure your device is running the latest software version.

    How to Know If Adaptive Charging Is Active

    Once Adaptive Charging is enabled, your Pixel will display a notification on the lock screen when it’s active. Look for a message that says, Adaptive Charging active. Full charge by (your alarm time).”

    If you don’t see this notification, ensure that:

    • Your phone is charging with an original or compatible charger.
    • You’ve set an alarm, or your typical wake-up time is consistent.
    • The feature is turned on in settings.

    Benefits of Adaptive Charging

    Enabling Adaptive Charging on your Google Pixel offers several advantages:

    • Extends Battery Lifespan: Reduces battery degradation over time.
    • Energy-Efficient Charging: Only charges as needed, saving energy.
    • Prevents Overheating: Slow charging helps keep your device cooler.
    • Convenient: Ensures your phone is fully charged and ready in the morning.

    Common Issues with adaptive charging and how to Troubleshoot

    Sometimes, users encounter problems with Adaptive Charging. Here are some tips to fix common issues:

    Feature Not Showing in Settings

    If you can’t find Adaptive Charging in the settings:

    • Ensure your phone is running the latest Android version.
    • Confirm that you have a compatible Google Pixel model.

    Notification Not Displayed

    If the notification doesn’t appear, check the following:

    • Use an original Google charger or a high-quality alternative.
    • Set an alarm or ensure your device has access to your daily routine.

    Adaptive Charging Doesn’t Work Consistently

    Make sure you’re plugging in your phone overnight for at least 4 hours and in an environment where your daily patterns are predictable.

    Frequently Asked Questions

    What is Adaptive Charging on Google Pixel?

    Adaptive Charging is a feature that optimizes the charging process to preserve your battery’s health by charging more slowly overnight and finishing just before you wake up.

    How do I enable Adaptive Charging?

    Go to Settings > Battery > Adaptive Preferences and toggle on Adaptive Charging. Ensure your phone is plugged in for at least 4 hours during your usual sleep hours.

    Does Adaptive Charging work on all Pixel phones?

    No, Adaptive Charging is available on Pixel 4 and newer models with Android 12 or later.

    Why is Adaptive Charging not working?

    Ensure your phone is plugged in overnight, using a compatible charger, and that you’ve set an alarm or have a consistent wake-up routine.

    Can Adaptive Charging be turned off?

    Yes, you can disable it by going to Settings > Battery > Adaptive Preferences and toggling off the feature.

    Does Adaptive Charging slow down regular charging?

    No, Adaptive Charging only slows down the charging process when it detects overnight charging. Regular charging remains unaffected.

    Is Adaptive Charging safe for my phone?

    Yes, it is designed to protect your battery and extend its lifespan, making it safer than standard charging methods over time.

    Final Thoughts

    Enabling Adaptive Charging on your Google Pixel is a simple yet powerful way to maintain your phone’s battery health and longevity. By following the steps outlined in this guide, you can make the most of this feature and ensure your device stays efficient for years to come.

    For more help, click on the link below for a detailed video guide, or refer back to this article for troubleshooting tips. Don’t forget to share this article with other Google Pixel users who might benefit from learning about Adaptive Charging!

    YouTube link:

    MORE RELATED CONTENT:

    I Tried the Google Pixelbook, and Its Display Is a Game-Changer for Creative Work

    Best Google Pixel 8 & 9 Phone Cases to Shop This Holiday

    How to Use Maps on Google Pixel Watch

    Google Pixel Buds Pro 2 Design and Comfort

  • How to Set up Siri on any iPhone

    How to Set up Siri on any iPhone

    Siri, Apple’s virtual assistant, can make your life much easier by performing tasks like sending messages, setting reminders, making calls, or even answering questions, all with voice commands. If you’re wondering how to set up Siri on any iPhone, this article will walk you through the entire process in simple, easy-to-follow steps.

    How to Setup Siri on any iPhone
    How to Setup Siri on any iPhone

    Whether you’re using an older iPhone model or the latest version, Siri can be set up in just a few minutes.

    What Is Siri and Why Should You Use It?

    Siri is Apple’s intelligent virtual assistant that allows you to interact with your iPhone using just your voice. Siri can:

    • Answer questions.
    • Send messages or make calls.
    • Set reminders, alarms, or timers.
    • Provide navigation instructions.
    • Control smart home devices.

    Setting up Siri enables hands-free convenience, making your iPhone even more useful in day-to-day life.

    How to Set up Siri on any iPhone

    Here’s a detailed guide to help you enable and customize Siri on your iPhone.

    Ensure Your iPhone Is Compatible

    Siri works on all modern iPhone models, from the iPhone 4S onward. Ensure that your iPhone is updated to the latest iOS version:

    • Go to Settings
    • Tap on General
    • Then select Software Update and check for updates.

    Activate Siri

    • Go to Settings > Siri & Search.

    Turn on these options:

    • Listen for “Hey Siri”: Enables hands-free Siri.
    • Press the Side/Home Button for Siri: Allows manual activation.
    • Allow Siri When Locked: Lets you use Siri even when your phone is locked.

    Set Up “Hey Siri”

    Train Siri to recognize your voice:

    • Tap Continue when prompted.
    • Follow on-screen instructions, such as saying “What’s the weather like today?”

    Choose Siri’s Language and Voice

    • Go to Settings > Siri & Search > Language to select your language.
    • Tap Siri Voice to choose gender and accent.

     Enable Siri Suggestions

    In Settings > Siri & Search, turn on:

    • Suggestions in Search
    • Suggestions in Look-Up
    • Suggestions on Lock Screen

    Link Siri to Third-Party Apps

    • In Settings > Siri & Search, find your desired app.
    • Toggle Use with Siri to enable voice commands.

    Test Siri

    Activate Siri by saying “Hey Siri” or pressing the Side/Home button. Try commands like:

    • “Call Mom.”
    • “What’s the weather tomorrow?”
    • “Set an alarm for 7 AM.”

    And that’s it! Siri is ready to assist you.

    Troubleshooting Siri Setup Issues

    If you encounter problems while setting up Siri, here are some tips to resolve them:

    “Hey Siri” Not Responding

    • Ensure Listen for “Hey Siri” is toggled on in settings.
    • Re-train Siri by turning the feature off and on again.

    Siri Doesn’t Recognize My Voice

    • Make sure you’re in a quiet environment during setup.
    • Use clear, natural speech when training Siri.

    Siri Not Available

    If Siri isn’t available:

    • Check your internet connection. Siri requires WiFi or cellular data to work.
    • Confirm that Siri is enabled in Settings > Siri & Search.

    Siri Doesn’t Work with Third-Party Apps

    • Check if the app supports Siri integration.
    • Enable the Use of Siri for the specific app in settings.

    Watch the Video Tutorial on MobileTechJoint

    Customizing Siri for a Better Experience

    Once Siri is set up, you can further personalize it to suit your needs:

    Add Shortcuts

    The Shortcuts app allows you to create custom Siri commands for specific tasks.

    • Open the Shortcuts
    • Tap the + icon to create a new shortcut.
    • Assign a Siri phrase to trigger the shortcut.

    Control Smart Home Devices

    If you have smart home devices compatible with Apple HomeKit, you can control them using Siri.

    • Set up your devices in the home app.
    • Use commands like “Hey Siri, turn off the lights.”

    Enable Accessibility Features

    Siri can help users with disabilities by performing actions hands-free. Explore accessibility options under Settings > Accessibility > Siri.

    Frequently Asked Questions

    What is Siri?

    Siri is Apple’s virtual assistant that uses voice recognition to perform tasks like sending messages, setting alarms, and answering questions.

    How do I enable Siri on my iPhone?

    Go to Settings > Siri & Search, and toggle on Listen for “Hey Siri” and Press the Side/Home Button for Siri.

    Why is Siri not responding to “Hey Siri”?

    Ensure the feature is enabled in settings and re-train Siri in a quiet environment if needed.

    Can I change Siri’s voice?

    Yes, you can customize Siri’s voice by going to Settings > Siri & Search > Siri Voice. Choose from different genders and accents.

    Does Siri work without the internet?

    Some basic functions, like setting alarms or launching apps, may work offline. However, most features require an internet connection.

    Can Siri control third-party apps?

    Yes, Siri supports integration with many third-party apps. Enable Use with Siri for each app in Settings > Siri & Search.

    How do I disable Siri?

    You can turn off Siri by going to Settings > Siri & Search and toggling off Listen for “Hey Siri” and Press Side/Home Button for Siri.

    Is Siri secure?

    Siri is designed with privacy in mind. Voice data is anonymized, and you can manage what Siri learns about you in Settings > Siri & Search > Siri History.

    Final Thoughts

    Setting up Siri on your iPhone is a simple and rewarding process that enhances your phone’s functionality. From hands-free convenience to smarter app integrations, Siri is an invaluable tool for iPhone users. Follow the steps in this article to get started and customize Siri to suit your needs.

    For additional help, watch the comprehensive video tutorial on YouTube by clicking the link below:


    Don’t forget to share this guide with friends and family who might find it helpful!

    MORE RELATED CONTENT:

    How to Setup Siri on iPhone 14 Plus

    I Thought the iPhone 16 Was a Letdown at First

    When Will Apple Release iOS 18 for Your iPhone: Expected Release Date of iOS 18

    Is Apple making an iPhone 16 Ultra? Here is Everything We Know

  • How to Turn on or off Safe Mode on Samsung Phone

    How to Turn on or off Safe Mode on Samsung Phone

    In this article, we’ll guide you through how to turn on or off Safe Mode on a Samsung phone in simple steps. Safe Mode on Samsung phones is a helpful feature for diagnosing and troubleshooting software issues.

    Turn on or off Safe Mode on Samsung Phone
    Turn on or off Safe Mode on Samsung Phone

    It temporarily disables third-party apps and runs only the default system apps, making it easier to identify whether a problem originates from an app or the phone’s operating system.

    How to Turn on Safe Mode on a Samsung Phone

    The easiest way to enter Safe Mode is by restarting your device. Follow these steps to activate Safe Mode on your Samsung phone:

    • Hold down the Power button until the Power Options menu appears.
    • In the power menu, tap and hold the Power Off option until a Safe Mode prompt appears.
    • Tap Safe Mode. Your phone will restart and boot into Safe Mode.

    How to Turn Off Safe Mode on a Samsung Phone

    Once you’ve finished troubleshooting, you can exit Safe Mode and return to normal operation. Here’s how:

    • Simply restart your phone by pressing and holding the Power button and selecting Restart.
    • Your device will reboot in normal mode with all apps re-enabled.

    Why Use Safe Mode on Samsung Phones?

    You may need to enable Safe Mode for several reasons:

    • Troubleshooting App Issues: If your phone crashes or lags after installing a new app, Safe Mode can help determine if the app is causing the problem.
    • Improving Performance Temporarily: When your phone feels sluggish, running it in Safe Mode may speed it up by disabling unnecessary apps.
    • Uninstalling Problematic Apps: Safe Mode allows you to uninstall apps that you cannot remove in normal mode due to crashes or interference.

    Watch Our Video Tutorial on YouTube

    For a step-by-step video guide on enabling and disabling Safe Mode, click on the link below.

    https://www.youtube.com/shorts/ffSfRF_01MY

    Our detailed tutorial simplifies the process and ensures you can troubleshoot your Samsung phone like a pro. Don’t forget to subscribe for more helpful tech tips and tricks!

    Frequently Asked Questions 

    What happens in Safe Mode?

    Safe Mode disables all third-party apps and services, allowing the phone to run only its essential software. It’s used for troubleshooting and diagnosing app-related issues.

    How do I know if my phone is in Safe Mode?

    When your Samsung phone is in Safe Mode, you’ll see the words “Safe Mode” in the lower-left corner of the screen.

    Can I use apps in Safe Mode?

    You can only use pre-installed system apps in Safe Mode. Third-party apps will be disabled.

    Will Safe Mode delete my data?

    No, Safe Mode does not delete any data, apps, or settings. It temporarily disables third-party apps until you exit Safe Mode.

    Why can’t I exit Safe Mode?

    If your phone keeps restarting in Safe Mode, there might be a persistent issue, such as a malfunctioning app or software glitch. Try uninstalling recently installed apps or performing a factory reset if necessary.

    Conclusion

    Safe Mode is an essential tool for diagnosing and fixing software issues on Samsung phones. Knowing how to turn on or off Safe Mode allows you to identify and resolve problems quickly. Whether you’re uninstalling a problematic app or troubleshooting performance issues, Safe Mode simplifies the process.

    For additional guidance, be sure to watch the tutorial on our MobileTechJoint YouTube channel. With these steps, you’ll have full control over Safe Mode on your Samsung phone. Stay tuned to MobileTechJoint for more expert tech tips!

    CHECK THESE OUT:

    Camera Maintenance Tips you Need to Know

    How to Connect Samsung Galaxy Watch 5 Pro to Wi-Fi

    Ways to Share a Calendar on iPhone

    How to Mirror your Phone Screen to TV

  • How to Turn On or Off Location on iPhone

    How to Turn On or Off Location on iPhone

    Managing your iPhone’s location settings is essential for convenience and privacy. Whether you’re sharing your location with friends, using GPS for navigation, or limiting apps’ access to your whereabouts, knowing how to turn on or off location on iPhone is a vital skill. In this article, we’ll walk you through step-by-step instructions to adjust your location settings easily.

    Turn On or Off Location on iPhone
    Turn On or Off Location on iPhone

    Turning on location services ensures apps that rely on GPS, such as Maps or ride-hailing services, function correctly. Here’s how you can enable it:

    • Unlock your iPhone and locate the Settings app. It’s the one with a gear icon.
    • Scroll down and tap on Privacy & Security.
    • Tap on Location Services at the top of the Privacy settings.
    • To turn the location on, flip the toggle switch at the top of the screen to green. This enables location services for your device.

    If you followed the detailed steps above, you have successfully turned on the location on your iPhone.

    How to Turn Off Location on iPhone

    If you’re concerned about privacy or want to conserve battery life, turning off location services is a quick process. Follow these steps:

    • Open the Settings app on your iPhone.
    • Scroll down and select Privacy & Security.
    • Tap Location Services.
    • Turn off location services by flipping the toggle to gray. This disables location services for all apps and system functions.

    Note: Some services like Find My iPhone will remain active even if location services are turned off. To disable these, navigate to Find My in settings.

    Why Manage Your iPhone’s Location Settings?

    Location settings on your iPhone allow apps and services to provide tailored experiences, such as real-time navigation, localized weather updates, or location-based reminders. However, leaving location services on all the time can drain your battery and potentially expose your private information. Managing these settings helps balance functionality and privacy.

    Adjusting Location Settings for Specific Apps

    If you don’t want to completely turn off location services, you can customize settings for individual apps. For example:

    • Follow steps 1–3 above to reach the Location Services menu.
    • Scroll through the list of apps and select the one you want to manage.
    • Choose an access level: Never, Ask Next Time, While Using the App, or Always.

    This granular control lets you strike a balance between functionality and privacy.

    Watch Our Video Tutorial on Youtube

    For a visual tutorial on how to manage location settings, click the link below:
    Our step-by-step tutorial will guide you through enabling or disabling location services on your iPhone with ease. Subscribe for more tech tips and tricks for iPhone users!

    FAQs About iPhone Location Settings

    Why can’t I turn off location services for some apps?

    Some apps, like Find My iPhone, require location services to function. These settings are critical for features like device recovery and cannot be fully disabled without turning off the service.

    How do I enable precise location for an app?

    Go to Settings > Privacy & Security > Location Services, select the app, and toggle on Precise Location.

    Will turning off location services affect app functionality?

    Yes, some apps may not work as intended without location access. For instance, navigation apps need GPS to provide accurate directions.

    Can I temporarily turn off location services?

    Yes, you can toggle off location services and turn them back on whenever needed. Use the steps outlined above to enable or disable them quickly.

    How do I check which apps are using my location?

    When location services are active, a small arrow icon appears in the status bar. You can also review location usage by going to Settings > Privacy & Security > Location Services.

    CHECK THESE OUT:

    How to Cast Your Phone to TV

    6 Ways to Cast From Phone to TV Without Hassle

    How to Sync Gimbals with Smartphones

    Top Tricks for Shooting Cinematic Videos

  • How to Cast Your Phone to TV

    How to Cast Your Phone to TV

    Casting your phone to a TV is an easy and convenient way to enjoy your favorite content on a larger screen. Whether you’re streaming movies, sharing vacation photos, or delivering presentations, the process is straightforward and versatile. This guide breaks down everything you need to know about casting your phone to a TV, ensuring a smooth and enjoyable experience.

    How to Cast Your Phone to TV

    Key Takeaways

    Feature Details
    Compatibility Works with Android, iOS, Smart TVs, Chromecast, Miracast, and AirPlay.
    Network Requirements Requires both devices to be on the same Wi-Fi network.
    Popular Methods Chromecast, AirPlay, built-in Smart TV features like Miracast or DLNA.
    Benefits Convenient, wireless, supports high-quality streaming and multitasking.
    Common Issues Connectivity, app incompatibility, or outdated firmware.

    Prerequisites for Casting

    Compatible Devices

    To cast content, your smartphone and TV must support compatible technologies. Android phones can use Chromecast or Miracast, while iPhones rely on AirPlay. Smart TVs often have built-in casting features, such as DLNA or proprietary apps like Samsung Smart View. Ensure your devices meet these requirements:

    • Android Phones: Version 5.0 or later supports Chromecast and Miracast.
    • iPhones: Requires iOS 12 or later for AirPlay compatibility.
    • Smart TVs: Popular brands like LG, Samsung, and Sony support DLNA or proprietary casting solutions.

    Network Requirements

    For seamless casting:

    1. Same Wi-Fi Network: Both your phone and TV must connect to the same network.
    2. Strong Signal Strength: Ensure the Wi-Fi has adequate bandwidth for smooth streaming.
    3. Secure Connection: Avoid public networks for optimal privacy and speed.

    Methods to Cast to TV from Phone

    Using Google Chromecast

    Chromecast is one of the easiest and most popular ways to cast content from your phone to a TV. Here’s how:

    1. Plug the Chromecast device into your TV’s HDMI port.
    2. Connect the Chromecast to your home Wi-Fi network using the Google Home app.
    3. Open a Chromecast-enabled app like YouTube or Netflix.
    4. Tap the Cast icon in the app and select your Chromecast device.

    Benefits of Chromecast:

    • Supports 4K streaming.
    • Works with a wide range of apps.
    • Screen mirroring for non-supported apps.

    Using AirPlay for iPhones

    AirPlay allows iPhone users to cast to Apple TV or compatible devices like Roku. Follow these steps:

    1. Ensure both devices are on the same Wi-Fi network.
    2. Swipe down from the top-right corner of your iPhone screen to access the Control Center.
    3. Tap Screen Mirroring and select your Apple TV or compatible device.

    Pro Tip: AirPlay supports multitasking, so you can browse or use other apps while casting.

    Using Built-In Smart TV Features

    Most Smart TVs support casting without the need for additional hardware.

    1. Enable casting or screen mirroring on your TV (e.g., Miracast, DLNA).
    2. Open the casting feature on your phone (Settings > Display > Cast).
    3. Select your TV from the list of available devices.

    Common Issues:

    • App Incompatibility: Not all apps support native casting.
    • Lag or Delays: Check Wi-Fi strength and device compatibility.

    Benefits of Casting Over Other Methods

    Casting is often preferred over alternatives like HDMI cables or USB drives for its wireless convenience and versatility.

    • No Wires Needed: Frees up ports and reduces clutter.
    • High Quality: Supports resolutions up to 4K UHD.
    • Multitasking: Continue using your phone while casting content.
    • Wide Compatibility: Works across various platforms and devices.

    Common Issues and Solutions

    Issue Solution
    No Devices Found Check Wi-Fi connection and ensure both devices are on the same network.
    Laggy Playback Reduce network congestion and move closer to the Wi-Fi router.
    App Not Casting Update the app or switch to screen mirroring mode.
    TV Not Compatible Use an external casting device like Chromecast or a third-party adapter.

    Conclusion

    Casting your phone to your TV is a simple and effective way to enhance your viewing experience. Whether you’re streaming a blockbuster movie, sharing vacation memories, or presenting a project, the versatility and ease of this technology make it a must-have skill. With multiple options like Chromecast, AirPlay, and built-in TV features, you’ll never run out of ways to enjoy your phone’s content on the big screen.

    So, why wait? Start casting today and unlock the full potential of your devices.

    Also Check:

  • 6 Ways to Cast From Phone to TV Without Hassle

    6 Ways to Cast From Phone to TV Without Hassle

    Casting your phone to your TV has become a popular way to enjoy videos, photos, and apps on a larger screen. Whether you want to stream a movie, share photos with friends, or display presentations, the right casting method can make the process seamless and enjoyable.

    6 Ways to Cast From Phone to TV Without Hassle

    In this guide, we’ll explore six of the best methods to cast from phone to TV without hassle, covering both wired and wireless options. With the right setup, you can enjoy a cinematic experience right from your smartphone.

    Key Takeaways: Methods to Cast From Phone to TV

    Method Ease of Use Device Compatibility Internet Requirement
    Built-in Smart TV Casting Very Easy New Smart TVs Yes
    Chromecast Easy Android & iOS Yes
    Miracast Moderate Limited to Miracast TVs No
    HDMI/MHL Cable Easy Most TVs with HDMI ports No
    Roku/Fire Stick Easy Universal Support Yes
    DLNA Apps Moderate Android & DLNA-enabled TVs No

    The appeal of casting lies in its convenience and versatility. Instead of being limited to a small screen, casting allows you to:

    • Enhance viewing experiences with larger displays and superior sound quality.
    • Eliminate the need for external storage devices by streaming directly from your phone.
    • Enjoy a clutter-free setup without relying on complex cables.

    According to a 2023 report by Statista57% of U.S. households use screen mirroring technology at least once a week. With more devices supporting casting, it’s becoming easier to connect without specialized technical skills.

    Preparation Checklist

    Before you start, ensure you’re ready with the following:

    1. Compatible Devices: Check that both your phone and TV support casting technologies.
    2. Wi-Fi Network: A stable connection is vital for wireless methods.
    3. Required Apps or Hardware: Install apps like Google Home or connect external devices like Chromecast.
    4. Updated Software: Ensure both your TV and phone have the latest software updates to avoid compatibility issues.

    Methods to Cast From Phone to TV Without Hassle

    1. Using Built-in Smart TV Casting

    Many smart TVs come with built-in casting features like Google Cast or AirPlay. Here’s how you can use them:

    • Android Phones: Use the “Cast” option in your Quick Settings menu.
    • iPhones: Access AirPlay by swiping down on your Control Center.
    • Supported brands like Samsung, LG, and Sony make it effortless to connect.

    Benefits:

    • No need for extra hardware.
    • Direct integration with popular apps like YouTube and Netflix.

    Limitations:

    • Requires a Wi-Fi connection.
    • Older TVs may lack support.

    2. Chromecast Method

    Chromecast is a reliable choice for users who want high-quality streaming.

    Setup Steps:

    1. Plug the Chromecast device into your TV’s HDMI port.
    2. Use the Google Home app to set up the connection.
    3. Tap the “Cast” icon in supported apps to start streaming.

    Why Choose Chromecast?
    Chromecast supports 4K content, integrates with Google Assistant, and is compatible with both Android and iOS devices. According to TechRadar, Chromecast remains one of the top-rated casting devices in 2024 for its ease of use.

    3. Using Miracast

    Miracast allows direct wireless connections without requiring Wi-Fi. It acts like a wireless HDMI cable, streaming your phone’s screen to the TV.

    Steps:

    1. Check if your TV supports Miracast.
    2. On your phone, select “Wireless Display” from the Settings menu.
    3. Choose your TV from the list of available devices.

    Advantages:

    • Works without the internet.
    • Ideal for offline content like photos and videos.

    Drawbacks:

    • Limited to devices that support Miracast.
    • May experience lag during streaming.

    4. HDMI or MHL Cable Connection

    For those with older TVs or no Wi-Fi access, a wired connection is a foolproof option.

    • Use an HDMI adapter to connect your phone to the TV.
    • Some Android phones support MHL (Mobile High-Definition Link) for a similar purpose.

    Why Use Cables?
    Wired connections ensure zero lag and offer the best resolution. They’re perfect for gaming or high-definition movies. However, you’ll need to keep your phone close to the TV during use.

    5. Streaming Devices Like Roku or Fire Stick

    Both Roku Streaming Stick and Amazon Fire Stick offer robust casting options.

    • With Roku, use the Roku app to mirror your screen.
    • On Fire Stick, enable “Display Mirroring” under the Settings menu.

    Advantages:

    • Compatible with almost all phones and TVs.
    • Offers additional apps and features beyond casting.

    Fun Fact: According to CNET, Fire Stick users stream 7 hours of content per week on average.

    6. DLNA Apps

    If you want to cast offline content, DLNA-based apps like AllCast or Plex can help.

    • Download a DLNA app on your phone.
    • Connect to your TV over the same network.

    Why Choose DLNA?
    These apps are ideal for streaming locally stored media, such as downloaded movies or personal photos.

    Troubleshooting Common Casting Issues

    • No Signal Detected: Restart your TV and phone.
    • Laggy Streams: Switch to a 5GHz Wi-Fi band or lower streaming quality.
    • Audio Issues: Check your TV’s sound settings and enable HDMI audio output if applicable.

    Conclusion

    Casting your phone to a TV is simpler than ever with the options available today. Whether you prefer the convenience of wireless solutions like Chromecast or the reliability of cable connections, there’s a method for every need. Explore these top 6 methods to cast from your phone to TV without hassle and transform your viewing experience.

    What’s your favorite method? Share your thoughts in the comments below.

    Also Check:

    How to Download and Use the Chromecast App for Seamless Streaming

    Best Google Home Devices for Security, Entertainment, and More

    The Best Streaming Device for Your TV

    Chromecast Not Working: Why Is My Chromecast Not Working, How to Fix It

    Is Chromecast with Google TV Worth It? Everything You Need to Know

  • How to Sync Gimbals with Smartphones

    How to Sync Gimbals with Smartphones

    Gimbals have become an essential tool for content creators, videographers, and even casual smartphone users who want smooth, professional-quality videos. However, many people struggle with setting them up. Knowing how to sync gimbals with smartphones is crucial to unlocking their full potential and ensuring a seamless shooting experience.

    How to Sync Gimbals with Smartphones
    How to Sync Gimbals with Smartphones

    This detailed blog post will walk you through the process, discuss common issues, and provide tips for maximizing your gimbal performance.

    What Is a Gimbal and Why Syncing Matters?

    A gimbal is a device that stabilizes your camera or smartphone, eliminating unwanted shakes and movements. Modern gimbals come with advanced features such as app integration, face tracking, and programmable movements. These features often rely on syncing your smartphone with the gimbal, usually via Bluetooth and a companion app.

    Proper synchronization ensures:

    • Access to all smart features, like tracking and timelapse.
    • Reliable communication between the device and your smartphone.
    • A smoother user experience with fewer technical issues.

    Preparing to Sync Your Gimbal with a Smartphone

    Before syncing your gimbal with your smartphone, there are a few steps to prepare for a successful setup:

    Charge Your Devices:

    • Ensure both the gimbal and smartphone are fully charged to avoid interruptions during the process.

    Install the Manufacturer’s App:

    • Download the official app associated with your gimbal model (e.g., DJI Mimo, Zhiyun Play, or Hohem Pro). These apps are available on the Apple App Store or Google Play Store.

    Enable Bluetooth:

    • Turn on Bluetooth on your smartphone, as most gimbals use this connection method.

    Check Compatibility:

    • Verify that your gimbal is compatible with your smartphone model and operating system.

    Update Firmware:

    • Make sure your gimbal’s firmware is up to date. This can often be done through the companion app.

    How to Sync Gimbals with Smartphones

    Step 1: Turn on the Gimbal

    Power up your gimbal by pressing and holding its power button. Some models may require you to press it twice quickly. Wait until the device is stable and ready for pairing.

    Step 2: Launch the Gimbal App

    Open the app associated with your gimbal. For example:

    • DJI Osmo Mobile: Use the DJI Mimo app.
    • Zhiyun Smooth Q3: Use the ZY Play app.
    • Hohem iSteady X: Use the Hohem Pro app.

    Upon opening, the app may prompt you to sign in or create an account. Follow the on-screen instructions to complete this step.

    Step 3: Activate Bluetooth Pairing Mode

    Most gimbals automatically enter pairing mode when turned on, but if yours doesn’t:

    • Look for a dedicated Bluetooth or pairing button on the gimbal.
    • Press and hold it until an indicator light starts blinking.

    Step 4: Pair Your Smartphone with the Gimbal

    • Within the gimbal app, locate the pairing option. This is usually labeled as “Connect Device” or “Pair Gimbal.”
    • A list of available devices will appear. Select your gimbal’s name or model number.
    • Wait for the app to confirm the pairing. You may hear a beep or see a confirmation message.

    Step 5: Calibrate the Gimbal

    Once synced, most apps will prompt you to calibrate the gimbal. Calibration ensures that the motors function properly and that the smartphone remains stable.

    Common Calibration Steps:
    • Place the gimbal on a flat surface.
    • Follow the on-screen instructions to adjust tilt, roll, and pan settings.
    • Save the settings once calibration is complete.

    Step 6: Test the Connection

    After syncing, test the connection by using the app to control the gimbal. Try these functions:

    • Adjust the angle using the joystick.
    • Enable object tracking or face tracking.
    • Start and stop video recording via the app.

    Troubleshooting Common Syncing Issues

    While syncing is generally straightforward, you may encounter some issues. Here are solutions to common problems:

     Gimbal Not Showing in Bluetooth List

    • Solution: Turn off and restart both devices. Ensure the gimbal is in pairing mode. Move closer to the gimbal to ensure the signal is strong.

     Connection Drops Frequently

    • Solution: Check for Bluetooth interference from nearby devices. Ensure both the smartphone and gimbal have enough battery.

     App Fails to Recognize Gimbal

    • Solution: Reinstall the app or check for updates. Verify the app permissions to ensure Bluetooth access is enabled.

     Firmware Update Fails

    • Solution: Use a stable Wi-Fi connection to update the firmware. Avoid turning off the gimbal or smartphone during the process.

    Maximizing the Performance of Your Synced Gimbal

    Once your gimbal is successfully synced with your smartphone, you can unlock its full potential by exploring advanced features and settings.

    Enable Face and Object Tracking

    Use the app to enable tracking modes, which allow the gimbal to automatically follow a person or object. This feature is excellent for vlogging and action shots.

    Explore Shooting Modes

    Many gimbal apps offer various shooting modes, such as:

    • Panorama: Automatically stitch multiple shots together.
    • Motion Timelapse: Capture timelapse videos with dynamic movement.
    • Slow Motion: Record stabilized slow-motion videos.

    Customize Joystick Settings

    Adjust the speed and sensitivity of the gimbal’s joystick in the app for better control.

    Program Motion Paths

    Some gimbals allow you to set pre-programmed movement paths. This is particularly useful for cinematic shots and timelapses.

    Balance the Smartphone

    Always balance your smartphone on the gimbal before use. A well-balanced device reduces strain on the motors and improves stabilization.

    Maintenance Tips for Long-Term Performance

    • Clean the Gimbal: Use a soft cloth to wipe the gimbal, especially around the motors, to prevent dust buildup.
    • Store Properly: Use the provided case or a padded bag to protect the gimbal during travel.
    • Charge Regularly: Avoid letting the battery drain completely to prolong its lifespan.
    • Update Firmware: Regular updates ensure optimal performance and access to new features.

    Recommended Gimbals for Smartphones

    If you’re in the market for a new gimbal, here are some top-rated options for 2024:

    DJI Osmo Mobile 6

    • Compact and easy to use.
    • Features intelligent tracking and advanced stabilization.

    Zhiyun Smooth 5

    • Professional-grade stabilization.
    • Offers versatile shooting modes and robust build quality.

    Hohem iSteady X2

    • Affordable and lightweight.
    • Perfect for beginners with intuitive controls.

    Moza Mini-MX2

    • Compact design with powerful stabilization.
    • Great for travel and vlogging.

    Conclusion

    Learning how to sync gimbals with smartphones is an essential step for anyone looking to enhance their videography or photography. By following the steps outlined in this article, you can ensure a smooth connection and unlock advanced features to elevate your content.

    Whether you’re a beginner or a seasoned professional, the right gimbal, paired correctly with your smartphone, can make all the difference in achieving smooth, cinematic shots. Happy filming!

    CHECK THESE OUT:

    How to use your Gimbal Like a Pro

    Why the Best Gimbals for Smartphones Are My Go-To After Ditching Selfie Sticks

    Which Gimbal is Best for Mirrorless Camera

    Which Gimbal is Best for S23 Ultra

    Elevate Your Mobile Filmmaking with the AOCHUAN Smart XE 3-Axis Smartphone Foldable Gimbal

  • How to use your Gimbal Like a Pro

    How to use your Gimbal Like a Pro

    Gimbals have completely changed the way we record videos by providing fluid, dramatic footage that was previously only achievable with top-tier gear. Whether you’re a content creator, a videographer, or just someone who loves shooting videos, mastering your gimbal can take your video quality to the next level. This article will teach you how to use your gimbal like a pro.

    How to Use Your Gimbal Like a Pro
    How to Use Your Gimbal Like a Pro

    What is a Gimbal?

    A gimbal is a stabilizing device that keeps your camera or smartphone steady while shooting video. It uses motors and sensors to minimize unwanted movements, such as shaking hands or sudden jerks, ensuring that your footage is smooth and professional-looking.

    There are two main types of gimbals:

    • Handheld Gimbals: For cameras or smartphones, ideal for vloggers and filmmakers.
    • Wearable or mounted gimbals: designed for drones or action cameras, great for adventurous shoots.

    How to Use Your Gimbal Like a Pro

    Understand Your Gimbal

    Before you start shooting, take time to understand the gimbal’s structure and functions. Most gimbals have the following components:

    • Motors: Usually three motors control the tilt, roll, and pan axes.
    • Joystick/Buttons: For manual adjustments and switching modes.
    • Battery: Powers the device.
    • Mount: Where your camera or smartphone is secured.

    Charge Your Gimbal

    Ensure your gimbal is fully charged. A low battery can cause the gimbal to malfunction during recording.

    Balance Your Camera

    Balancing is crucial to get smooth footage and prolong battery life. Here’s how to do it:

    • Step 1: Attach your camera or phone securely.
    • Step 2: Adjust the arms and clamps until your device stays level without the gimbal being powered on.
    • Step 3: Lock everything in place to avoid rebalancing during use.

    Pro Tip: Rebalance whenever you change lenses or accessories on your camera.

    Basic Gimbal Movements

    To use your gimbal like a pro, you need to master basic movements:

    Pan

    • What It Is: A horizontal sweep of the camera.
    • How to Do It: Rotate the gimbal slowly left or right. This creates a cinematic effect, perfect for revealing landscapes or following a subject.

    Tilt

    • What It Is: Moving the camera up or down.
    • How to Do It: Use the joystick or gimbal controls to direct the camera for dramatic upward or downward shots.

    Roll

    • What It Is: Rotating the camera along its axis.
    • How to Do It: Use the roll function to add dynamic motion, such as for creative angles or transitions.

    Tracking

    Most modern gimbals have a tracking mode, where the gimbal follows a subject. Use this for:

    • Walking shots
    • Active scenes, such as sports or dancing

    Mastering Gimbal Modes

    Modern gimbals come with various modes tailored for different shooting styles. Learning these will drastically improve your skills:

    Follow Mode

    • The gimbal follows your hand movements for smooth pan and tilt motions.
    • Best for: walking shots, vlogging, or tracking a subject.

    Lock Mode

    • Keeps the camera locked in one direction, regardless of how you move the gimbal.
    • Best for: interviews or when you need steady framing.

    POV Mode (Point of View)

    • Moves the camera to mimic your perspective.
    • Best for: immersive action shots.

    Inception Mode

    • Rotates the camera in a full 360-degree spin.
    • Best for: creative transitions or dramatic effects.

    Sport Mode

    • Reacts quickly to rapid movements.
    • Best for: sports, action scenes, or fast-paced events.

    Advanced Gimbal Techniques

    Once you’re comfortable with basic operations, try these advanced techniques to elevate your footage:

    The Crane Shot

    • Simulate a crane by starting low and smoothly raising the gimbal upward.
    • Perfect for: revealing a subject or transitioning between scenes.

    The Orbit Shot

    • Move in a circular motion around your subject, keeping it centered.
    • Perfect for: Highlighting a person or object in dynamic environments.

    The Dolly Zoom

    • Combine zooming in with physically moving the gimbal backward (or vice versa).
    • Creates a dramatic background compression effect.

    Walking Shots

    • Use the “ninja walk” technique: bend your knees slightly and walk heel-to-toe to minimize shaking.
    • Pair this with Follow Mode for smooth results.

    Low-Angle Shots

    • Invert your gimbal to capture ground-level perspectives.
    • Great for: tracking feet or adding a unique viewpoint.

    Tips for Shooting Like a Pro

    • Plan Your Shots: Storyboard your sequence and determine which movements and angles you’ll use.
    • Use Slow Movements: Slow and steady motions look more cinematic than fast, jerky ones.
    • Experiment with Angles: Don’t stick to eye level. Use high, low, and diagonal angles for variety.
    • Sync with Music: Match your gimbal movements with the rhythm of your soundtrack for a more engaging video.
    • Incorporate Manual Controls: Learn to combine gimbal automation with manual focus and zoom for added creativity.

    Common Mistakes to Avoid

    Even pros make mistakes. Avoid these common pitfalls:

    • Skipping Balancing: An unbalanced gimbal leads to poor stabilization and drains the battery.
    • Overusing Gimbal Effects: Too many transitions and rotations can overwhelm viewers.
    • Relying Only on Gimbal: While gimbals stabilize footage, good framing and lighting are equally important.
    • Ignoring the Environment: Be mindful of obstacles, lighting, and weather conditions while shooting.

    Editing Tips for Gimbal Footage

    Once you’ve captured your footage, enhance it during editing.

    • Stabilize Further (if needed): Use software like Adobe Premiere or Final Cut Pro to refine shaky clips.
    • Add Speed Ramps: Slow down or speed up certain parts of your clip for dramatic effect.
    • Color Grade: Match your video’s tone with professional color grading.

    Maintaining Your Gimbal

    A well-maintained gimbal ensures consistent performance. Follow these tips:

    • Clean Regularly: Wipe down with a soft cloth to remove dust and debris.
    • Store Properly: Use a protective case to prevent damage.
    • Update Firmware: Check for software updates for optimal functionality.
    • Check Balancing: Over time, recheck balance to avoid motor strain.

    Choosing the Right Gimbal

    If you’re still deciding on a gimbal, here are some factors to consider:

    • Payload capacity: Match it with your camera’s weight.
    • Battery Life: Ensure it lasts for the duration of your shoots.
    • Portability: Compact gimbals are ideal for travel.
    • Features: Look for modes and functions that align with your needs.

    Popular gimbals to explore:

    • DJI Osmo Mobile (for smartphones)
    • Zhiyun Crane Series (for cameras)
    • FeiyuTech Gimbals (for versatile use)

    Conclusion

    Using a gimbal like a pro takes practice, patience, and creativity. Start with the basics of balancing, understanding modes, and practicing smooth movements. Gradually incorporate advanced techniques and editing skills to create truly cinematic footage. Whether you’re shooting a travel vlog, a wedding, or an action sequence, a gimbal can be your best ally for professional-quality videos.

    By following the tips in this guide, you’ll soon transform your videos into captivating visual stories that stand out. Happy filming!

    CHECK THESE OUT:

    Why the Best Gimbals for Smartphones Are My Go-To After Ditching Selfie Sticks

    Which Gimbal is Best for a Mirrorless Camera?

    Which Gimbal is Best for S23 Ultra?

    AOCHUAN Smart XE 3-Axis Smartphone Foldable Gimbal

  • Smart Photography Tips for Better Results

    Smart Photography Tips for Better Results

    Photography is an incredible way to capture memories, tell stories, and express creativity. With the right techniques and tools, anyone can take stunning photos, regardless of their experience level or the equipment they use. By learning smart photography tips for better results, you can elevate your skills, improve the quality of your images, and impress your audience.

    Smart Photography Tips for Better Results
    Smart Photography Tips

    From mastering lighting to understanding composition and editing, this article covers everything you need to know.

    Why Smart Photography Tips Matter

    Whether you’re a hobbyist or an aspiring professional, applying smart techniques can significantly enhance your photography. Modern cameras and smartphones are powerful, but great photos rely on a combination of creativity, technical know-how, and smart practices. With these tips, you’ll learn to make the most of your gear and take consistently impressive pictures.

    Smart Photography Tips for Better Results

    Master Composition

    Composition refers to how elements are arranged in your photo. Thoughtful composition is key to creating visually appealing images.

    • Rule of Thirds: Divide your frame into nine equal sections using two horizontal and two vertical lines. Position your subject along these lines or intersections for balance.
    • Leading Lines: Use natural lines (roads, fences, rivers) to guide the viewer’s eye toward your subject.
    • Framing: Surround your subject with elements like windows, arches, or tree branches to create a natural frame.
    • Negative Space: Leave space around your subject to draw more attention to it.

    Pay Attention to Lighting

    Lighting can make or break a photo. Learning to use light effectively is one of the smartest ways to improve your photography.

    • Golden Hour: Shoot during the golden hour (early morning or late afternoon) for soft, warm lighting.
    • Avoid Harsh Light: Midday sun can create unflattering shadows; seek shade or use diffusers to soften the light.
    • Backlighting: Shoot against the light source for dramatic silhouettes or halo effects.
    • Artificial Lighting: Experiment with lamps, LEDs, or flash for indoor photography. Use a softbox or bounce light for even, flattering illumination.

    Use Your Camera Settings Wisely

    Knowing how to adjust your camera settings can dramatically improve your photos.

    • ISO: Keep ISO low (e.g., 100-200) for bright conditions to avoid grainy images. Increase it in low-light situations, but be cautious of noise.
    • Aperture (f-stop): Use a wide aperture (f/1.8 to f/4) for shallow depth of field and blurry backgrounds. A smaller aperture (f/8 to f/16) keeps more of the scene in focus.
    • Shutter Speed: Use a fast shutter speed for action shots and slower speeds for low light or creative effects like motion blur.
    • White Balance: Adjust for different lighting conditions to ensure accurate colors.

    Focus on the Details

    Paying attention to small details can make your photos stand out.

    • Clean Your Lens: Dust or smudges can ruin your image clarity.
    • Eliminate Distractions: Look for cluttered backgrounds or objects that draw attention away from your subject.
    • Check Edges: Ensure that nothing unwanted is sticking into your frame, like tree branches or random objects.

    Experiment with Perspectives

    Changing your perspective can add creativity and interest to your shots.

    • Low Angle: Shoot from below to make your subject appear larger or more dramatic.
    • High Angle: Capture from above for a unique viewpoint, especially in flat-lay photography.
    • Close-Ups: Zoom in on textures or patterns to create abstract or detailed shots.
    • Wide Shots: Step back and include more of the environment for storytelling.

    Take Advantage of Your Smartphone

    Modern smartphones are equipped with excellent cameras. Here’s how to maximize their potential:

    • Use Pro Mode: Many smartphones have manual settings for ISO, shutter speed, and white balance.
    • HDR Mode: High Dynamic Range (HDR) mode helps capture details in both shadows and highlights.
    • Portrait Mode: This mode creates a blurred background (bokeh) for professional-looking portraits.
    • External Lenses: Attach wide-angle, macro, or telephoto lenses for creative effects.

    Post-Processing for Perfect Results

    Editing can enhance your photos and correct any flaws.

    • Cropping and Straightening: Remove unnecessary elements and align the horizon.
    • Adjust Brightness and Contrast: Make the image pop by tweaking light and dark areas.
    • Color Grading: Enhance or change the mood with filters or adjustments to hue and saturation.
    • Remove Blemishes: Use tools like the healing brush to remove spots, dust, or unwanted objects.

    Recommended apps and software:

    • For beginners: Snapseed, Lightroom Mobile, or VSCO.
    • For professionals: Adobe Photoshop and Adobe Lightroom.

    Practice Consistency

    Consistency in your style makes your photography recognizable and professional.

    • Develop a Signature Look: Use similar color tones, compositions, or subjects.
    • Plan Themes: Create collections around specific themes, like nature, architecture, or portraits.

    Learn to Tell a Story

    A good photo often tells a story or evokes emotion.

    • Focus on Emotion: capture expressions, movements, or interactions.
    • Sequence Shots: Take a series of photos that build a narrative, such as a walk through a market or a sunset turning into night.
    • Use Props: Props can add context or drama to your story.

    Practice, Practice, Practice

    The more you shoot, the better you get. Dedicate time to improving specific skills:

    • Join Challenges: Participate in online photography challenges to push your creativity.
    • Analyze Your Work: Review your photos to identify strengths and areas for improvement.
    • Experiment with New Gear: Try out different lenses, tripods, or drones to expand your capabilities.

    Common Mistakes to Avoid

    • Overediting: Avoid making your photos look unnatural with excessive filters or adjustments.
    • Ignoring Composition: Even minor adjustments to framing can drastically improve your image.
    • Not Backing Up Photos: Always save your work on external drives or cloud storage to prevent loss.
    • Over-relying on Auto Mode: Learn manual settings for greater creative control.

    Frequently Asked Questions 

    What is the best time of day to take photos?

    The golden hour shortly after sunrise and before sunset is ideal for photography. The light is soft, warm, and flattering during these times.

    Can I take professional-quality photos with a smartphone?

    Yes! Modern smartphones offer excellent cameras. Use Pro mode, external lenses, and editing apps to enhance your results.

    What’s the easiest way to improve my photography skills?

    Start by mastering composition and lighting. Practice regularly, experiment with different perspectives, and learn basic editing techniques.

    Do I need expensive equipment to take great photos?

    Not at all. While high-end gear offers advantages, creativity, and smart techniques matter more than the equipment you use.

    How can I make my photos more interesting?

    Focus on storytelling, use creative angles, and experiment with light and shadows. Post-processing can also enhance the visual appeal.

    What software is best for photo editing?

    For beginners, apps like Snapseed or Lightroom Mobile are user-friendly. Advanced users may prefer Adobe Photoshop and Lightroom.

    Conclusion

    By following these smart photography tips for better results, you can improve the quality of your photos and develop your unique style. Remember, great photography is about creativity, attention to detail, and continuous learning. Whether you’re capturing moments with a smartphone or a DSLR, these tips will help you take your skills to the next level. So grab your camera, start experimenting, and watch your photography flourish!

    CHECK THESE OUT:

    5 Reasons the Sony Camera for Live Streaming is Perfect

    Wondering What Sony Camera Shoots 8K? Check This Out.

    Why I’m Choosing the Ulanzi Tripod for My Next Shoot

    Advanced Camera Techniques Every Photographer Should Know