Category: Tricks/Tips

Unlock your tech’s full potential with practical hacks and tips. From speeding up your devices to mastering hidden features, simplify your digital life with our expert guidance.

  • How to Use Stop Watch on iPhone 15 Pro

    How to Use Stop Watch on iPhone 15 Pro

    The iPhone 15 Pro isn’t just a communication device or a portal to entertainment, but a potential powerhouse for streamlining your day. These built-in Stop Watch app offers a simple yet effective tool for measuring elapsed time with precision. This seemingly simple tool can be your secret weapon for conquering time and achieving your goals.

    How to Use Stop Watch on iPhone 15 Pro
    How to Use Stop Watch on iPhone 15 Pro

    The Stop Watch app on iPhone 15 Pro goes beyond the basic functionality of a traditional stopwatch.  With its intuitive interface, background functionality, and ability to track multiple intervals, it transforms into a versatile tool for anyone who wants to become a master of their time. Whether you’re a fitness enthusiast, a busy professional, a creative mind, or simply someone who wants to add a touch of precision to your daily tasks, the Stop Watch app is here to empower you.

    This guide will equip you with the knowledge to master the Stop Watch app. We’ll explore its functionalities, highlight the benefits it offers, and delve into reasons why you might want to incorporate it into your daily routine.

    Why Use Stop Watch on iPhone 15 Pro?

    While there might be numerous timer apps available, the built-in Stop Watch on iPhone 15 Pro offers unique advantages.

    The Stopwatch on your iPhone 15 Pro goes beyond just a phone function. Paired with an Apple Watch, it transforms into a convenient wrist-worn tool. Ditch the phone fumbling! Track workouts, races, cooking times, or anything that needs timing with a simple tap or swipe on your watch. No more blurry phone screens or awkward angles – the Stopwatch keeps the display clear and accessible.

    Plus, you can multitask seamlessly, controlling the Stopwatch while using your phone for other things. Some Apple Watch models take it a step further, offering features like lap times for performance analysis and background tracking that keeps the timer running even when you switch apps. Even without an Apple Watch, the iPhone’s Stopwatch remains a handy way to keep track of time on the go.

    How to Use Stop Watch on iPhone 15 Pro

    Below are the Steps to successfully use stop watch on your iPhone 15 Pro.

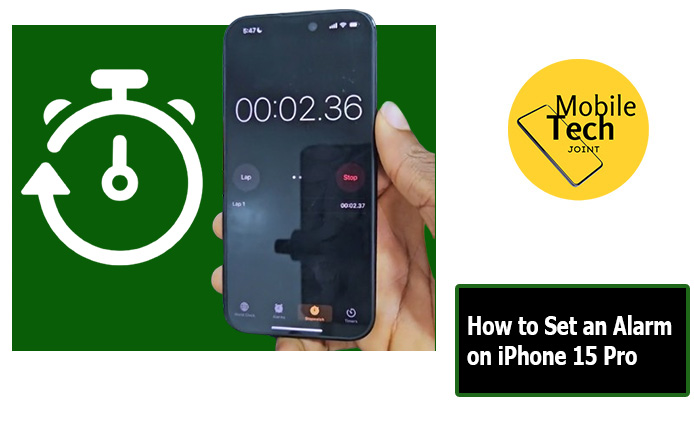
    • Frist, Locate the “Stop Watch” app icon on your home screen and tap on it to launch the app.
    • Then, Press the large, circular “Start” button in the center of the screen. The timer will begin running immediately, displaying the elapsed time in the digital display.
    • Once you’ve finished measuring the elapsed time, tap on the red “Stop” button. The timer will freeze, displaying the final time on the screen.

    Read: How to Switch Wallpapers on iPhone 14 Plus

    Benefits of Using Stop Watch on iPhone 15 Pro

    There are several advantages to incorporating the Stop Watch app into your daily routine.

    • Simple and Intuitive: The clean interface and user-friendly design make the Stop Watch accessible to everyone, regardless of technical expertise.
    • Multitasking Friendly: The ability to run the timer in the background allows you to multitask efficiently, checking the time or using other apps without interrupting your timing session.
    • Accuracy: The iPhone 15 Pro’s built-in clock and processing power ensure accurate timekeeping, making it a reliable tool for precise measurements.
    • Track Multiple Intervals: The Lap function allows you to track individual segments within a longer timing session.
    • Always at Your Fingertips: The Stop Watch app is pre-installed on your iPhone, eliminating the need to download and manage third-party applications.

    Conclusion

    The Stop Watch app on your iPhone 15 Pro is a versatile and user-friendly tool that can be a valuable asset in various situations. Whether you’re a fitness enthusiast tracking your workouts, a chef monitoring cooking times, a student timing an exam, or simply someone who needs to measure elapsed time accurately, the Stop Watch app has you covered.

    Its simplicity, reliability, and seamless integration within the iPhone ecosystem make it a go-to choice for basic timing needs. So, next time you need to track time, ditch the bulky stopwatch and leverage the power of your iPhone 15 Pro!

    Frequently Asked Questions (FAQs)

    Does the Stop Watch app run when my iPhone is locked?

    Absolutely! The Stop Watch continues to run in the background even when you lock your iPhone or minimize the app. You can check the elapsed time or stop the timer by accessing the Control Center.

    Can I customize the Stop Watch app’s appearance?

    Unfortunately, the built-in Stop Watch app doesn’t offer customization options for its appearance. However, you can adjust the system-wide color scheme of your iPhone, which might indirectly affect the Stop Watch app’s visual elements.

    What are some limitations of the iPhone’s Stop Watch app?

    While the Stop Watch app is excellent for basic timing, it has some limitations.

    No Customizable Alerts: Unlike some third-party apps, the iPhone’s Stop Watch doesn’t offer functionalities like setting alerts for specific times or lap intervals.

    No Lap Naming: The Lap function records lap times but doesn’t allow you to assign names to individual laps for easier identification.

    Should I consider using a third-party stopwatch app?

    If you require advanced features like customizable alerts, lap naming, or integration with other fitness apps, then exploring third-party stopwatch apps might be beneficial. However, for most basic timing needs, the built-in Stop Watch app on your iPhone 15 Pro offers a reliable and convenient solution.

    For more insights on this article, check out these video tips across our social platforms:

  • How to Use the Handwash Feature on Google Pixel Watch

    How to Use the Handwash Feature on Google Pixel Watch

    Keeping your hands clean is a fundamental practice for maintaining good hygiene and preventing the spread of germs.  Your Google Pixel Watch can be a helpful tool in this endeavor, thanks to its built-in Handwash feature.  This feature not only reminds you to wash your hands but also guides you through the proper handwashing technique for optimal effectiveness.

    How to Use the Handwash Feature on Google Pixel Watch
    How to Use the Handwash Feature on Google Pixel Watch

    This guide will delve into using the Handwash feature on your Pixel Watch, explaining its functionalities, highlighting the benefits it offers, and exploring why you might want to incorporate it into your daily routine.

    About Handwash Feature on Google Pixel Watch

    The Handwash feature on your Google Pixel Watch is a helpful reminder and guide for effective handwashing. Here’s what it offers.

    This handy tool ensures you’re scrubbing those germs away for the recommended 40 seconds, following World Health Organization guidelines.  It’s not a fancy tracker, but a simple timer that starts with a tap or swipe on your watch. While it doesn’t analyze your handwashing technique, it helps you focus on thorough scrubbing for the entire duration.  After the timer buzzes, rinse and dry your hands as usual.

    You might even see a reminder to wash your hands again in 3 hours, but that notification can be dismissed if needed. By making handwashing a convenient, on-wrist routine, the Pixel Watch’s Handwash Feature empowers you to prioritize good hygiene and keep yourself healthy.

    How to Use the Handwash Feature on Google Pixel Watch

    Using the Handwash feature on your Pixel Watch is a seamless process, and below are the steps to take to successfully use the Handwash feature.

    • First, wake your watch, either by double tapping on the screen of your watch or by pressing the crown button, which is located by the side of your Pixel Watch.
    • Next, scroll down and look for the option labeled “Hand wash Timer”, and click on it.
    • After that, your watch will start a 3-second countdown to start the timer for the “Hand wash” feature.
    • A 20-second countdown timer will appear on your watch face along with haptic feedback (if enabled) to guide you.
    • Throughout the 20-second countdown, the watch will vibrate at specific intervals, prompting you to focus on different areas of your hands during the washing process.
    • Once the countdown finishes, you can now rinse your hands thoroughly with clean, running water and clean with a towel.

    Why Use the Handwash Feature on Google Pixel Watch?

    There are several advantages to using the Handwash feature on your Google Pixel Watch.

    • Improved Hygiene: By prompting you to wash your hands and guiding you through the proper technique, the Handwash feature encourages thorough handwashing, which can significantly reduce the spread of germs and help you stay healthy.
    • Convenience: The automatic detection eliminates the need to remember to start a timer or set an alarm for handwashing. The watch seamlessly integrates handwashing reminders into your daily routine.
    • Enhanced Technique: The haptic feedback (when enabled) provides a physical reminder to focus on different areas of your hands, ensuring a more thorough cleaning process.
    • Increased Awareness: The Handwash feature can make you more mindful of handwashing throughout the day, especially during critical times like before eating or after using public transportation.

    Conclusion

    The Handwash feature on your Google Pixel Watch is a simple yet powerful tool that promotes good hygiene and overall well-being.  By utilizing automatic detection, a countdown timer, and haptic feedback (if enabled), the Handwash feature guides you through a thorough handwashing routine, helping you stay healthy and reduce the spread of germs.

    Check This Out: How to Use Stop Watch on Google Pixel Watch

    Whether you’re looking for a gentle reminder to wash your hands or want to ensure you’re using the proper technique, the Handwash feature on your Pixel Watch is a valuable addition to your daily life.

    Frequently Asked Questions (FAQ)

    Can I turn off the Handwash feature completely?

    Unfortunately, the Handwash feature is currently built-in and cannot be fully disabled.  However, you can turn off automatic detection and haptic reminders within the Fit app settings, essentially rendering the feature inactive.

    Does the Handwash feature drain my Pixel Watch battery?

    The impact on battery life is minimal.  The Handwash feature uses minimal processing power and sensor data, and its overall effect on battery life is negligible.

    Can I use the Handwash feature with other hand sanitizers besides soap and water?

    The Handwash feature is primarily designed to guide you through proper handwashing with soap and water, which is generally considered the most effective method for germ removal.  While the feature might still detect hand movements when using hand sanitizer, it might not be able to accurately track the duration or effectiveness of sanitization.

    Can the Handwash feature track how many times I wash my hands in a day?

    The Fit app can optionally track your handwashing frequency.  This data is not displayed on the watch face itself but can be accessed within the Fit app.  This can be a helpful way to monitor your handwashing habits and identify areas for improvement.

    For more insights on this article, check out these video tips across our social platforms:

    On Instagram

  • How to Enable Color Correction on Samsung S23 +

    How to Enable Color Correction on Samsung S23 +

    The Samsung S23+ display can sometimes have some can of flop or look like it lacks accuracy in terms of the display color.

    Color Correction


    Perhaps you’re a designer working with critical colors, or maybe you suspect a slight visual impairment while scrolling through your phone or operating it. Fortunately, the S23+ offers a built-in solution called the “Color correction” feature.

    This functionality allows you to fine-tune the way colors are rendered on your device, enhancing the viewing experience for various needs.

    In this comprehensive guide, you will be enlightened on the activation process and exploring the available modes. Whether you’re seeking improved color fidelity or accessibility features, this guide will equip you with the knowledge to optimize your S23+ display.

    About Color Correction on Samsung S23+

    Color correction is an accessibility feature on the Samsung S23+, that allows you to modify the way colors are displayed on the screen.

    This can be beneficial for people with certain visual impairments, such as color blindness, or for those who simply prefer a different color balance on their device.

    Several color correction modes are available on the S23+, each offering a unique way to adjust the on-screen colors.

    How to Enable Color Correction on Samsung S23 +

    Enabling color correction on your Samsung S23+ is a straightforward process that can be done in just a few steps, and below are those steps to take.

    • First, head to your Settings, either by heading to your app list, then look for Settings and click on it, or swipe down from the top of your screen to access the notification shade, then click on the settings icon located at the top-right corner of your screen to access settings.
    • Scroll down, while looking for a tab labeled Accessibility, and click on it
    • Next, click on Vision Enhancement to continue.
    • Then scroll down and click on the Color Correction feature.
    • To enable the Color Correction feature, toggle on the switch at the top right corner of your screen. And choose the best option that has been listed below to suit your preferences.

    Here are the required procedures to follow to enable color correction feature on the Samsung S23 +.

    Related: How to Access Motion and Gestures on Samsung S23 +

    Benefits of Color Correction on Samsung S23+

    Color correction offers several advantages for Samsung S23+ users:

    • Improved Color Visibility

    For individuals with color blindness, color correction modes can significantly enhance the way colors are displayed, making it easier to distinguish between different hues.

    • Enhanced Comfort

    Certain color correction modes, like grayscale, can reduce eye strain, particularly in low-light environments.

    • Customizable Display

    With various color correction options, you can personalize the S23+’s display to match your preferences, whether you prefer a warmer or cooler color tone.

    Conclusion

    The Samsung S23+ boasts a versatile color correction feature that can significantly enhance your viewing experience.

    With the ability to adjust the overall color balance, enhance specific colors for color blindness, or even switch to a grayscale view, you can personalize your S23+’s display to perfectly suit your needs and preferences.

    Whether you’re an artist seeking accurate color representation, someone with visual impairments requiring increased accessibility, or simply looking to reduce eye strain, color correction offers a valuable solution.

    So, don’t hesitate to explore the various modes available and unlock the full potential of your S23+’s display.

    Does Color Correction on the Samsung S23+ Drain the Battery?

    While color correction itself has minimal impact on battery life, the specific mode you choose might have a slight effect.

    Grayscale mode, for example, may use slightly less battery due to the reduced need to display a full-color spectrum. However, the overall impact on battery life is likely negligible compared to other factors like screen brightness and app usage.

    Can I Adjust the Intensity of Color Correction on the Samsung S23+?

    Yes, for some color correction modes on the S23+, you can adjust the intensity to fine-tune the effect.

    This is particularly helpful with modes like “Color tone” where you can choose between a warmer or cooler balance. Look for the settings icon next to the chosen mode to access intensity adjustments.

    What if I Don’t Know What Type of Color Blindness I have?

    The S23+ offers several color blindness correction modes, but if you’re unsure which one best suits your needs, there are online resources available to help you identify your specific type of color blindness.

    Once you know the type, you can experiment with the corresponding correction mode on your S23+ to see which one provides the most significant improvement in color distinction.

    For more insights on this article, check out these video tips across our social platforms:

  • How to Answer Phone Calls on Google Pixel Watch

    How to Answer Phone Calls on Google Pixel Watch

    The Google Pixel Watch offers a convenient way to answer phone calls with just a few taps or swipes, directly from your wrist.

    Answer Phone Calls

    Whether you have a cellular Pixel Watch operating independently or one that is connected to your phone, answering calls with this device is a game-changer. Multitasking becomes a breeze, allowing you to answer calls while engaged in other activities.

    With the ability to adjust call volume and switch between the watch and phone speakers, the Pixel Watch provides a practical and stylish way to manage your calls. However, in this blog, you will be enlightened on How to Answer Phone Calls on Google Pixel Watch like a pro.

    Why Answer Phone Calls on Google Pixel Watch

    Answering calls with your Pixel Watch is a game-changer. Multitasking becomes a breeze, answering calls while cooking, working out, or doing anything that occupies your hands becomes easier with a simple tap or swipe.

    No more phone diving in bags or missing calls because it’s out of reach. Plus, answering calls with your watch adds a touch of civilization.

    And with a cellular Pixel Watch, calls are at your fingertips even without your phone. It’s a convenient, stylish, and practical way to manage your calls, freeing you from the limitations of your phone.

    How to Answer Phone Calls on Google Pixel Watch

    Below are the steps to take to answer phone calls on your Watch and also the things to look for when answering a call.

    When you receive a call from a person, your watch will automatically wake up, and once it wakes, the name in which you saved the person number will display.

    Then you will see two options, to either Answer or Decline the call

    If you answer the call, you can adjust the volume by using the crown on your Pixel Watch (rotate it up or down) you can also switch between the watch speaker and your phone’s speaker/headset, by tapping on the three dots on the call screen and then choose the desired audio source.

    Then to end a call, simply tap the Red Phone icon on the screen.

    Related: How to Enable Always-On Screen on Google Pixel Watch

    The benefit of Answering Calls On Google Pixel Watch

    With the watch on your wrist, you can attend to other things while having a conversation with someone, making it easy to multitask, and ensuring you never miss important calls.

    With a cellular Pixel Watch, calls are at your fingertips even without your phone nearby. Enjoy the freedom to roam without sacrificing connectivity.

    Answering calls with your watch exudes a touch of modern elegance, making you look effortlessly connected and in control.

    Your wrist is prime real estate for notifications and calls. Unlike phones that can get buried in bags or misplaced, your watch is always readily accessible, ensuring you never miss an important call.

    Conclusion

    So let go of your phone blunders. It is quite easy to answer calls with the Pixel Watch. With just a tap or swipe, you can multitask like a pro and look great! With cellular models, you can answer even when your phone is not close by.

    It’s convenient, stylish, and keeps you connected on your terms. Answer calls seamlessly, stay focused, and ditch the outdated phone routine.

    Does Pixel Watch Use SIM?

    The Wi-Fi/Bluetooth model relies on your phone’s connection for calls, texts, and most functionalities. It doesn’t have a SIM card slot and can’t connect to cellular networks by itself. But, if you crave independence, the cellular model with a built-in eSIM is your best option.

    Can I Answer a Phone Call on a Pixel Watch?

    Calls on Pixel Watch? Easy! Both models let you answer calls with a swipe. See caller info, answer on the watch speaker, or manage it all (silence, decline, answer on the phone) from your wrist.

    Cellular models answer calls even without your phone nearby, while Wi-Fi/Bluetooth models need your phone in range.

    Does Pixel Watch Need a Phone Line?

    Depending on the model, your Pixel Watch may be reliant on your phone line. You can use the Wi-Fi/Bluetooth model on top of your phone’s connection, eliminating the need for a separate line for texting and calls.

    However, for the watch to function, your phone has to be within Bluetooth range. The best option is the cellular model that has an integrated eSIM.

    This will require an extracellular plan for the eSIM, but the benefit is that you can use your watch to make calls, send texts, and access data even when your cell phone is not close by.


    For more insights on this article, check out these video tips across our social platforms:

  • How to Enable Data Saver on Google Pixel 7 Pro

    How to Enable Data Saver on Google Pixel 7 Pro

    The Google Pixel 7 Pro Is one of the top-tier known for its advanced features, which give users a wide range to customize settings, to their preference, taking their user experience to the next level, and assisting with some important features.

    Data Saver

    You have to be connected to the internet, and sometimes when trying to enjoy your phone’s full potential, you tend to consume more data than intended.

    Fortunately, there is a way to reduce the overage consumption of your data, with Data Saver enabled, you can significantly reduce the data consumption by background apps and services, saving your data and extending battery life.

    With this guide, you can take full control of your data usage. So, read and follow the procedures carefully.

    Why Enable Data Saver

    The data saver feature is programmed to help reduce data consumption, by restricting background data usage and preventing apps from secretly draining your data allowance.

    This helps in, not only data allowances but all so helps in saving battery life and helps in a smoother and more responsive browsing experience when using mobile data. However, there is more to the Data Saver than just saving your mobile data, more reasons why you should enable that feature are:

    • Conserve Mobile Data

    Data Saver restricts background data usage for most apps, significantly reducing the amount of data your phone consumes when you’re not actively using them.

    This is particularly beneficial for apps that constantly refresh content or automatically download updates in the background.

    • Extend Battery Life

    Data transfer consumes battery power. By limiting background data usage, Data Saver can help you squeeze more juice out of your Pixel 7 Pro’s battery, especially when you’re on the go and may not have immediate access to a charger.

    • Avoid Data Plan Overage Charges

    If you have a limited data plan, exceeding your data allowance can result in hefty overage charges. Data Saver helps you stay within your data limits, preventing unwanted surprises on your phone bill.

    • Peace of Mind When Traveling

    Traveling often involves using cellular data more than usual, especially when Wi-Fi is limited. Data Saver can be a lifesaver, helping you manage your data usage and avoid expensive roaming charges when abroad.

    • More Control Over Your Data

    Data Saver empowers you to take control of your mobile data consumption. You can choose which apps are exempt from Data Saver restrictions, ensuring smooth functionality for essential apps while reducing data usage for others.

    With these factors, it is sure you would want to enable the Data Saver option on your Google Pixel 7 Pro device.

    How to Enable Data Saver on Google Pixel 7 Pro

    To successfully enable Data Saving on your Google Pixel 7 Pro, follow the step-by-step step listed below. So, follow the procedure carefully.

    • Frist, navigate to the Settings app, either by heading to your app’s drawer , or swipe down from the top of your screen, to access device quick panel.
    • Click on the setting icon (looks like a cogwheel or Gear icon).
    • In the Settings section select Network & Internet or Connections depending on your software version.
    • After that, scroll down and locate Data Saver option and click on it.
    • Then, toggle on the switch next to Data Saver to the On position. Then a notification will appear in your Settings app to requiring you to confirm the activation.

    That’s it! Data Saver is now enabled on your Pixel 7 Pro, helping you conserve mobile data and potentially extend battery life.

    Benefit of Enabling Data Saver on Google Pixel 7 Pro

    They are some real good benefits in enabling Data Saver on your Google Pixel 7 Pro, and here’s how it can benefits you:

    With the Data Saver enabled, they will be some restriction on background data usage, preventing apps from quietly draining your data allowance. This translates to significant savings on your mobile plan, especially if you’re on a limited data package.

    By limiting data activity in the background, Data Saver helps your Pixel 7 Pro to save battery. You can enjoy extended use without worrying about a sudden power outage.

    With less background data traffic competing for bandwidth, you might experience a smoother and faster browsing experience when using your mobile data.

    Related: How to Update Software on Google Pixel 7 Pro

    Conclusion

    Enabling your Data Saver on your Pixel 7 Pro, is a fantastic feature that empowers you to take control of your mobile data usage and battery life. By enabling it, you can experience significant cost savings on your data plan, enjoy longer usage between charges, and potentially experience a smoother browsing experience on mobile data.

    So why wait? Activate Data Saver today and unlock a more efficient and budget-friendly mobile experience on your Google Pixel 7 Pro!

    What is APN on Google Pixel?

    APN stands for Access Point Name. It’s like a virtual address that helps your Google Pixel connect to your mobile carrier’s internet network. When you insert your SIM card, your Pixel might automatically configure the APN settings, but sometimes it may not.

    In simple terms, the APN acts like a translator between your phone and your mobile carrier’s network. It tells your phone how to communicate with the towers and access the internet.

    Why Won’t my APN Settings Save?

    Frustrated with APN settings not sticking on your Pixel? Here’s the short story:

    • Double-check the info: Make sure the APN details match your carrier exactly.
    • Fill in all the blanks: Missing fields like MCC and MNC can cause saving issues.
    • Restart your Pixel: Sometimes a simple reboot can fix glitches.

    Still stuck? Check your carrier’s website or Google support for troubleshooting steps specific to your situation. Remember, correct APN settings are key to connecting your Pixel to the internet!

    What Happens if APN is Not Set?

    If there is no APN on your Pixel device? That’s a big problem!  Mobile data won’t be able work, meaning no internet on the go. Apps and features relying on mobile data go dark.  Calls and texts should be fine, but some carrier features might be affected. So fix the APN.

    For more insights on this article, check out these video tips across our social platforms:

  • How to Connect to Wi-Fi Network on Google Pixel Watch

    How to Connect to Wi-Fi Network on Google Pixel Watch

    The Google Pixel Watch is one of the best time-telling gadgets, it is not only stylish but a powerful extension of your smartphone. But for you to unlock its full potential, you need a reliable internet connection.

    connect wifi

    Wi-Fi provides a stable and secure way for your Pixel Watch to stay connected, offering a range of benefits and other features.

    In this article will we show you How to Connect to the Wi-Fi Network on Google Pixel Watch for maximum potential and accessibility. All you need to do is read and follow the instructions carefully in this blog for positive results.

    Why Connect to Wi-Fi Network on Google Pixel Watch?

    When you are connected to a Wi-Fi network, your watch will have a Boost and unlock your Pixel it’s potential.

    Apps will start to work better, you will be able to stream music smoothly, and Google Assistant is always on duty, all without draining your phone’s battery.

    Plus, save mobile data and enjoy automatic updates. It is said to be able to fast charge if connected to Wi-Fi.

    How to Connect to Wi-Fi Network on Google Pixel Watch

    Below are the steps to successfully connect your Google Pixel watch to Wi-Fi Network. So go through the process carefully.

    • First, wake your watch, either by tapping on the screen or pressing the Crown Button.
    • Then Swipe down from the top of the watch face to access the Quick Settings menu.
    • Next, click on the Settings icon, which is represented with a cogwheel symbol.
    • After that, you will an option labeled Connectivity, it represented with the hotspot symbol. Click On it.
    • Then, scroll down a bit to see the Wi-Fi option, and then, click on It to Proceed.
    • If your Wi-Fi is not on, toggle on the switch to turn It on.
    • Next, to add a new network click on + Add Network.
    • Then select and connect to the network you want to connect to.

    These are the required steps to take, to successfully to connect to Wi-Fi Network on your Google Pixel Watch.

    Related:  How to Turn On Mobile Data on Google Pixel Watch

    Benefits of Connecting Google Pixel Watch to Wi-Fi

    Here are some benefits you will get while your Google Pixel Watch is connected to a Wi-Fi network.

    Enhanced Functionality

    For some apps to be fully functional, like Fitness trackers music, News and weather apps that need to content real-time update to keeping you informed, greatly need Wi-Fi Network. To perfume fully and effectively.

    Independent Google Assistant

    When your Wi-Fi Network is connected, your Google Assistant on your Pixel Watch becomes more powerful. Ask questions, get directions, or control your smart home devices – all without needing your phone nearby.

    Conclusion

    Connecting your Pixel Watch to Wi-Fi unlocks its full potential. You’ll experience a wider range of functionalities, improved performance, and a more convenient and enjoyable user experience. So get close to your Wi-Fi network, and take advantage of it and see the difference it makes on your Google Pixel Watch.

    How Do I Know if my Watch is Connected to Wi-Fi?

    To ensure you are connected to a Wi-Fi Network, you will see an indicator at the upper-left of the Control Center screen.

    Which displays in the place of the phone icon and the wireless signal icon is also highlighted if you are connected to a Wi-Fi.

    Can I Make Calls with my Google Pixel Watch while Wi-Fi is On?

    You can make and receive call, send and receive message., on your Google Pixel watch even if your Wi-Fi network is on or connected.

    Can I Make Calls with my Google Pixel Watch?

    Yes, it is possible to make call if you are with the 4G LTE option, you can make and receive calls without your phone.

    For more insights on this article, check out these video tips across our social platforms:

  • How to Bold Text on iPhone 14 Plus

    How to Bold Text on iPhone 14 Plus

    With the highly futuristic iPhone 14 Plus, you can alter or configure a number of the iPhone settings to fit your preferences. And one of these futuristic features is the ability to change the boldness of your device text, making your text, easier to see.

    Bold Text

    This guide will give you insights on the step-by-step process involved in How to Bold Text iPhone 14 Plus, however, all you are required of is, read and follow through the procedures outlined in this blog carefully for positive results.

    About the Bold Text on iPhone 14 Plus

    Bold text is a type of text formatting that makes characters appear thicker and darker than regular text. This distinct appearance assists the user in highlighting and differentiating specific portions of text, making them more noticeable and easier to read.

    It emphasizes certain information and helps to enhance your readability on your iPhone 14 Plus.

    Even when you are reading a message, browsing through websites, or using apps, bold text can make important information stand out, ensuring that you never miss any important details.

    How to Bold Text on your iPhone 14 Plus

    Below is the step-by-step process on how to bold text on your 14 plus.

    • First, unlock your iPhone, and head to your phones Settings, which is located on your home screen.
    • Then Scroll down until you see Accessibility and click on it.
    • Next, within the Accessibility menu, look for an option labeled Display & Text Size. And click on it.
    • After that, turn on the switch next to the Bold Text option, you don’t need to restart your device for the effect to take place. But if your device prompt you to restart, then go ahead.

    Those are the possible steps needed to bold text on your iPhone 14 Plus.

    Related: How to Enable Dark Mode on iPhone 14 Plus

    Benefits of Enabling Bold Text

    Here are some benefits you get from enabling Bold text option on your iPhone 14 Plus:

    • Enhanced Readability

    Bolding text makes it visually stand out from the rest of the content. This is particularly helpful for emphasizing important keywords, headings, or phrases within emails, notes, or messages. It’s like highlighting on paper, drawing the reader’s eye to crucial information.

    • Improved Information Hierarchy

    By strategically bolding text, you can create a clear hierarchy of information on your screen. This is especially beneficial for lists, outlines, or documents where you want to visually differentiate main points from subheadings or details.

    Bolding helps guide the reader through the information and ensures they grasp the intended structure.

    • Increased Emphasis and Importance

    Bold text naturally conveys a sense of importance.  Using it for specific words or phrases can draw attention to critical details, warnings, or calls to action.

    This can be particularly useful in emails or messages where you want to ensure certain information is not overlooked.

    • Accessibility for Users with Visual Disability

    Bolding text can provide a slight improvement in readability for users with mild visual impairments. The increased thickness of the text offers a subtle contrast that can make reading on a screen a little easier.

    • Aesthetics and Style

    Bold text can add a touch of visual interest to your messages, notes, or documents. It can break up monotony and create a more visually appealing layout, especially when combined with italics or underlining for further emphasis.

    Conclusion

    By enabling, Bold text on your iPhone 14 Plus, can significantly enhance readability and emphasize important information, making it a valuable tool for everyday use.

    You can easily enable and apply bold text across your device. Experiment with bold text to find the optimal balance for your needs and enjoy a more accessible and organized experience on your iPhone 14 Plus.

    How Easy is Bolding Text?

    Super Easy! Bolding text on iPhone 14 Plus only requires a few taps within the keyboard or editing options. No technical knowledge is needed, making it accessible to all users.

    How Long Does Bolding Take?

    Quick Process! Bolding text is a breeze. Simply select the text you want to emphasize and choose the bold formatting option. It typically takes a few seconds.

    When to Use Bold Text?

    For Emphasis & Clarity! Use bolding strategically to highlight important points in messages, notes, or emails. It improves readability and ensures key information stands out.

    For more insights on this article, check out these video tips across our social platforms:

  • How to Enable Assistive Touch on iPhone 14 Plus

    How to Enable Assistive Touch on iPhone 14 Plus

    The iPhone assistive touch is a very valuable feature that is built in on your iPhone 14 Plus, which gives users an on-screen menu for easy navigation and to access some essential functions.

    Assistive Touch

    This feature is especially important for individuals who have difficulty in using the hardware buttons or gestures.

    Assistive Touch offers customizable on-screen controls, And Enabling Assistive can significantly enhance the usability and accessibility of your iPhone, making it easier to perform a wide range of tasks.

    However, this guide will put you through the processes of how to enable assistive touch on the iPhone 14 Plus. But first, let’s have a general understanding of what Assistive touch is all about.

    What is Assistive Touch on iPhone 14 Plus

    The Assistive Touch on Apple devices is a built-in feature that allows users to operate their IOS device, without the need to press buttons on their devices.

    It allows users to perform actions that would typically require physical buttons or complex gestures through on-screen touch controls, whether you want to take a screenshot, open a recent app, or even lock your iPhone, the Assistive Touch feature can handle the task.

    How to Enable Assistive Touch on iPhone 14 Plus

    Below is the step-by-step guide on how to enable Assistive Touch on iPhone 14 Plus.

    • First, unlock your device, and navigate to Settings on your device home screen.
    • Next, scroll down and look for the Accessibility option, click on it.
    • After that, in the Accessibility settings, look for an option labeled Touch, and click on it.
    • Then, to enable the Assistive Touch, tap on it and toggle the switch to turn it On or Off.
    • As soon as you enable it, a floating on-screen button will appear, which you can move any side of your screen for your convenience. This button gives you quick access to various functions and controls which is the Assistive Touch.

    How to Customize Assistive Touch on iPhone 14 Plus

    There are different ways to customize your Assistive touch, For example,

    You can customize single-tap, double-tap, long press, and 3D Touch actions by assigning them to different functions in the Assistive touch.

    You can also customize the top-level menu by adding or removing icons to access functions you use most frequently.

    If you also have specific gestures you want to use regularly, you can create new custom gestures within the Assistive Touch settings.

    Related: How to Access Storage on iPhone 14 Plus

    The benefit of Enabling Assistive Touch on iPhone 14 Plus

    The Assistive Touch provides essential support for users with physical disabilities, allowing them to navigate through their iPhone using gestures that may be easier for them to perform.

    Users can configure the Assistive Touch menu to contain a variety of tasks, including volume control, screen rotation, screen locking, and more. This customization might make commonly used functions more accessible.

    It gives users, access to Shortcuts, Assistive Touch can be used to access other accessibility features quickly, such as Voiceovers, Zoom, and Magnifier.

    Conclusion

    In all, enabling and customizing your Assistive Touch on your iPhone 14 Plus can greatly enhance your device’s accessibility. By exploring its various features and tailoring it to your needs, you can perform tasks more efficiently and comfortably.

    Experiment with different functionalities to make the most of this versatile accessibility feature, ensuring a seamless and personalized user experience.

    Is it Easy to Master Assistive Touch?

    Absolutely! Enabling Assistive Touch on iPhone 14 Plus requires just a few steps in Settings.  No technical background is needed, making it perfect for beginners.

    How Long Does it Take to Setup Assistive Touch?

    Quick Activation!  Turning on Assistive Touch usually takes less than 2 minutes. You can customize it further later to fit your needs.

    Why Use Assistive Touch?

    Enhanced Control & Convenience!  Assistive Touch offers an on-screen button for essential functions, replacing physical button usage and simplifying navigation, especially if the physical buttons are difficult to reach or use.

    For more insights on this article, check out these video tips across our social platforms:

  • How to Setup Siri on iPhone 14 Plus

    How to Setup Siri on iPhone 14 Plus

    The iPhone 14 Plus Siri (Apple’s virtual assistant), is an advanced assistant that is by powered artificial intelligence, that is designed to help you manage tasks, get information, and control your device using voice commands to perform tasks, answer questions, and control various features of your iPhone simple voice commands.

    Setup SIRI

    With the iPhone 14 Plus, Siri becomes an indispensable tool for enhancing your user experience, allowing you to interact with your phone hands-free. Setting up Siri is essential for accessing its powerful features quickly and efficiently.

    This comprehensive guide will provide you with the basic processes on how to setup Siri on iPhone 14 Plus. So, read and follow through the process carefully.

    How to Setup Siri on iPhone 14 Plus

    Below is the step-by-step process for setting up your Siri on your iPhone 14plus.

    • First, start by unlocking your iPhone, locate your Settings app, and click on it.
    • Next, scroll down until you see Siri & Search option and click on it to access Siri settings.
    • After that, turn on the switch labeled, Press the Side Button for Siri to proceed.
    • Next, a notification will pop up, telling you to Enable Siri.
    • Click on it, and listen for Hey Siri. To proceed.
    • Now you can follow the onscreen procedures provided to complete setting up Siri on your iPhone 14 Plus.

    These are the required steps, follow through carefully, for positive results.

    Related: How to Enable AssistiveTouch on iPhone 14 Plus

    Benefit of Enabling Siri on iPhone 14 Plus

    There are some huge and outstanding benefits to enabling Siri on your iPhone 14 Plus. And some of these benefits are.

    • Siri allows you to perform some outstanding and hands-free tasks, making it easier to multitask and stay productive.
    • Siri can provide rapid information, such as weather reports, news, sports, and more, helping you to save time and effort.
    • To an extent, Siri can also help in Making calls, sending messages, and even sending emails with just your voice commands.
    • Siri can also help with translation with multiple language capacities, whether you are texting or having a conversation with someone.

    Conclusion

    In conclusion, enabling Siri on your iPhone 14 Plus opens a world of convenience, productivity, and entertainment. With this feature, you can perform tasks hands-free, access information quickly, and control your device with ease.

    Siri’s capabilities range from simple tasks like making calls and sending messages to more complex tasks like navigating and controlling your smart home devices.

    By leveraging Siri’s feature, you’ll enhance your iPhone experience and make the most of your device’s capabilities. So, activate Siri today and discover a more intuitive and enjoyable way to interact with your iPhone!

    How Easy is it to Set Up Siri?

    Very Easy! Setting up Siri on iPhone 14 Plus involves a few simple steps in the Settings app. No technical expertise is required, making it accessible for users of all comfort levels.

    How Long Does Siri Setup Take?

    Quick Setup! The entire process of enabling and configuring Siri on your iPhone 14 Plus typically takes less than 2 minutes. You can customize further later if needed.

    Why Use Siri on iPhone 14 Plus?

    Enhanced Convenience! Siri allows hands-free interaction with your iPhone. Use voice commands to make calls, send messages, control music, and more, all without needing to touch your phone.

    For more insights on this article, check out these video tips across our social platforms:

  • How to Access Motion and Gestures on Samsung S23 +

    How to Access Motion and Gestures on Samsung S23 +

    The Samsung Galaxy S23+ goes beyond the typical touchscreen experience, offering intuitive motion and gesture controls to enhance your interaction with the phone.

    To access motion and gestures on your Samsung Galaxy S23+, you can use various intuitive features that make interacting with your device more convenient and efficient.

    Access Motion and Gestures

    These motion and gesture controls enable and give you easy access to navigate your device and perform various functions with simple movements or actions.

    This guide will give you insight into how to access Motion and gestures on Samsung S23 +, empowering you to navigate your phone with a flick of your wrist or a double tap.

    About the Motion and Gestures on Samsung S23+

    Motion and Gestures encompass various functionalities that utilize the built-in sensors in your S23+ to recognize your movements and translate them into actions on the screen. Here are some core functionalities within Motion and Gestures:

    • Lift to Wake

    Picking up your phone wakes the display, eliminating the need to fumble for the power button.

    • Double Tap to Wake/sleep

    Double-tapping the screen quickly turns the display on or off, providing convenient access.

    • Palm Swipe to Capture

    Swiping the edge of your hand across the screen captures a screenshot, offering an alternative to button combinations.

    • Keep Screen on While Viewing

    The phone detects your gaze and keeps the display lit as long as you’re looking at it, preventing accidental timeouts.

    • Alert on Pick Up

    If you miss a call or message, your phone will vibrate when you pick it up, reminding you of the notification.

    Important Note: The availability of specific Motion and Gesture features might vary depending on your software version and phone model.

    How to Access Motion and Gestures on Samsung S23 +

    There are two primary ways to access and manage Motion and Gesture settings on your Samsung Galaxy S23+:

    Using Settings App (Detailed Control)

    • Open the Settings app on your Galaxy S23+.
    • Scroll down and tap on the Advanced Features tab.
    • Within Advanced Features, locate and tap on Motions and Gestures.
    • You’ll see a list of available Motion and Gesture Features with toggle switches to enable or disable them.
    • Tap the toggle switch next to the desired feature to On to activate it.

    (Optional) Explore additional settings for specific features (e.g., adjusting the palm swipe capture area).

    Using Quick Search (Fast Access)

    • Swipe down from the home screen to access the Search Bar.
    • In the search bar, type Motion and Gestures or  just Gestures.
    • Tap on the relevant search result that appears, which will direct you to the Motion and Gestures Settings within Advanced Features.
    • From there, you can follow steps 4-6 from Method 1 to manage your desired Motion and Gestures.

    Those are the required steps needed to successfully access motion and gestures on Samsung S23 +, and modify the one you prefer.

    Related: How to Enable Emergency SOS on Samsung S23 +

    Why Use Motion and Gestures on Samsung S23+?

    There are several compelling reasons to leverage Motion and Gestures on your S23+:

    • Enhanced Convenience

    Motion and gestures provide quicker and more intuitive ways to interact with your phone. Simple movements like raising your phone or swiping your hand can replace button presses, streamlining your experience.

    • Accessibility Benefits

    For users with dexterity limitations, Motion and Gestures can offer alternative control methods, making the phone more accessible.

    • Reduced Wear and Tear

    Utilizing gestures like double-tap to wake/sleep can potentially minimize wear and tear on the power button.

    Conclusion

    By understanding the available features and utilizing the methods outlined in this guide, you can leverage Motion and Gestures on your Samsung Galaxy S23+.

    This functionality empowers you to interact with your phone in a more intuitive and convenient way, enhancing your overall user experience. So, explore the world of Motion and Gestures and discover how these features can streamline your phone usage.

    Can I Activate Gestures on my Samsung S23 +?

    While some gestures like “Lift to wake” are convenient, you might worry about accidental activation.

    Fortunately, Samsung offers customization options for specific gestures. For instance, you can increase the required number of taps for the “Double tap to wake/sleep” function to minimize accidental activations.

    Will Using Motion and Gestures Drain my Battery?

    The impact of Motion and Gestures on battery life is generally minimal. These features utilize the phone’s built-in sensors, and their power consumption is optimized.

    However, if you’re concerned about battery life, you can selectively disable gestures you don’t use frequently.

    Are there any Compatibility Issues with Motion and Gestures on Samsung S23 +?

    Some screen protectors, especially thick or with certain materials, might interfere with the phone’s ability to recognize gestures accurately.

    If you experience issues with Motion and Gestures, try using a different screen protector or temporarily removing it to see if the problem persists.

    For more insights on this article, check out these video tips across our social platforms: