Category: Tricks/Tips

Unlock your tech’s full potential with practical hacks and tips. From speeding up your devices to mastering hidden features, simplify your digital life with our expert guidance.

  • How to Enable Developer Options on Samsung S10

    How to Enable Developer Options on Samsung S10

    The Samsung Galaxy S10 is a powerful device, but it offers even more functionality when you unlock Developer Options.

    Enable Developer Options on Samsung S10

    This hidden menu provides access to advanced settings and features typically used by app developers and experienced users.

    This piece article will give you insights on how to enable developer options on samsung s10, read and follow through the procedures carefully and explore some of the benefits it offers.

    Why Enable Developer Options?

    Developer Options provide a variety of benefits, including:

    • Debugging Tools

    These tools assist developers in testing and troubleshooting apps. While some users might not need them directly, they can be helpful for identifying app-related issues.

    • Advanced Settings

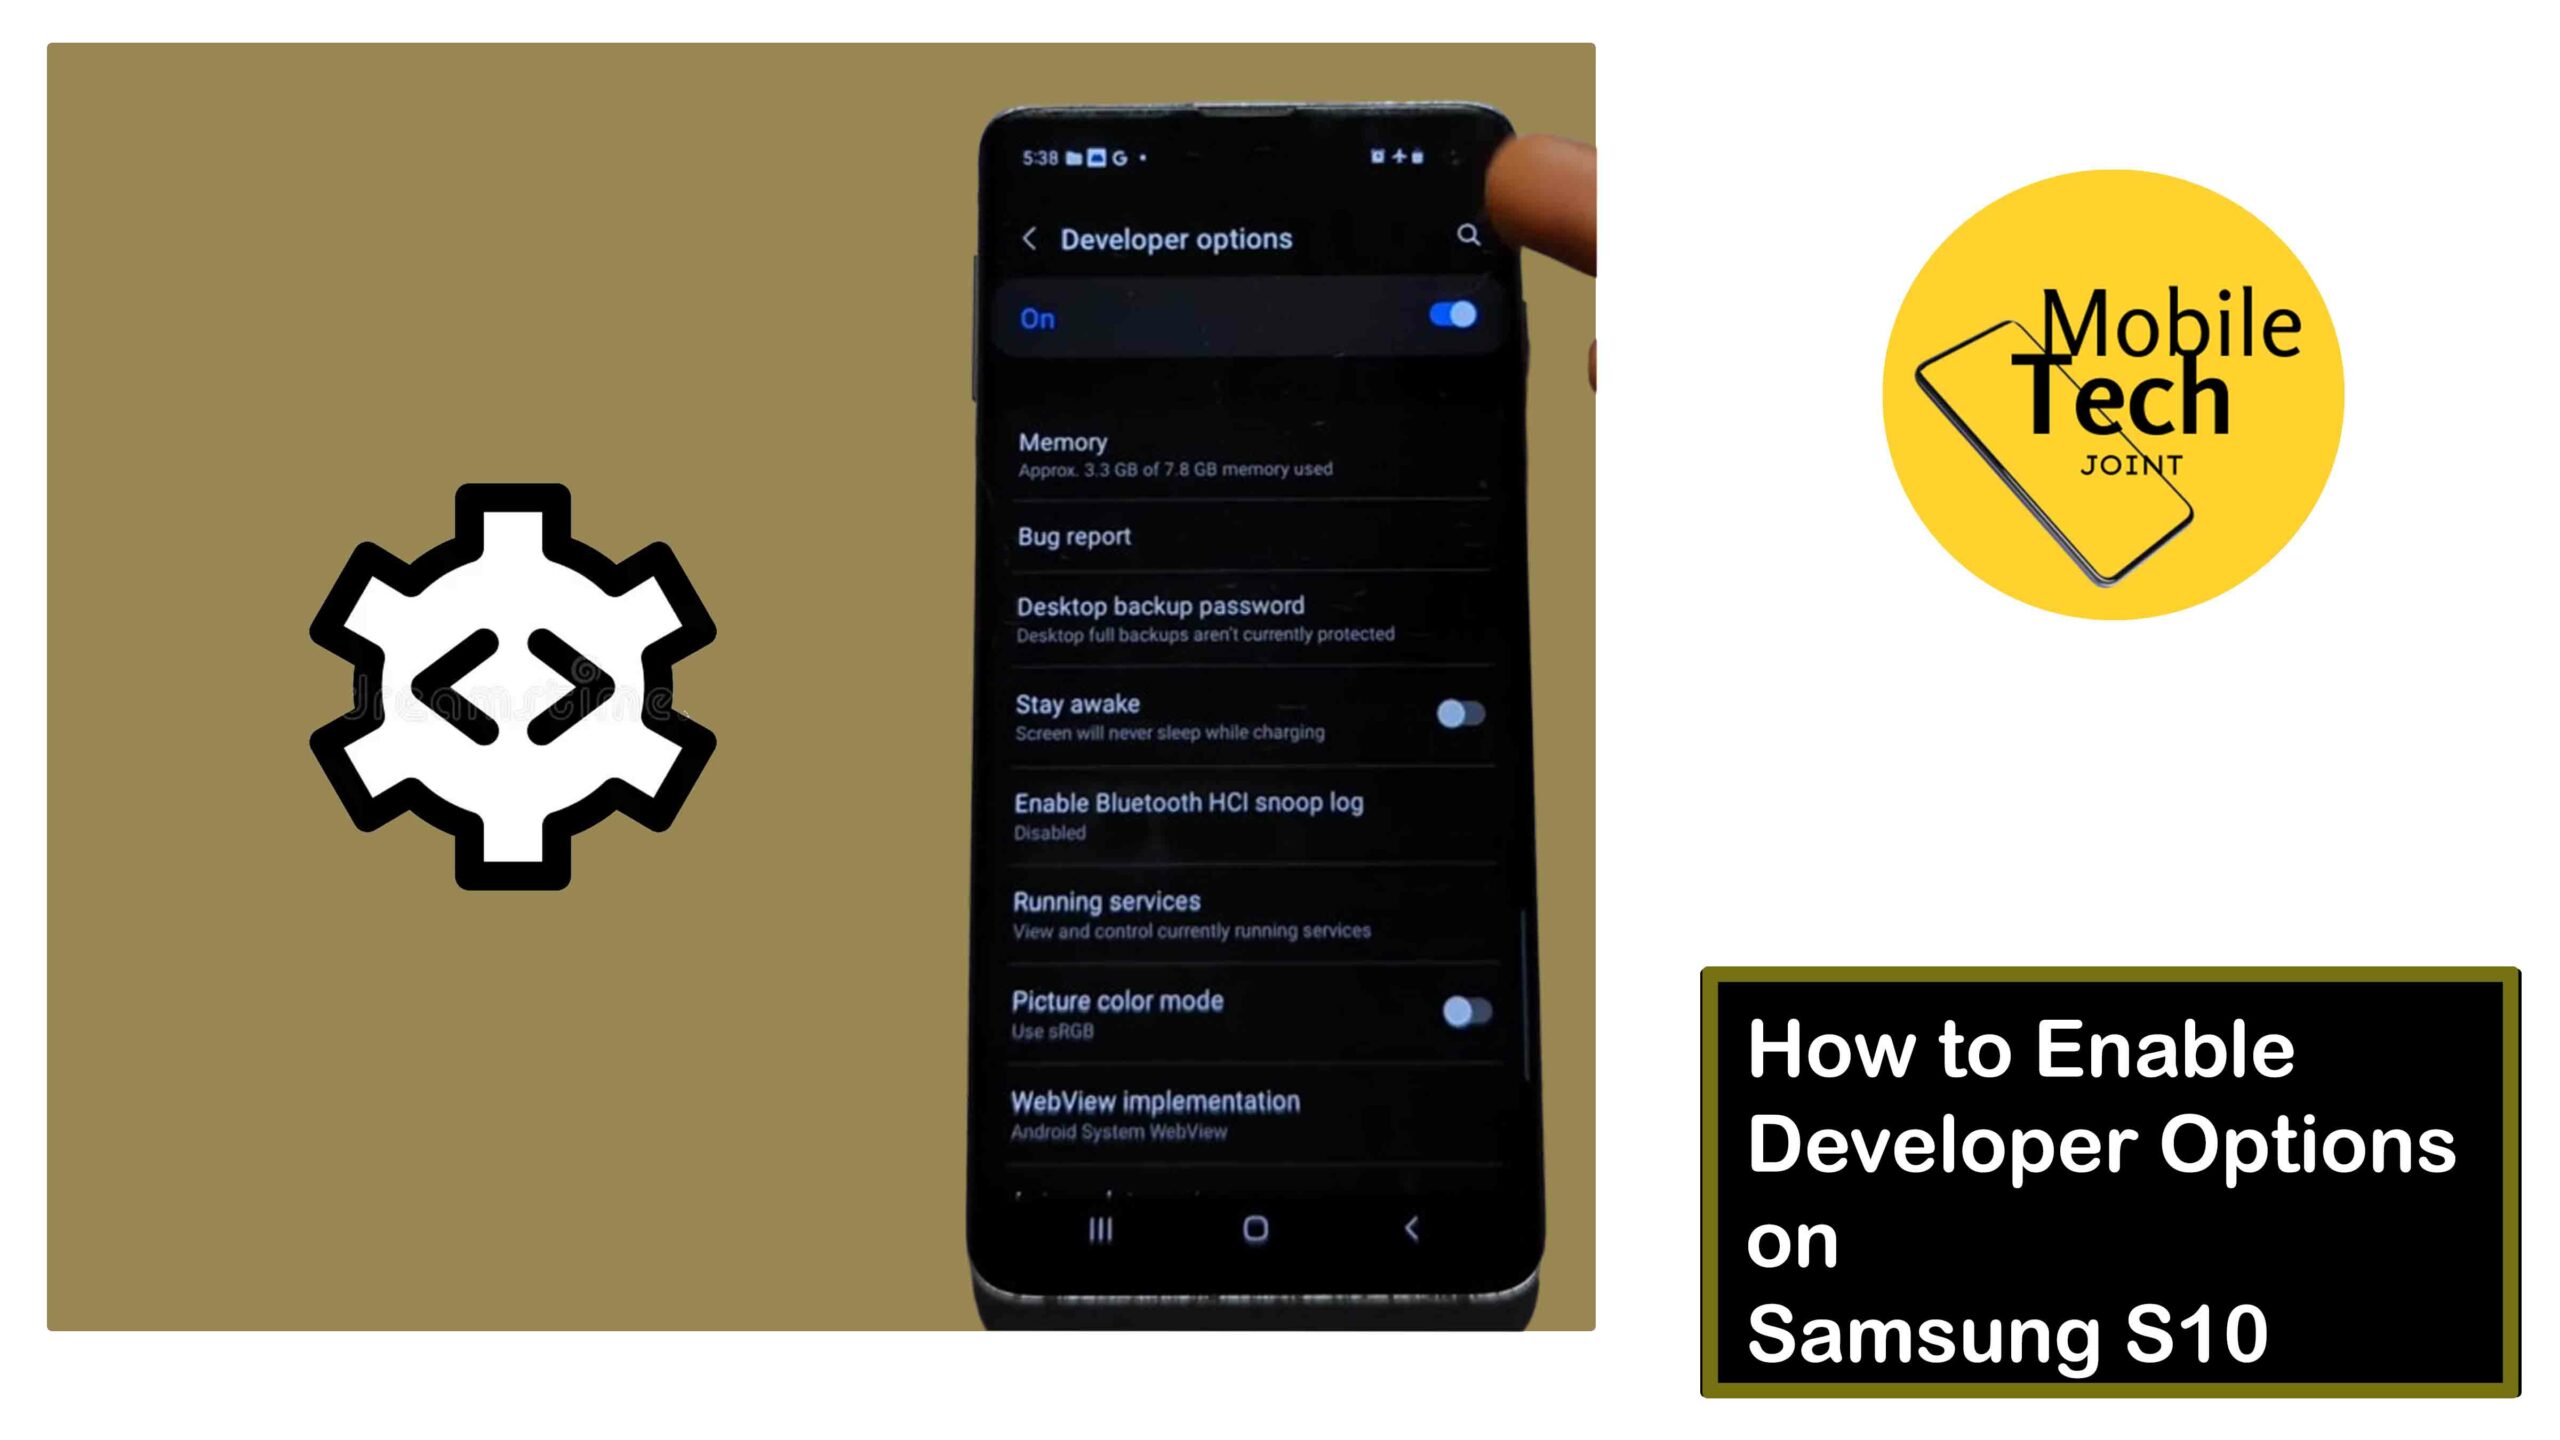
    Developer Options offer access to hidden settings that can customize your S10’s behavior in various ways.

    For example, you can enable USB debugging for file transfer or activate features like “Stay awake” to prevent the screen from automatically turning off while charging.

    • Performance Monitoring

    Certain options allow you to monitor your S10’s performance, such as tracking CPU usage and memory allocation.

    How to Enable Developer Options on Samsung S10

    Before you could possibly enable the Developer options feature on your Samsung Galaxy S10, you will have to read and follow the procedures outlined below:

    • Open the Settings app on your Samsung S10.
    • Scroll down and tap on  the About Phone option.
    • Locate the Software Information tab and tap on it.
    • Now you have to find  the Build Number option. You might need to scroll down a bit.
    • The rapidly click on the Builder Number option 7 times and you’ll see a message on the screen indicating how many taps are left until Developer Options are unlocked.
    • Enter your PIN, Password, or Pattern to confirm your identity.
    • Once confirmed, you’ll see a popup message stating Developer mode has been turned On.

    Access Developer Options on Samsung S10

    After enabling the developer options on your Samsung device, you will then access it. In most cases, you wont see the developer option in same section where you enable it. So what you will do next to access it, is follow the steps below:

    • Navigate to Settings on the device you turned the developer options on.
    • Scroll to the least.
    • Then below you will see the Developer Options, you may click on it to access it.

    Those are the possible steps you need to enable and access the Developer options on your Samsung S10, this procedures also works for most Android devices.

    Important Cautions

    While Developer Options offer various functionalities, it’s crucial to use them with caution. Some settings can modify your S10’s behavior in ways that might impact performance or stability.

    It’s recommended to only enable options you understand and avoid modifying settings unless you’re confident about the potential consequences.

    Conclusion

    By enabling Developer Options on your Samsung S10, you unlock an array of hidden features and settings.

    Explore this menu responsibly, and you might discover valuable tools for troubleshooting, performance monitoring, or even customizing your S10’s user experience in unforeseen ways.

    Remember, a little knowledge goes a long way, so  be cautious while venturing into these advanced settings. Happy exploring!

    What if I Enable a Setting I Don’t Understand my Phone?

    Most Developer Options can be disabled and reset to their default settings.  If you encounter an issue, navigate back to the specific setting you modified and toggle it back to the off position.

    Are there Any Risks in Enabling Developer Options?

    While unlikely, some settings within Developer Options have the potential to alter your S10’s behavior in unforeseen ways.  It’s always best to research any setting before enabling it, especially if you’re unsure about its function.

    Is it Okay to Keep Developer Options Enabled all the Time?

    For most users, keeping Developer Options disabled is perfectly acceptable.

    You can enable them only when needed for troubleshooting or specific purposes and then disable them again afterward.

    For more insights on this article, check out this video tips across our social platform:

  • How to Enable Bluetooth on Google Pixel Watch

    How to Enable Bluetooth on Google Pixel Watch

    The Google Pixel Watch thrives on connectivity, allowing you to stay informed, manage notifications, and even make calls directly from your wrist.

    Enable Bluetooth on Google Pixel Watch

    But to unleash this potential, you’ll need to enable Bluetooth. Bluetooth technology on the Google Pixel Watch facilitates communication with your smartphone, enabling a range of features and functionalities.

    However, if you would want to enable this feature on your Google Pixel Watch but do not know how? kind read and follow the procedures outlined in this blog carefully because it gives insights on how to enable bluetooth on Google Pixel watch.

    How to Enable Bluetooth on Google Pixel Watch

    Here’s a quick guide on activating Bluetooth on your Pixel Watch and pairing it with your smartphone:

    Enable Bluetooth on the Pixel Watch

    Follow the steps carefully:

    • Press the crown button or double-tap the screen to activate the watch face.
    • From the watch face, swipe down from the top of the screen to access the Quick Settings menu.
    • Look for the Bluetooth icon within the Quick Settings menu.
    • Tap the Bluetooth icon to toggle it on.
    • Access Bluetooth Settings for More Control: Tap and hold the Bluetooth icon. This will open the dedicated Bluetooth settings menu on your watch.

    Enable Bluetooth through Settings App

    • Swipe down from the watch face and tap on the cogwheel icon (Settings) located within the Quick Settings menu.
    • Scroll down through the Settings options and click Connectivity. Tap on it to access connection settings.
    • Locate the Bluetooth option within the Connectivity menu and click on it.

    RelatedHow to Access Timer on Google Pixel Watch

    Pair Pixel Watch with Smartphone

    Once you’ve enabled Bluetooth, you can pair your Pixel Watch with your smartphone:

    • Make sure Bluetooth is enabled on your phone.
    • Open the Google Pixel Watch App on your phone.

    Follow the on-screen pairing instructions. The app will guide you through a step-by-step process to establish a connection between your watch and phone.

    Once you are done following the on-screen instructions provided by the watch, then you’ve successfully paired it with your smartphone. You can now enjoy the convenience of a connected smartwatch experience.

    Conclusion

    By enabling Bluetooth on your Google Pixel Watch, you unlock a world of possibilities.

    From staying connected with notifications to managing calls and leveraging various functionalities, Bluetooth serves as the bridge between your watch and the broader digital ecosystem.

    So, keep Bluetooth enabled to experience the full potential of your Pixel Watch and stay seamlessly connected throughout your day.

    Does Bluetooth Drain Battery Life?

    Yes, enabling Bluetooth will slightly impact battery life. However, the convenience of a connected watch often outweighs the minimal drain. Optimize usage by disabling Bluetooth when not needed.

    Can I Pair My Pixel Watch with Any Phone?

    No, Pixel Watch currently works best with compatible Android phones. Check Google’s support resources for confirmed compatible devices.

    What Happens if Bluetooth Disconnects?

    Some functionalities might be limited. Reconnect Bluetooth through your watch settings or the Pixel Watch app to restore full functionality.

    Can I Use Wi-Fi Instead of Bluetooth?

    While Bluetooth is primary, Wi-Fi can be used for some downloads or updates on the Pixel Watch. Explore connection settings on your watch for Wi-Fi options.

    How Do I Forget a Bluetooth Connection?

    Within the Pixel Watch Bluetooth settings, you can find previously paired devices and choose to “Forget” unwanted connections.

    For more insights on this article, check out these video tips across our social platforms:

  • How to Adjust Wrist Orientation on Google Pixel Watch

    How to Adjust Wrist Orientation on Google Pixel Watch

    The Google Pixel Watch offers a customizable experience, allowing you to tailor its functionality to your preferences.

    Adjust Wrist Orientation on Google Pixel Watch

    One key aspect of personalization is wrist orientation. This feature lets you choose how the watch display aligns with your dominant hand and wearing position.

    Whether you’re a righty who wears your watch traditionally or a lefty who prefers it on the inside of your wrist, wrist orientation ensures a seamless user experience.

    How to Adjust Wrist Orientation on Google Pixel Watch

    Here are the basic steps needed to successfully adjust your wrist orientation on your Google Pixel Watch.

    Using the Pixel Watch Settings

    • Swipe down from the top of the watch face to access the Quick Settings menu.
    • Tap on the Settings icon (cogwheel symbol).
    • Scroll down and select the Display option.
    • Under Display options, locate Wrist orientation.
    • Choose between Left or Right depending on which wrist you wear the watch on.
    • You’ll see the watch screen automatically rotate to reflect your chosen orientation.

    Using the Google Pixel Watch App

    • On your smartphone, open the Google Pixel Watch App.
    • Navigate to Watch preferences.
    • Select the Watch Orientation option.
    • Choose Left or Right based on your wrist preference.
    • The changes will automatically sync to your Pixel Watch, adjusting the display orientation.

    Those are the required steps.

    RelatedHow to Adjust Font Size on Google Pixel Watch

    Additional Considerations

    Here are some additional considerations:

    • Crown Location

    While adjusting wrist orientation, you can also choose the location of the digital crown (the rotating dial on the side).

    This allows you to decide if the crown appears on the top or bottom based on your wearing style.

    • Impact on Functionality

    Changing wrist orientation might affect some features that rely on sensor placement. For instance, “tilt-to-wake” might activate differently depending on your chosen orientation.

    Experiment and find the setup that feels most natural for your usage.

    Conclusion

    By customizing your Pixel Watch’s wrist orientation, you can ensure a comfortable and intuitive experience, whether you’re checking notifications, tracking workouts, or simply glancing at the time.

    So go ahead, explore the options, and personalize your watch to perfectly suit your style and preferences!

    Does Wrist Orientation Affect Battery Life?

    Nope! Wrist orientation itself doesn’t impact battery life. However, features triggered by wrist movements (like “tilt-to-wake”) might be affected.

    These features rely on motion sensors, and with a wrist orientation change, the sensor might not be in the optimal position to detect your movement as efficiently. Disabling “tilt-to-wake” if you prefer manually activating the display can help conserve battery life.

    Can I Change Wrist Orientation After Setup?

    Absolutely! You can adjust wrist orientation anytime through the watch settings or the Pixel Watch app.

    This flexibility allows you to experiment and find the most comfortable position for checking notifications, tracking workouts, or simply glancing at the time.

    What if My Watch Face Doesn’t Rotate?

    Not all watch faces support automatic rotation. Check your watch face settings to see if it offers an option to adjust for different wrist orientations.

    If not, consider choosing a different watch face that adapts to the new orientation, ensuring a seamless viewing experience regardless of your dominant hand or wearing style.

    Will My Apps Work Differently?

    Most apps are not affected by wrist orientation. However, some fitness apps that rely on specific sensor positions, like those tracking wrist movements for exercise routines, might require adjustments based on your chosen orientation.

    Consult the app’s instructions or support resources for guidance on optimizing its functionality with your preferred wrist orientation setting.

    Can I Set Different Orientations for Watch Faces?

    Currently, wrist orientation applies to the entire watch and cannot be customized for individual watch faces.

    This means all watch faces will adapt to the same orientation setting you choose. While this might limit some personalization options, it ensures a consistent user experience across all watch faces on your Pixel Watch.

    For more insights on this article, check out these video tips across our social platforms:

  • How to Adjust Screen Brightness on Google Pixel Watch

    How to Adjust Screen Brightness on Google Pixel Watch

    The Google Pixel Watch has an amazing display, however the appropriate brightness level varies depending on the situation.

    Adjust Screen Brightness on Google Pixel Watch

    Fortunately, the Pixel Watch provides a simple way to adjust the screen brightness to meet your requirements and environment.

    This article will show you how to adjust screen brightness on Google Pixel Watch for maximum viewing comfort and battery efficiency. All you need to do is read and follow the instructions carefully in this blog for positive result.

    Why Adjust on Pixel Watch?

    The Pixel Watch’s screen brightness controls the intensity of light that is emitted by the display.

    A lower brightness setting is easier on the eyes in low-light environments, while a higher brightness might be necessary for clear visibility in bright daylight.

    Additionally, adjusting brightness can contribute to optimizing battery life, lower brightness settings typically consume less power.

    How to Adjust Brightness on Google Pixel Watch

    There are two primary ways to adjust the screen brightness on your Google Pixel Watch:

    Using Swipe Down Menu (Quick Access)

    Follow the procedures outlined here below:

    • Wake up the screen by tapping on it or pressing the crown button.
    • Swipe down from the top of the watch face to access the Quick Settings menu.
    • Locate the Brightness icon, which typically resembles a sun icon.
    • Tap and hold the Brightness icon to access the brightness adjustment slider.
    • Slide your finger up or down on the slider to adjust the brightness level. A higher position on the slider indicates a brighter display.
    • Release your finger when you reach the desired brightness level.

    Using Settings App 

    As stated above, follow the procedures carefully for succesful results:

    • Press the crown button to access the app list.
    • Locate and tap the Settings app icon.
    • Scroll down and tap on Display.
    • Scroll down and select Adjust Brightness tab.
    • Now you may choose to either descrease your brightness with the minus button or the plus button to increase.

    Those are the steps required.

    Tips for Managing Brightness

    Here are some helpful tips for managing screen brightness on your Pixel Watch:

    • Enable Automatic Brightness

    The Pixel Watch offers an “Automatic brightness” option within the Display settings. When enabled, the watch automatically adjusts the brightness based on the ambient light conditions.

    • Adjust Brightness Based on Activity

    Consider lowering the brightness for nighttime use or while indoors to improve comfort and potentially save battery life. Increase the brightness when outdoors or in bright environments for better visibility.

    Related: How to Enable Sunlight Boost on Google Pixel Watch

    Conclusion

    By mastering the art of adjusting screen brightness on your Google Pixel Watch, you can ensure optimal comfort and visibility throughout the day.

    Utilize the quick access method for on-the-go adjustments, or delve into the settings app for finer control.

    Remember, a well-balanced brightness setting enhances your viewing experience and helps you get the most out of your Pixel Watch’s battery. So, go forth and explore the world with a perfectly illuminated display!

    Does Lowering Brightness Impact the Watch’s Display Quality?

    While very low brightness levels might make text or details slightly harder to see, most users find a comfortable balance between brightness and clarity.

    Experimenting with different levels will help you find the sweet spot.

    Will Enabling Automatic Brightness Drain my Battery?

    Automatic brightness relies on the watch’s sensors to adjust brightness constantly.

    In some cases, this might lead to slightly higher battery consumption compared to a fixed, lower brightness setting. However, the convenience of automatic adjustments often outweighs this minimal impact.

    Can I Schedule the Brightness to Adjust Automatically?

    Unfortunately, the Pixel Watch currently doesn’t offer built-in brightness scheduling. However, enabling Automatic Brightness and adjusting the brightness based on your typical usage patterns (lower at night) can achieve a similar effect.

    For more insights on this article, check out these video tips across our social platforms:

  • How to Scan Threats on Samsung S24 Ultra

    How to Scan Threats on Samsung S24 Ultra

    The Samsung Galaxy S24 Ultra is a powerhouse, but staying protected from online threats is crucial. Thankfully, your phone comes equipped with built-in security features to safeguard your device and data.

    How to Scan Threats on Samsung S24 Ultra

    This article will guide you through utilizing the scan function to identify and neutralize potential threats on your S24 Ultra. All you are required of is follow through the procedures outlined in this blog carefully.

    About Threats on S24 Ultra

    Mobile threats can come in various forms, including viruses, malware, spyware, and phishing attempts.

    These threats can steal your data, damage your device, or disrupt its performance. Regularly scanning your phone helps identify and eliminate these threats before they can cause harm.

    How to Scan Threats on Samsung S24 Ultra

    The Galaxy S24 Ultra boasts Samsung’s security platform, Knox, which incorporates various features to protect your device. Here’s how to scan threats:

    • Open the Settings app on your phone.
    • Scroll down and tap on Battery and device care.
    • Locate Device Protection and tap on it.
    • Under Device Protection, you’ll see the Scan options. You’ll typically find two options:
    • Scan Phone: This initiates a comprehensive scan of your entire device, including apps, files, and system settings.
    • Scan for Malware: This focuses specifically on detecting malicious software applications.
    • Choose the scan you prefer (typically “Scan phone” for a complete check).
    • Tap Scan to initiate the process. Your phone will scan your device and notify you of any identified threats.

    You could get possitive results when you follow the steps on how to scan threats on Samsung S24 Ultra carefully.

    Additional Security Measures

    Here are some additional steps to enhance your S24 Ultra’s security:

    • Keep Software Updated

    Regularly update your phone’s operating system and apps to benefit from the latest security patches.

    • Download Apps from Trusted Sources

    Only download and install apps from the official Galaxy Store or reputable sources.

    • Be Wary of Phishing Links

    Don’t click on suspicious links or attachments in emails or text messages.

    • Use Strong Passwords

    Utilize unique and complex passwords for all your accounts.

    Conclusion

    By utilizing the built-in scan function and implementing these additional security practices, you can significantly enhance your S24 Ultra’s protection against potential threats.

    Regular scans and responsible online behavior are essential for safeguarding your device, data, and privacy.

    So, take charge of your security and enjoy a worry-free mobile experience with your S24 Ultra.

    How Long Does a Scan Take on my S24 Ultra?

    Scan times can vary depending on the chosen scan type (“Scan phone” or “Scan for malware”) and the amount of data stored on your device.

    A full scan might take several minutes, while a malware scan could be quicker.

    What Happens if my Phone Detects a Threat?

    If a threat is identified, your S24 Ultra will typically notify you and provide options to quarantine or remove the malicious app or file.  Follow the on-screen instructions to neutralize the threat.

    Is there a Way to Schedule Automatic Scans?

    Unfortunately, Samsung’s built-in security app doesn’t currently offer automatic scan scheduling. However, you can manually run scans periodically for optimal protection.

    Can I Use Third-party Antivirus Apps on my S24 Ultra?

    Yes, you can download and install reputable third-party antivirus apps from the Galaxy Store. These apps might offer additional features or scan variations compared to Samsung’s built-in security.

    For more insights on this article, check out these video tips across our social platforms:

  • How to Enable Battery Protection on Samsung S24 Ultra

    How to Enable Battery Protection on Samsung S24 Ultra

    The Samsung Galaxy S24 Ultra packs a powerful battery, but optimizing its lifespan is essential for uninterrupted use throughout the day.

    Enable Battery Protection on Samsung S24 Ultra

    Luckily, the S24 Ultra includes a built-in Battery Protection feature that extends battery life by regulating charging cycles. This post will walk you through how to enable Battery Protection on your S24 Ultra.

    Battery Protection Samsung S24 Ultra

    Lithium-ion batteries, like the one in your S24 Ultra, can degrade over time, especially when subjected to frequent full charging cycles.

    Battery Protection helps mitigate this by limiting the maximum charge level your phone reaches. This reduces stress on the battery and potentially extends its overall lifespan.

    How to Enable Battery Protection on Samsung S24 Ultra

    Here’s how to enable Battery Protection on Samsung S24 Ultra, follow through carefully:

    • Open the Settings app on your S24 Ultra.
    • Scroll down and tap on “Battery and device care”.
    • Locate “Battery” and tap on it.
    • Under the battery settings, you’ll see the “Battery protection” option.
    • Toggle the switch next to “Battery protection” to the on position (usually green or blue).

    Follow through the procedures carefully.

    Choosing the Right Protection Level

    Once enabled, you can further customize Battery Protection by selecting your preferred maximum charge level:

    • Basic

    The battery will stop charging when it reaches 100% and resume charging only when it drops below 95%.

    • Adaptive

    This option utilizes your sleep schedule to optimize charging. It will prioritize reaching 80% charge by your bedtime and then complete the remaining charge before you wake up.

    • Maximum

    This mode limits the maximum charge level to 80%. While offering the most significant battery lifespan benefit, it might not be ideal if you need your phone to be fully charged throughout the day.

    Benefits of Using Battery Protection

    The Samsung S24 Ultra boasts with its powerful battery, but even the most efficient technology can benefit from optimization.

    The built-in Battery Protection offers a range of advantages to help you maximize your phone’s lifespan and keep you powered throughout the day.

    Here are 10 reasons to enable Battery Protection on your S24 Ultra:

    • Reduced Wear and Tear

    Lithium-ion batteries degrade over time, especially when constantly kept at high charge levels. Battery Protection helps by:

    • Limiting Peak Charge

    Choose between Basic (stops charging at 95%) or Maximum (stops at 80%) to prevent the phone from constantly pushing the battery to its limit.

    • Adaptive Charging

    This mode learns your sleep schedule and avoids unnecessary overnight charging, mimicking natural charging patterns.

    • Maintain Battery Capacity

    Over time, your battery’s ability to hold a charge can diminish. Battery Protection helps slow down this degradation.

    • Improve Overall Battery Health

    By keeping the battery operating within optimal temperature ranges, Battery Protection promotes a longer lifespan.

    • Monitor Battery Health

    Keep an eye on your battery’s overall health and identify potential issues early on.

    • Optimize Charging Habits

    Fine-tune your charging behavior to fit your needs, whether prioritizing speed or long-term battery health.

    • Minimize Background App Activity

    Battery Protection can potentially limit background app activity when the phone isn’t in use, reducing overall power drain.

    • Extend Time Between Charges

    By optimizing charging and battery health, you can enjoy extended usage time before needing to plug in again.

    Conclusion

    Battery Protection is a valuable tool on the Samsung Galaxy S24 Ultra, empowering you to take control of your battery health.

    By enabling this feature and choosing the appropriate protection level, you can optimize your phone’s battery life and enjoy extended use throughout the day.

    Remember, a healthy battery translates to a smoother and more enjoyable mobile experience.

    Does Battery Protection Affect my Phone charging?

    Yes, depending on the chosen protection level. With a lower target charge limit (e.g., 80%), your phone will reach full charge faster compared to charging to 100%.

    What if I Need my Phone Fully Charged for a Long Trip?

    You can temporarily disable Battery Protection for specific situations.  Simply toggle the switch back to “off” and your phone will charge to 100%. Remember to re-enable Battery Protection afterward for long-term benefits.

    Can I Set Maximum Charge Level On my Samsung?

    Unfortunately, Samsung’s Battery Protection currently only offers the pre-defined options (Basic, Adaptive, Maximum). You cannot set a specific custom charge level between 80% and 100%.

    For more insights on this article, check out these video tips across our social platforms:

  • How to Show Battery Percentage on Samsung S22 Ultra

    How to Show Battery Percentage on Samsung S22 Ultra

    The Samsung Galaxy S22 Ultra boasts a powerful battery that fuels your day-to-day activities.

    Show Battery Percentage on Samsung S 24 Ultra

    But keeping track of your remaining juice can be crucial, especially when you’re on the go.  While the default status bar on the S22 Ultra might only display a battery icon, fret not!

    There’s a simple way to reveal the exact battery percentage, allowing you to stay informed and manage your power usage effectively.

    Why Show Battery Percentage?

    Knowing your precise battery percentage offers several advantages:

    • Accurate Power Monitoring

    The battery percentage provides a clearer picture of your remaining power, allowing you to plan your phone usage accordingly.

    • Optimized Charging

    By monitoring the percentage, you can avoid overcharging or ensure your phone is adequately charged before heading out.

    • Peace of Mind

    Having the battery percentage readily available eliminates the anxiety of relying solely on the battery icon’s vague representation.

    How to Show Battery Percentage on Samsung Galaxy S22 Ultra

    Here’s how to enable the show battery percentage option on your S22 Ultra:

    • Swipe down from the top of your screen to access the notification panel.
    • Locate the Settings icon in the top right corner and tap on it. This opens the panel options.
    • Scroll down till you see Device Care and click on it.
    • Click on the Battery tab to continue.
    • Scroll down to where it says Show Battery Percentage, toggle it on to enable Battery percentage on your Samsung S 24 Ultra.

    Those are the required steps needed to enable the Show battery percentage option on your Samsung device.

    Tips for Battery Management

    Maximizing your S22 Ultra’s battery life goes beyond just knowing the percentage. Here are some additional tips:

    • Adjust Screen Brightness

    Reducing screen brightness is a significant factor in extending battery life.

    • Enable Power Saving Mode

    This mode restricts background activity and throttles performance slightly, but it can significantly improve battery life.

    • Manage Location Services

    Limit apps that constantly access your location, as this can drain the battery.

    • Monitor Battery Usage

    Within Settings > Battery, you can analyze which apps are consuming the most power and take appropriate actions.

    Conclusion

    By following these steps, you’ve successfully unlocked the battery percentage display on your Samsung Galaxy S22 Ultra.

    By keeping this information readily available and implementing some basic battery management practices, you can optimize your phone’s performance and ensure you have enough power to conquer your day.

    So go forth, explore, and stay connected with confidence!

    Can I Customize the Way the Battery Percentage Looks?

    Unfortunately, Samsung doesn’t offer extensive customization options for the battery percentage display. It typically appears as a simple numerical value next to the battery icon.

    Will Showing the Battery Percentage Drain my Battery?

    No, displaying the battery percentage is a very minimal function and has negligible impact on battery life.

    Does Wireless Charging Affect the Battery Life of my S22 Ultra?

    Both wired and wireless charging methods have minimal impact on battery health if you use approved chargers. However, excessive heat can damage batteries, so avoid wireless charging in hot environments.

    Should I Keep my Phone Plugged in all the Time?

    It’s generally recommended to avoid constantly keeping your phone plugged in. Repeated full charge cycles can reduce battery health over time. Let the battery drain somewhat before plugging it in for charging.

    For more insights on this article, check out these video tips across our social platforms:

  • How to Access Storage on iPhone 14 Plus

    How to Access Storage on iPhone 14 Plus

    The iPhone 14 Plus packs a powerful punch, but storage space is a valuable commodity.  Knowing how to access and manage your storage is crucial for optimizing your iPhone’s performance.

    Access Storage on iPhone 14 Plus

    This article will guide you through accessing storage information on your iPhone 14 Plus and explore some helpful tips for maximizing your storage space.

    About Storage on iPhone 14 Plus

    Your iPhone 14 Plus comes with a set amount of internal storage space to house apps, photos, music, videos, and other files.

    Understanding how much storage you’ve used and what’s taking up the most space empowers you to make informed decisions about managing your iPhone’s content.

    How to Access Storage on iPhone 14 Plus

    Here are the steps to follow if you wish to acces the storage on your iPhone:

    • Launch the Settings app on your iPhone 14 Plus.
    • Scroll down and tap on General.
    • Locate iPhone Storage and tap on it.

    Understand Your iPhone Storage Breakdown

    Once you access iPhone Storage, you’ll see a breakdown of your storage usage. This typically includes categories like Apps, System Data, Photos, Media (music, videos, podcasts), and iCloud Drive.

    Tapping on a specific category will provide more details about what’s using space within that category.

    Related: How to Enable Dark Mode on iPhone 14 Plus

    Tips for Managing Storage on iPhone 14 Plus

    Here are some helpful tips to maximize your iPhone 14 Plus’s storage space:

    • Review and Offload Unused Apps

    Regularly assess your downloaded apps and remove any you no longer use. Offloading an app removes the app itself while keeping its data and documents, allowing you to reinstall it later if needed.

    • Manage Photos and Videos

    Photos and videos can quickly consume significant storage. Utilize iCloud Photos to store your photos and videos in the cloud, freeing up space on your device.

    You can also choose to optimize iPhone storage for photos and videos, automatically keeping high-resolution versions in iCloud and lower-resolution versions on your device.

    • Clear Safari Cache and Browsing Data

    Over time, Safari accumulates cache and browsing data. Clearing this data occasionally can help free up some storage space.

    Within Settings > Safari, you can choose to “Clear History and Website Data” to achieve this.

    • Utilize iCloud Storage

    If you frequently back up your iPhone or store a lot of data in iCloud Drive, consider upgrading your iCloud storage plan for more space.

    Conclusion

    By understanding how to access storage information and implementing these storage management tips, you can ensure your iPhone 14 Plus has enough space for the things you need and enjoy.

    Regularly monitoring your storage and taking appropriate actions will help you maintain a smooth and efficient iPhone experience.

    Can I See which Specific Apps are Using the Most Storage?

    Yes!  Within “iPhone Storage,” tapping on the “Apps” category will display a list of all downloaded apps, ranked by storage usage.

    This allows you to identify apps that are consuming a significant amount of space.

    What’s the Difference Between “Delete App” and “Offload App”?

    “Delete App” removes the entire app and its data from your device. “Offload App” only removes the app itself while keeping its data and documents.

    You can reinstall the offloaded app later without losing your data.

    Is there a Way to Automatically Offload Unused Apps?

    While there’s no built-in option for automatic offloading, iOS can automatically offload unused apps when storage space is low. This feature can be enabled within Settings > App Store.

    How Can I Tell if iCloud Photos is Working Correctly?

    Within “Photos” in the Settings app, you can check if “Optimize iPhone Storage” is enabled. This ensures high-resolution photos are stored in iCloud, freeing up space on your device.

    What Happens if my iPhone Storage is Full?

    A full storage space can impact your iPhone’s performance.

    You might experience difficulties downloading new apps, taking photos or videos, or updating your iOS. Regularly managing storage helps prevent these issues.

    For more insights on this article, check out these video tips across our social platforms:

  • How to Enable Dark Mode on iPhone 14 Plus

    How to Enable Dark Mode on iPhone 14 Plus

    The iPhone 14 Plus boasts a stunning display, but bright interfaces can be harsh on your eyes, especially at night or in low-light environments.

    Enable Dark Mode on iPhone 14 Plus

    Fortunately, the iPhone 14 Plus includes a built-in Dark Mode, which darkens the whole user interface, menus, and supported apps.

    This not only enhances viewing comfort and reduces eye strain but can also potentially contribute to improved battery life.  This article will guide you through enabling Dark Mode on your iPhone 14 Plus and explore its benefits.

    About Dark Mode on iPhone 14 Plus

    Dark Mode on the iPhone 14 Plus utilizes a dark color palette with lighter text, creating a more balanced and visually appealing interface for darker environments.

    This reduces the amount of bright light emitted from the screen, minimizing eye strain and promoting a more comfortable viewing experience.

    How to Enable Dark Mode on iPhone 14 Plus

    There are two primary ways to enable Dark Mode on your iPhone 14 Plus, follow through the steps carefully for positive results:

    Using Control Center

    If you wish to enable the dark mode from your control center, then follow the steps below:

    • Swipe down from the top-right corner of your screen to access Control Center.
    • Locate the Brightness slider. It resemble a sun icon.
    • Hold on the Brightness slider.
    • Look for the Dark Mode toggle next to the brightness bar.
    • Tap the Dark Mode toggle to turn it on (usually turns white).

    Using Settings

    Here are the steps if you wish to enable throuht the settings app:

    • Open the Settings app on your iPhone 14 Plus.
    • Tap on Display & Brightness.
    • Locate the Appearance section.
    • Choose between Light and Dark mode. Selecting Dark will enable Dark Mode.

    Follow through the steps carefully.

    Related: How to Access Keyboard Settings on iPhone 14 Plus

    Benefits of Dark Mode on iPhone 14 Plus

    There are several advantages to enabling Dark Mode on your iPhone 14 Plus:

    • Reduced Eye Strain

    Dark Mode minimizes the amount of bright light emitted from the screen, especially at night.

    This can significantly reduce eye strain and fatigue, making it more comfortable to use your phone in low-light environments.

    • Improved Battery Life

    While the impact might vary depending on usage patterns, studies suggest dark themes can potentially improve battery life on OLED displays like the one found in the iPhone 14 Plus.

    Dark pixels consume less power compared to bright white pixels.

    • Enhanced Readability

    Dark Mode with high-contrast text can improve readability in certain situations, particularly for users with sensitivities to bright light.

    • Aesthetics

    Many users simply prefer the visual appeal of a dark interface. Dark Mode can create a more modern and sleek look for your iPhone 14 Plus.

    Conclusion

    Dark Mode is a valuable feature on the iPhone 14 Plus, offering a combination of visual comfort, potential battery savings, and a touch of aesthetic preference.

    With its ease of use and clear benefits, Dark Mode allows you to personalize your iPhone 14 Plus experience and enjoy a more comfortable and potentially more efficient way to interact with your phone.

    Does Dark Mode Affect all Apps on my iPhone?

    While Dark Mode applies to the system-wide interface, individual apps decide if they support Dark Mode.

    You might need to enable Dark Mode within specific apps for them to adopt the dark color scheme.

    Can I Schedule Dark Mode to Turn on and Off Automatically?

    Yes!  Within Settings > Display & Brightness, look for the “Auto-Brightness” option.

    With this enabled, you can set a schedule for Dark Mode to activate and deactivate based on sunset and sunrise times in your location.

    Is there a Way to Adjust the Intensity of Dark Mode?

    Currently, iPhone doesn’t offer direct control over Dark Mode intensity. However, some apps with built-in Dark Mode might allow customization options.

    Does Dark Mode make it Harder to See Certain Content?

    In rare cases, some content or images within apps might appear less visible with Dark Mode enabled.  If you encounter such situations, you can temporarily disable Dark Mode or adjust app-specific settings if available.

    Will Dark Mode Save Battery Life?

    The impact of Dark Mode on battery life can vary depending on screen brightness, usage patterns, and specific phone model.

    While OLED displays generally benefit more from Dark Mode in terms of battery savings, the results might not be significant in all scenarios.

    For more insights on this article, check out these video tips across our social platforms:

  • How to Access Keyboard Settings on iPhone 14 Plus

    How to Access Keyboard Settings on iPhone 14 Plus

    The iPhone 14 Plus boasts a powerful keyboard that lets you communicate and express yourself with ease.

    Access Keyboard Settings on iPhone 14 Plus

    Did you know you can customize this keyboard to perfectly suit your typing preferences? Don’t bother yourself on how to do so! All you need to do is follow through the steps outlined here carefully.

    This article will guide you through accessing the keyboard settings on your iPhone 14 Plus, allowing you to unlock a world of personalization options.

    About Keyboard Settings on iPhone 14 Plus

    The iPhone’s keyboard settings offer a range of features to enhance your typing experience. You can adjust functionalities like:

    • Autocorrection

    Fine-tune autocorrection behavior or turn it off completely for a more predictable typing experience.

    • Predictive Text

    Control the suggestions offered by QuickType, including enabling or disabling emoji suggestions or turning off predictive text altogether.

    • Keyboard Sounds

    Tweak or disable the clicking sounds that occur with each keypress.

    • Haptic Feedback

    Enable or disable haptic feedback, which provides a subtle vibration when you press a key.

    • Text Replacement

    Create custom shortcuts for frequently used phrases or words, saving you time and effort.

    • Dictation

    Enable or customize dictation settings for voice-to-text functionality.

    • Keyboard Layouts

    Choose from a variety of keyboard layouts, including different languages or one-handed typing options.

    How to Access Keyboard Settings on iPhone 14 Plus

    Accessing the keyboard settings on your iPhone 14 Plus is a simple process, follow the steps below carefully:

    • Open the Settings app on your iPhone 14 Plus.
    • Scroll down and tap on General.
    • Locate the Keyboard section and tap on it.

    Those are the procedures required to access the keyboard settings on your iPhone 14 Plus.

    Exploring Keyboard Settings Options

    Once you’ve accessed the Keyboard settings, you’ll find a variety of options to personalize your typing experience. Here’s a glimpse into some key features:

    • Autocorrection & Suggestions

    Within the “Autocorrection” section, you can toggle autocorrection on or off, adjust capitalization settings, and even add or remove learned words from the autocorrect dictionary. You can also control QuickType suggestions by enabling or disabling emoji suggestions and predictive text functionality.

    • Sounds & Haptics

    The “Sounds” section allows you to enable or disable the clicking sounds that occur with each keypress. Similarly, the “Haptics” section lets you control the haptic feedback that provides a subtle vibration when you press a key. Choose the combination that best suits your preferences.

    • Text Replacement

    This feature allows you to create shortcuts for frequently used phrases or words. For example, you can set a shortcut for “on my way” or your email address, saving you time and effort while typing.

    • Dictation

    Enable dictation to utilize voice-to-text functionality. You can also customize dictation settings like language recognition and enabling/disabling “Automatic Punctuation”.

    • Keyboards

    This section allows you to add or remove keyboard layouts for different languages or enable one-handed typing options for easier typing on the go.

    Conclusion

    The iPhone 14 Plus’s keyboard settings empower you to personalize your typing experience and optimize it for comfort and efficiency.

    By exploring the various options available, you can create a keyboard setup that perfectly aligns with your preferences, making communication and expression on your iPhone 14 Plus a more enjoyable experience.

    So, delve into the keyboard settings and unlock the full potential of your iPhone’s typing capabilities.

    Can’t Find the Keyboard Section in Settings?

    The Keyboard section might be located under a different menu depending on your iOS version. Try searching for “Keyboard” within the Settings app using the search bar at the top.

    How Do I Change the Language on my iPhone Keyboard?

    You can add or remove keyboard layouts for different languages within the “Keyboards” section of the Keyboard settings. Once you’ve added a new language layout, you can switch between languages by tapping and holding the globe icon on the keyboard itself.

    Can I Adjust the Keyboard Size on the iPhone 14 Plus?

    While you can’t directly resize the keyboard, iOS offers one-handed typing options.

    Access the “Keyboards” section in Keyboard settings and choose either “Left-handed” or “Right-handed” to shrink the keyboard and position it on the chosen side of the screen for easier one-handed typing.

    Does Dark Theme Affect the Keyboard on iPhone 14 Plus?

    Yes, enabling Dark Theme will typically apply to the keyboard interface as well, changing it to a darker color scheme for better low-light visibility.

    Can I Customize the Look of the Keyboard Beyond Dark Theme?

    Unfortunately, iOS doesn’t offer built-in options for extensive keyboard customization beyond Dark Theme.

    However, some third-party keyboards available on the App Store might offer additional themes or color scheme options.

    For more insights on this article, check out these video tips across our social platforms: