Blog

  • Lenovo Tab Plus Review: Is It the Best Affordable Tablet or Just Another Mediocre Option?

    Lenovo Tab Plus Review: Is It the Best Affordable Tablet or Just Another Mediocre Option?

    Lenovo has long been a trusted name in the technology industry, known for producing reliable and innovative devices. In the tablet market, Lenovo offers a range of products that cater to different needs and budgets. The Lenovo Tab Plus is one of their latest offerings, promising a blend of performance, design, and value for money. This review will delve into the various aspects of the Lenovo Tab Plus to help you decide if it’s the right tablet for you.

    Lenovo Tab Plus Review: Is It the Best Affordable Tablet or Just Another Mediocre Option?

    Key Takeaways

    • Design and Build Quality: Modern aesthetics with comfortable handling.
    • Display: High-quality screen with excellent color accuracy.
    • Performance: Powerful processor suitable for multitasking and gaming.
    • Software and UI: User-friendly interface with useful pre-installed apps.
    • Battery Life: Long-lasting battery with fast-charging capability.
    • Camera Quality: Decent camera performance for photos and videos.
    • Audio Quality: Good sound quality with well-placed speakers.
    • Connectivity and Extras: Comprehensive connectivity options and additional features.
    • Price and Value: Competitive pricing offering good value for money.

    Lenovo Tab Plus Review

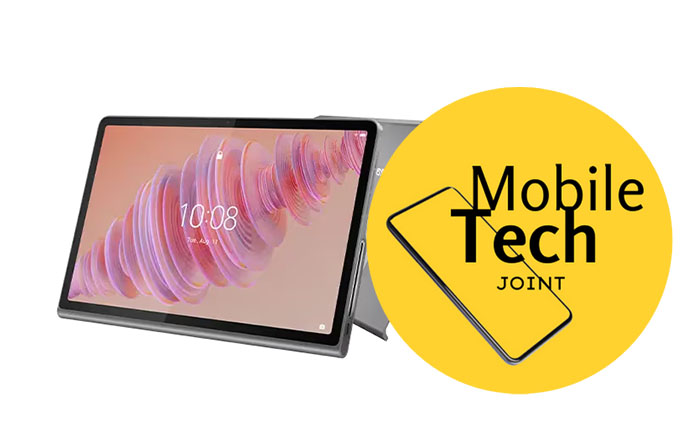
    The Lenovo Tab Plus features a sleek and modern design that is both aesthetically pleasing and functional. The tablet is constructed with high-quality materials, giving it a premium feel. Its slim profile and lightweight build make it comfortable to hold for extended periods.

    • Materials: Metal back, glass front.
    • Dimensions: 247.6 x 157.3 x 7.1 mm.
    • Weight: 490 grams.

    The ergonomic design ensures that the tablet is easy to handle, whether you’re using it for reading, watching videos, or browsing the web. The placement of buttons and ports is intuitive, allowing for easy access and operation.

    Display

    The Lenovo Tab Plus boasts a 10.3-inch FHD IPS display with a resolution of 1920 x 1200 pixels. This results in sharp and vibrant visuals, making it ideal for media consumption and productivity tasks.

    Aspect Specification
    Screen Size 10.3 inches
    Resolution 1920 x 1200 pixels
    Panel Type IPS
    Brightness 330 nits
    Color Accuracy 98% sRGB

    The display performs well under various lighting conditions, maintaining good visibility outdoors. The wide viewing angles ensure that the screen looks great from any angle, making it perfect for sharing content with others.

    Performance

    Powered by the MediaTek Helio P22T processor, the Lenovo Tab Plus delivers robust performance for a range of tasks. Coupled with 4GB of RAM, the tablet handles multitasking with ease, allowing users to switch between apps smoothly.

    • Processor: MediaTek Helio P22T.
    • RAM: 4GB.
    • Storage Options: 64GB/128GB (expandable via microSD).

    In real-world usage, the Lenovo Tab Plus performs admirably in both productivity and entertainment scenarios. Whether you’re browsing the web, streaming videos, or playing games, the tablet offers a lag-free experience.

    Software and User Interface

    The Lenovo Tab Plus runs on Android 10 with Lenovo’s custom UI. The user interface is clean and intuitive, making it easy for users of all ages to navigate.

    Pre-installed Software:

    • Lenovo Assistant: Helps optimize the tablet’s performance.
    • Kids Mode: A safe environment for children to explore.
    • Productivity Suite: Includes apps like Microsoft Office.

    The tablet also comes with a range of customization options, allowing users to tailor the experience to their preferences. The user interface is responsive, with smooth transitions and animations.

    Battery Life

    One of the standout features of the Lenovo Tab Plus is its impressive battery life. The tablet is equipped with a 7000mAh battery, providing ample power for a full day of use.

    • Battery Capacity: 7000mAh.
    • Average Usage Time: Up to 10 hours.
    • Charging Time: Approximately 3 hours with fast charging support.

    The battery performance remains consistent across different usage scenarios, ensuring that you can rely on the tablet for both work and play without worrying about frequent recharges.

    Camera Quality

    The Lenovo Tab Plus features a 13MP rear camera and a 5MP front camera. While not groundbreaking, the camera setup is adequate for casual photography and video calls.

    Camera Specification
    Rear 13MP
    Front 5MP
    • Photo Quality: Decent in good lighting conditions.
    • Video Quality: Capable of recording 1080p videos.
    • Additional Features: HDR mode, panorama, and face detection.

    The cameras perform well enough for everyday use, but they are not intended to replace a dedicated camera or smartphone for high-quality photography.

    Audio Quality

    Audio quality is another area where the Lenovo Tab Plus excels. The tablet is equipped with dual speakers that deliver clear and loud sound, making it great for watching movies or listening to music.

    • Speaker Placement: Top and bottom edges.
    • Audio Output: Clear and balanced sound.

    The presence of a 3.5mm headphone jack is a welcome addition, allowing users to connect their favorite wired headphones or speakers.

    Connectivity and Extras

    The Lenovo Tab Plus offers a range of connectivity options to ensure seamless integration with other devices and networks.

    • Wi-Fi: Dual-band 802.11ac.
    • Bluetooth: 5.0.
    • USB Ports: USB-C for charging and data transfer.

    Additional Features:

    • Stylus Support: Compatible with Lenovo’s Active Pen.
    • Keyboard Compatibility: Can be paired with a Bluetooth keyboard for enhanced productivity.

    These extras make the Lenovo Tab Plus a versatile device that can adapt to various use cases, from casual browsing to professional work.

    Price and Value for Money

    The Lenovo Tab Plus is priced competitively, offering good value for the features it provides. It’s available in two storage variants: 64GB and 128GB, with prices starting at around $250.

    Comparison to Competitors:

    • Apple iPad (8th Gen): Higher price, but offers better app ecosystem.
    • Samsung Galaxy Tab A7: Similar price range, but Lenovo offers better build quality.

    Overall, the Lenovo Tab Plus provides an excellent balance of performance, features, and affordability, making it a great choice for those looking for a capable tablet without breaking the bank.

    Pros and Cons

    Pros:

    • Sleek and modern design.
    • High-quality display.
    • Strong performance.
    • Long battery life.
    • Competitive pricing.

    Cons:

    • Cameras are just average.
    • Limited high-end features.

    Conclusion

    The Lenovo Tab Plus is a well-rounded tablet that offers a lot of value for its price. With a sleek design, solid performance, and long battery life, it’s a great option for both casual users and those looking for a productivity companion. While it may not have the best cameras or the most premium features, it more than makes up for it with its overall performance and affordability.

    Final Verdict

    If you’re in the market for a reliable and versatile tablet that won’t break the bank, the Lenovo Tab Plus is definitely worth considering. It strikes a great balance between price and performance, making it an excellent choice for a wide range of users.

    Also Check:

  • OnePlus Watch 2R First Impressions: Cost-Effective Alternative to the Watch 2

    OnePlus Watch 2R First Impressions: Cost-Effective Alternative to the Watch 2

    After a long wait, OnePlus has expanded its smartwatch lineup with the OnePlus Watch 2R, a more affordable alternative to the OnePlus Watch 2. The OnePlus Watch 2R promises to offer significant value with its new design and retained core features. Here, we dive into our first impressions of this highly anticipated device.

    OnePlus Watch 2R First Impressions: Cost-Effective Alternative to the Watch 2

    Key Takeaways

    • Design: Sleek aluminum case, lighter than the Watch 2.
    • Display: 1.43-inch AMOLED, bright and vivid.
    • Hardware: Dual-engine architecture, Snapdragon W5, and BT2700 processors.
    • Battery: 500mAh, promising long battery life.
    • Connectivity: Bluetooth, Wi-Fi, NFC, but no LTE.
    • Price: Priced at Rs 17,999, significantly cheaper than the Watch 2.

    OnePlus Watch 2R First Impressions

    The OnePlus Watch 2R stands out with its sleek and modern design, a departure from the OnePlus Watch 2. While the Watch 2 sports a more premium stainless steel build, the 2R opts for an aluminum case. This switch to aluminum not only reduces the cost but also makes the watch lighter, weighing in at just 59 grams compared to the Watch 2’s 80 grams.

    The design is more traditional with flatter, more pronounced sides and a diamond-shaped embossed pattern on the straps, giving it a premium look despite the cost reduction. The choice of aluminum raises some concerns about durability, but the brushed metal finish adds a touch of elegance that OnePlus fans will appreciate.

    Display

    The OnePlus Watch 2R features a 1.43-inch AMOLED display with a resolution of 466×466. This high-resolution display ensures sharp and vibrant visuals, making it a delight to use. The screen is protected by Panda Glass, offering decent protection against scratches and minor impacts.

    One of the clever design choices is the dual-toned chronogram on the bezel, which cleverly utilizes the space and gives the illusion of a smaller bezel. The display’s brightness reaches up to 1000 nits, ensuring excellent visibility even under direct sunlight.

    Hardware and Performance

    Under the hood, the OnePlus Watch 2R shares the same hardware as the Watch 2. It features a dual-engine architecture powered by the Qualcomm Snapdragon W5 processor and the BT2700. This combination ensures smooth performance and efficient battery management.

    With 2GB of RAM, the watch handles multitasking effortlessly. Apps launch instantly, and the overall UI is snappy and responsive. The 500mAh battery promises extended usage, making the Watch 2R a reliable companion for daily use.

    Software and Features

    The OnePlus Watch 2R runs on Wear OS, providing a seamless setup and integration with Google services. The initial setup process is straightforward, thanks to the intuitive OHealth app. The watch also supports Google Assistant, making it easy to manage tasks and get information on the go.

    Pre-installed apps include fitness and health tracking features such as heart rate monitoring, SpO2 measurement, sleep tracking, and stress monitoring. The watch supports over 100 different sports modes, making it an excellent choice for fitness enthusiasts.

    Connectivity and Usability

    The Watch 2R offers robust connectivity options, including Bluetooth, dual-band Wi-Fi, and NFC. However, it lacks LTE connectivity, which is present in the Watch 2. Despite this, the Bluetooth calling feature and Wi-Fi connectivity ensure that users can stay connected without major issues.

    The watch also offers 32GB of internal storage, with around 21GB available for user data. This ample storage space allows users to install a variety of Wear OS-supported apps from the Play Store.

    Battery Life and Charging

    The OnePlus Watch 2R comes with a substantial 500mAh battery. In real-life usage scenarios, the battery life has been impressive. With features like auto-brightness, continuous heart rate monitoring, and GPS tracking, the watch manages to last an entire day with heavy usage.

    The watch supports 7.5W VOOC Fast Charging, which can charge the battery from 12% to 100% in just 40 minutes. This fast charging capability ensures minimal downtime and maximum usability.

    Pros and Cons

    Pros:

    • Sleek design with aluminum build
    • High-resolution AMOLED display
    • Robust performance with dual-engine architecture
    • Excellent battery life and fast charging
    • Affordable price

    Cons:

    • Lack of LTE connectivity
    • Potential durability concerns with aluminum case

    Conclusion

    The OnePlus Watch 2R presents itself as a strong contender in the affordable smartwatch market. Its sleek design, robust performance, and comprehensive feature set make it a compelling choice for those looking for a cost-effective Wear OS device. While it lacks LTE connectivity, the overall value it offers at Rs 17,999 is hard to ignore.

    Future Review Plans

    Stay tuned for our comprehensive review, where we will put the OnePlus Watch 2R through rigorous testing to see how it performs in various scenarios. If you have any specific questions or features you want us to test, feel free to share them in the comments.

    Also Check:

  • iQoo Z9x Review: A Budget 5G Powerhouse with Impressive Battery Life

    iQoo Z9x Review: A Budget 5G Powerhouse with Impressive Battery Life

    The iQoo Z9x has emerged as a compelling contender. Offering a blend of performance, long-lasting battery life, and an attractive price point, this device aims to redefine expectations in the sub-Rs. 15,000 segment. But does it truly deliver on its promises? Let’s dive deep into our comprehensive review of the iQoo Z9x to find out.

    iQoo Z9x Review: A Budget 5G Powerhouse with Impressive Battery Life

    Key Takeaways

    • Impressive battery life with a 6,000mAh capacity and 44W fast charging
    • Solid performance powered by the Snapdragon 6 Gen 1 chipset
    • Decent display with 120Hz refresh rate and 1000 nits peak brightness
    • IP64 dust and water resistance, uncommon in this price range
    • Camera performance is adequate but not exceptional
    • Funtouch OS 14 offers extensive customization but comes with bloatware

    iQoo Z9x Review

    Whether you’re a student looking for a reliable device for online classes, a young professional needing a capable work companion, or simply a tech enthusiast on a budget, this review will help you determine if the iQoo Z9x is the right fit for your needs. Let’s begin our journey through the various aspects of this intriguing budget smartphone.

    Pros Cons
    Long-lasting battery Camera could be better
    Good performance for gaming Plenty of preinstalled apps
    IP64 rating Spammy notifications
    Fast 44W charging
    Stereo speakers

    Overall Rating: 8/10

    Design and Build

    The iQoo Z9x strikes a balance between aesthetics and durability. While it may not win any design awards, it offers a practical and functional build that should appeal to many users in the budget segment.

    Key Design Features:

    • Materials: Polycarbonate back and frame
    • Colors: Tornado Green and Storm Grey
    • Dimensions: 7.99mm thick
    • Weight: 199 grams
    • IP64 rating: Dust-tight and splash-resistant

    The Tornado Green variant features an interesting brushstroke pattern that shimmers under light, adding a touch of elegance to an otherwise utilitarian design. The matte finish on the rear panel does an excellent job of resisting fingerprints and smudges.

    One standout feature is the IP64 rating, which is rare in this price bracket. This offers protection against dust ingress and water splashes, providing some peace of mind for daily use.

    Display

    The iQoo Z9x comes equipped with a large 6.72-inch LCD display that offers a good visual experience for its price point.

    Display Specifications:

    • Size: 6.72 inches
    • Resolution: FHD+ (2408 x 1080 pixels)
    • Refresh Rate: 120Hz (adaptive)
    • Peak Brightness: 1000 nits
    • Protection: Widevine L1 certification

    The high refresh rate ensures smooth scrolling and animations, while the 1000 nits peak brightness allows for comfortable outdoor visibility. The Widevine L1 certification enables full HD streaming on popular platforms.

    While it’s not an AMOLED panel, the display performs admirably for an LCD, offering vibrant colors and decent contrast. However, some users might notice a slight yellow tint at the bottom edge, particularly when viewing white backgrounds.

    Performance

    At the heart of the iQoo Z9x lies the Qualcomm Snapdragon 6 Gen 1 chipset, which offers solid performance for a budget device.

    Benchmark Scores:

    • AnTuTu: 559,900
    • Geekbench 5: 940 (single-core), 2,838 (multi-core)
    • GFXBench: 92 (T-Rex), 39 (Manhattan 3.1), 20 (Car Chase)

    Real-world performance is smooth for everyday tasks, and the device handles multitasking well. Gaming performance is particularly impressive for its price range, with titles like Call of Duty: Mobile and Asphalt 9: Legends running smoothly at medium to high settings.

    It’s worth noting that the 120Hz refresh rate is not always utilized to its full potential. Users may need to manually enable it for specific apps to experience the smoothest possible performance.

    Software

    The iQoo Z9x runs on Funtouch OS 14, based on Android 14. This custom skin offers extensive customization options but comes with some caveats.

    Software Features:

    • Dynamic Effects for UI animations
    • AI Wallpaper Generator
    • Smart sidebar for quick access to apps
    • Ultra Game Mode for optimized gaming performance

    While the customization options are appreciated, the abundance of preinstalled apps and occasional spammy notifications from the native browser app can be frustrating. Fortunately, most of these apps can be uninstalled, and notifications can be managed in the settings.

    iQoo promises 2 years of major OS updates and 3 years of security updates, which is standard for this price range.

    Cameras

    The camera setup on the iQoo Z9x is functional but not exceptional. It consists of a 50MP primary sensor and a 2MP depth sensor on the rear, with an 8MP front-facing camera for selfies.

    Camera Performance:

    • Daylight: Good detail and color reproduction
    • Low-light: Soft images with limited detail
    • Portrait Mode: Decent edge detection but struggles with complex backgrounds
    • Selfies: Adequate in good lighting, tends to smooth facial details

    Video recording is limited to 1080p at 30fps on most variants, with 4K 30fps available only on the 8GB RAM model. Stabilization is better at 1080p, making it the preferred option for most users.

    Battery and Charging

    One of the standout features of the iQoo Z9x is its massive 6,000mAh battery, which offers exceptional battery life.

    Battery Performance:

    • PCMark Battery Test: 20 hours and 19 minutes
    • Real-world usage: Easily lasts a full day with heavy use
    • Charging: 44W fast charging
    • Charging Time: 0-100% in about 1 hour 39 minutes

    The combination of a large battery and efficient fast charging makes the iQoo Z9x an excellent choice for users who prioritize battery life.

    Audio

    The iQoo Z9x features a stereo speaker setup, which is a welcome addition at this price point. While the audio quality isn’t exceptional, with a tendency to sound tinny at high volumes, it does provide a more immersive experience compared to single-speaker setups.

    The inclusion of a 3.5mm headphone jack is also appreciated, offering flexibility for audio connectivity.

    Pricing and Variants

    The iQoo Z9x is available in three variants:

    1. 4GB RAM + 128GB storage: Rs. 12,999
    2. 6GB RAM + 128GB storage: Rs. 14,499
    3. 8GB RAM + 128GB storage: Rs. 15,999

    This pricing strategy makes the iQoo Z9x competitive in the budget 5G segment, offering good value for money, especially in terms of performance and battery life.

    Comparison with Competitors

    When compared to its rivals, the iQoo Z9x holds its own but faces stiff competition:

    • Moto G64 5G: Offers a cleaner Android experience and OIS on the main camera
    • Samsung Galaxy M34 5G: Provides an AMOLED display and better camera setup
    • Vivo T3x: Similar specifications but lacks stereo speakers
    • POCO X6 Neo: Features an AMOLED display
    • Realme P1 5G: Offers better performance and an AMOLED display

    Conclusion

    The iQoo Z9x is a solid contender in the budget 5G smartphone market. Its strengths lie in its impressive battery life, good performance for gaming, and the inclusion of an IP64 rating. The 120Hz display and stereo speakers enhance the multimedia experience, making it a good choice for entertainment-focused users.

    However, it’s not without its drawbacks. The camera performance, while adequate, falls short of some competitors. The software experience, with its bloatware and occasional spammy notifications, may not appeal to all users.

    For those prioritizing battery life, performance, and durability on a budget, the iQoo Z9x is certainly worth considering. However, if camera quality or a cleaner software experience are your top priorities, you might want to explore other options in this price range.

    Final Verdict: The iQoo Z9x offers excellent value for money, especially for users who prioritize battery life and performance over camera quality and software experience. It’s a solid choice for budget-conscious buyers looking for a capable 5G smartphone.

  • CMF Phone 1 Hands On: A Mid Range Marvel with Modular Design

    CMF Phone 1 Hands On: A Mid Range Marvel with Modular Design

    Nothing’s sub-brand CMF has made a splash with its inaugural device, the CMF Phone 1. This mid-range contender brings a fresh perspective to the market, combining innovative design elements with solid performance. Let’s dive into an in-depth hands-on review of this intriguing new entrant.

    CMF Phone 1 Hands On: A Mid-Range Marvel with Modular Design

    Key Takeaways:

    • The CMF Phone 1 features a unique, industrial-inspired design with customizable rear panels
    • It boasts a 6.67-inch Super AMOLED display with impressive specs for its price range
    • Powered by the MediaTek Dimensity 7300 5G chipset, it offers reliable performance for everyday tasks
    • The camera system, while decent, has some limitations in portrait mode and lacks ultra-wide capabilities
    • Priced at RM1,099, it presents a compelling option in the competitive mid-range smartphone market

    Design and Build: A Fresh Take on Smartphone Aesthetics

    The CMF Phone 1 marks a departure from Nothing’s signature transparent design language, opting instead for an industrial-inspired minimalist aesthetic. This bold move sets it apart not only from its cousins in the Nothing lineup but also from many of its mid-range competitors.

    Customizable Rear Panel

    One of the most striking features of the CMF Phone 1 is its modular rear panel. Available in four colors:

    • Black
    • Orange
    • Blue
    • Green

    Users can easily swap out the back cover to suit their style or mood. The process involves removing the rear screws using the included tools, allowing for a level of personalization rarely seen in modern smartphones.

    Accessory Point: Expanding Functionality

    At the bottom right corner of the device, you’ll find the innovative Accessory Point. This feature allows users to attach various first-party accessories by simply unscrewing the knob. Current offerings include:

    1. Lanyard
    2. Card holder
    3. Kickstand

    Each accessory is priced at RM59, providing affordable ways to enhance the phone’s utility.

    Build Quality and Durability

    While the CMF Phone 1 sports a rugged appearance, it’s important to note that this is primarily an aesthetic choice. The device is surprisingly lightweight and carries an IPX2 splash resistance rating, offering minimal protection against water ingress.

    Display: Punching Above Its Weight

    The CMF Phone 1 impresses with its display specifications, especially considering its price point. Let’s break down the key features:

    Spec Detail
    Size 6.67 inches
    Type Super AMOLED
    Resolution 1080 x 2400 pixels
    Refresh Rate 120Hz (adaptive)
    Touch Sampling 240Hz
    Peak Brightness 2000 nits

    The inclusion of an under-display optical fingerprint scanner is particularly noteworthy, as this feature is often reserved for more premium devices.

    Performance: Reliable Mid-Range Power

    At the heart of the CMF Phone 1 lies the MediaTek Dimensity 7300 5G chipset. Initial impressions suggest that this processor handles everyday tasks with ease:

    • App Launching: Quick and responsive
    • Multitasking: Smooth transitions between applications
    • Gaming: Capable of running most games, though high-end titles may require reduced settings

    It’s worth noting that the first boot-up process was reported to be somewhat slow, but this is not uncommon for new devices.

    Software: Nothing OS Stripped Down

    The CMF Phone 1 runs on Nothing OS, the same platform found on the brand’s flagship devices. However, this version is tailored for the CMF experience:

    • Minimalist Design: Clean, intuitive interface
    • Customization Options: Allows users to personalize their experience
    • Bloatware-Free: Absence of unnecessary pre-installed apps

    Notably, Glyph-specific applications are absent, given the lack of the signature lighting system on this model.

    Camera System: Capable but with Limitations

    The camera setup on the CMF Phone 1 is respectable for its class, though it does have some limitations:

    Rear Camera:

    • 50MP main sensor
    • Depth sensor (for portrait mode)

    Front Camera:

    • 16MP selfie shooter

    Performance Impressions:

    Pros:

    • Fast focusing
    • Sharp and vivid images in good lighting conditions

    Cons:

    • High contrast in some scenarios
    • Portrait mode can produce artificial-looking bokeh
    • Lack of ultra-wide and telephoto lenses

    Video Capabilities:

    • 4K recording at 30fps
    • 1080p recording at 60fps
    • Action Mode for improved stabilization (with some cropping)

    Battery and Charging: All-Day Power

    The CMF Phone 1 comes equipped with a 5,000mAh battery, which is standard for its class. While extensive testing is still needed, initial impressions suggest solid battery life. Charging features include:

    • 33W fast charging
    • 5W reverse wired charging via USB-C

    Price and Availability

    The CMF Phone 1 is set to hit the Malaysian market on July 15, 2024, with a competitive price tag of RM1,099. This positioning puts it in direct competition with other mid-range offerings, including Nothing’s own Phone (2a).

    Conclusion: A Promising Mid-Range Contender

    The CMF Phone 1 brings a fresh perspective to the mid-range smartphone market. Its standout features include:

    1. Unique, customizable design
    2. Impressive display specifications
    3. Solid performance for everyday tasks
    4. Clean, bloatware-free software experience

    While it may lack some of the flashier elements of its Nothing cousins, such as the Glyph lighting system, the CMF Phone 1 compensates with its attractive design, fun personalization options, and notably lower price point.

    For consumers seeking a mid-range device that stands out from the crowd without breaking the bank, the CMF Phone 1 presents a compelling option. As the smartphone market continues to evolve, it’s refreshing to see brands like CMF pushing the boundaries of design and functionality in this competitive segment.

    Also Check:

  • How to take a Screenshot on iPad

    How to take a Screenshot on iPad

    Taking screenshots on your iPad can be incredibly handy. Knowing how to take and manage a screenshot on your iPad is essential to capture important information, save memorable content, or create step-by-step tutorials. This guide will walk you through everything you need to take screenshots on your iPad, from using button combinations to organizing your images efficiently.

    How to Take a Screenshot on iPad

    Understanding the iPad Buttons

    Before reviewing the steps, it’s important to familiarize yourself with the physical buttons on your iPad. These buttons are crucial for taking screenshots. Depending on your iPad model, the button configurations may vary. The process is slightly different for older iPads with a Home button compared to newer models that lack the Home button.

    Taking a Screenshot Using Button Combinations

    Capturing a screenshot on your iPad is quick and easy once you know the right button combinations. Whether you’re saving a piece of information or sharing something interesting, the method varies depending on your model. Here’s how you can do it:

    For iPads with Face ID:

    • Locate the Buttons: Find the top button (power button) on the right side of your iPad and the volume up button on the left.
    • Press and Release: Simultaneously press and quickly release the top button and the volume up button.
    • Preview and Save: A thumbnail of your screenshot will appear in the lower-left corner of your screen. Tap it to edit or share it immediately, or swipe left to save it directly to your Photos app.

    For iPads with a Home Button:

    1. Locate the Buttons: Find the top button (power button) and the Home button (below the screen).
    2. Press and Release: Simultaneously press and quickly release the top button and the Home button.
    3. Preview and Save: Just like on Face ID models, a thumbnail will appear in the lower-left corner. Tap it for editing options or swipe it away to save automatically.

    Taking a Screenshot Using Assistive Touch on iPad

    Assistive Touch is an accessibility feature that can make taking screenshots even easier. It allows you to take screenshots with on-screen controls rather than physical buttons.

    Enabling Assistive Touch:

    • Open Settings: Tap the Settings app on your iPad.
    • Go to Accessibility: Scroll down and select Accessibility.
    • Find and Tap on Touch: Under the Physical and Motor section, tap Touch.
    • Enable Assistive Touch: Tap Assistive Touch and toggle the switch to turn it on. A floating Assistive Touch button will appear on your screen.

    Taking a Screenshot with Assistive Touch:

    • Open Assistive Touch Menu: Tap the floating Assistive Touch button.
    • Navigate to Screenshot: In the menu that appears, tap Device, then tap More (or just Screenshot if it’s already in your menu).
    • Capture the Screen: Tap Screenshot. Your iPad will capture the screen, and a thumbnail of the screenshot will appear in the lower-left corner.

    With Assistive Touch, taking screenshots is accessible and convenient, giving you more control and flexibility.

    Accessing and Editing Screenshots

    After taking a screenshot, you can find it in the Photos app under the Screenshots album. From here, you can edit your screenshots:

    • Basic Editing: Open the screenshot in Photos, tap Edit, and use the tools to crop, adjust, and enhance your image.

    Sharing Your Screenshots

    Taking a screenshot on your iPad is easy, but what if you want to share it? Whether it’s a funny meme, a helpful chart, or a moment in a game, sharing screenshots can be a quick way to communicate. here is how to share your screenshots effortlessly.

    • From the Photos app: Open the screenshot, tap the Share button, and choose how you want to share it—whether via social media, email, or messaging apps.
    • Tips: When sharing on social media, consider adding context to your screenshot for better engagement.

    Troubleshooting Common Issues When Taking Screenshots on iPad

    Sometimes, taking a screenshot on your iPad might not go as smoothly as expected. Whether you’re using button combinations or Assistive Touch, here are some common issues and how to troubleshoot them:

    1. Screenshot Not Capturing
    • Button Combination: If pressing the buttons doesn’t capture a screenshot, ensure you’re pressing them simultaneously and quickly releasing them. For iPads with Face ID, make sure you’re pressing the top button and volume up button at the same time. For iPads with a Home button, press the top button and the Home button simultaneously.
    • Assistive Touch: If the screenshot option isn’t appearing in the Assistive Touch menu, make sure you’ve correctly added it to the top-level menu in Settings > Accessibility > Touch > Assistive Touch > Customize Top Level Menu.
    1. Thumbnail Not Appearing
    • If the screenshot thumbnail doesn’t show up in the lower-left corner, it could be due to a temporary glitch. Try restarting your iPad to see if that resolves the issue.
    • Ensure that your iPad’s software is up to date by going to Settings > General > Software Update.
    1. Screenshots Not Saving
    • Storage Issues: If your screenshots aren’t saving, check if your iPad’s storage is full. Go to Settings > General > iPad Storage to see if you need to free up space.
    • Photos App Settings: Ensure that screenshots are set to save in your Photos app. Check your settings in Settings > Photos and make sure everything is configured properly.
    1. Assistive Touch Button Not Working
    • Lag or Unresponsiveness: If the Assistive Touch button is unresponsive, try turning Assistive Touch off and back on. Go to Settings > Accessibility > Touch > Assistive Touch and toggle the switch off and then on again.
    • Restart Your iPad: A simple restart might resolve any lingering software glitches affecting Assistive Touch.
    1. Screenshots Are Dark or Blurry
    • Check Screen Brightness: If your screenshots are coming out too dark, try increasing your screen brightness. Go to Settings > Display & Brightness and adjust the slider.
    • Screen Protector Interference: If you’re using a screen protector, make sure it’s clean and not interfering with the screen’s clarity, which can sometimes cause screenshots to appear blurry.
    1. Assistive Touch Menu Missing Screenshot Option
    • If the screenshot option is missing from your Assistive Touch menu, customize it again by going to Settings > Accessibility > Touch > Assistive Touch > Customize Top Level Menu and re-adding the Screenshot option.

    Conclusion

    Taking screenshots on your iPad is a simple yet powerful way to capture and share content. With a little practice, you’ll become proficient in using all the features discussed here. Happy screenshotting!

    Frequently Asked Questions (FAQs)

    How do I take a screenshot on my iPad?

    You can take a screenshot by using button combinations or Assistive Touch. For iPads with Face ID, press the top button and volume up button simultaneously. For iPads with a Home button, press the top button and Home button at the same time. Alternatively, you can use Assistive Touch by enabling it in “Settings > Accessibility > Touch > Assistive Touch” and then tapping the screenshot option from the menu.

    Where can I find my screenshots?

    All screenshots are saved in the Photos app. You can find them by going to the “Screenshots” album in the “Photos” app under the “Albums” tab.

    Why isn’t my screenshot saving?

    If your screenshots aren’t saving, your iPad’s storage might be full. Check your storage by going to “Settings > General > iPad Storage”. If storage isn’t the issue, try restarting your iPad or updating your software.

    Can I take a screenshot using Assistive Touch?

    Yes! Enable Assistive Touch by going to “Settings > Accessibility > Touch > Assistive Touch” and turning it on. Then, use the floating Assistive Touch button to access the screenshot option.

    What should I do if the screenshot button combination isn’t working?

    Ensure you’re pressing the buttons simultaneously and quickly releasing them. If it still doesn’t work, try restarting your iPad. For consistent issues, using Assistive Touch as an alternative method may help.

    How can I edit a screenshot immediately after taking it?

    After taking a screenshot, a thumbnail will appear in the lower-left corner of your screen. Tap it to open the editing tools, where you can crop, annotate, or share the screenshot.

    Can I customize the Assistive Touch menu to make screenshots easier to access?

    Yes, you can customize the Assistive Touch menu by going to “Settings > Accessibility > Touch > Assistive Touch > Customize Top Level Menu”. Add the screenshot option to the menu for quicker access.

    Why is my screenshot coming out blurry or dark?

    Blurry or dark screenshots could be due to screen brightness or a dirty screen protector. Adjust your screen brightness in “Settings > Display & Brightness” and clean your screen protector if necessary.

    My Assistive Touch button is unresponsive. What can I do?

    Try toggling Assistive Touch off and on by going to “Settings > Accessibility > Touch > Assistive Touch”. If that doesn’t work, restart your iPad to resolve any temporary glitches.

    Can I take a screenshot with my iPad using Siri?

    As of now, Siri doesn’t have a direct command for taking screenshots. You’ll need to use the button combinations or Assistive Touch to capture your screen.

    Also Check:

  • How to Clear Cache on Your iPad

    How to Clear Cache on Your iPad

    Is your iPad running slower than usual or are apps acting up? It might be time to clear the cache. Cache is a type of temporary data stored to help apps and websites load faster. However, over time, this data can accumulate and cause performance issues. Clearing the cache can help resolve these problems and keep your iPad running smoothly.

    How to Clear Cache on Your iPad

    What is a Cache?

    A cache is essentially a storage space on your iPad where temporary data is kept. It helps apps and websites load faster by storing frequently accessed information. While this can speed up your device, too much-cached data can lead to sluggish performance and app glitches.

    Signs You Need to Clear Cache on Your iPad

    Over time, your iPad can accumulate cache files that may slow down its performance or cause apps to behave unexpectedly. Here are some signs that it’s time to clear the cache on your iPad:

    1. Sluggish Performance: If your iPad starts feeling slow, with apps taking longer to open or switching between screens lagging, cache buildup could be the culprit. Clearing it can help speed things up.

    2. Frequent App Crashes: Apps crashing more often than usual? It might be due to corrupted cache files. Clearing the cache can resolve these issues, ensuring smoother app performance.

    3. Low Storage Space: Running out of storage space even after deleting files and apps? Cache data, especially from browsers and streaming apps, can take up significant space. Clearing the cache frees up valuable storage.

    4. Web Pages Not Loading Properly: If websites aren’t displaying correctly, or you’re getting outdated content, it might be due to cached data. Clearing your browser’s cache on the iPad can help load the latest versions of web pages.

    5. Outdated App Content: Sometimes, apps like social media or news apps might not show the most current information due to old cached data. Clearing the cache forces the app to fetch new data, providing up-to-date content.

    6. Battery Draining Quickly: A sudden drop in battery life can sometimes be linked to background processes tied to cached data. Clearing the cache might help reduce unnecessary background activity and improve battery performance.

    How to Clear Cache on iPad in Safari:

    Safari is the default browser on your iPad, and it stores data from the websites you visit, like cookies and images, to help pages load faster. Over time, this cached data can build up and cause problems. Here’s how you can clear it out in Safari:

    • Open Settings: Begin by tapping the “Settings” app on your iPad’s home screen. This is where you can manage all of your device’s settings.
    • Scroll to Safari: Scroll down the menu on the left side until you find “Safari”. Tap on it to open Safari’s settings.
    • Clear History and Website Data: Inside the Safari settings, look for the option labeled “Clear History and Website Data”. This is the key to clearing your cache. Tap on it.
    • Confirm Your Action: A pop-up will appear, asking you to confirm that you want to clear history, cookies, and other browsing data. Tap “Clear” to proceed.

    And that’s it! You’ve successfully cleared the cache in Safari, which should help with any performance issues or website loading problems.

    How to Clear your iPad Cache in Apps

    Over time, your iPad’s apps can accumulate cache, which is data stored to help apps run more smoothly. However, too much cache can slow down your device. Clearing it out can free up space and improve performance. Here’s how you can easily clear the cache in your iPad apps.

    Clearing Cache in Apps

    Unlike browsers, apps don’t have a straightforward “Clear Cache” button. Instead, you’ll need to offload or delete and reinstall the app to clear its cache. Here’s how to do it:

    • First, you’ll want to figure out which apps are taking up the most space on your iPad.
    • Go to Settings: Tap the “Settings” app on your home screen.
    • Navigate to General: Scroll down and select “General”.
    • Tap on iPad Storage: Here, you’ll see a list of apps and how much space each one is using.

    By following these steps, you can quickly clear up space and potentially speed up your iPad’s performance. Keep in mind that some apps store important data as cache, so clearing it might log you out or reset some settings.

    How to Use Third-Party Apps for Cache Management on iPad

    While iPads don’t have a built-in feature to clear cache for all apps simultaneously, you can use third-party apps to help manage and clear cache more effectively. These tools not only help free up space but also improve overall performance by clearing out junk files, temporary data, and other unnecessary items:

    Step 1: Choose a Reliable Cache Management App

    Several third-party apps are designed to help you manage storage and clear cache on your iPad. Some popular options include “Phone Clean”, “iMyFone Umate”, and “Cleaner for iPad”. These apps can detect and remove unnecessary files, temporary data, and cached content.

    • Search for the App: Open the “App Store” and search for a cache management app that fits your needs.
    • Download and Install: Select the app and tap “Get” to download and install it on your iPad.

    Step 2: Grant Necessary Permissions

    Once you’ve installed the app, you’ll need to give it permission to access your iPad’s storage. This allows the app to scan for cached files and other data that can be safely removed.

    Open the App: Tap the app icon on your home screen to launch it.

    Follow On-Screen Instructions: The app will guide you through the process of granting permissions. This may include access to your files, photos, and system data.

    Step 3: Scan for Cached Files

    Most cache management apps offer a quick scan feature that identifies unnecessary files and cached data.

    • Start a Scan: Look for an option like “Scan” or “Analyze” within the app and tap it.
    • Review the Results: Once the scan is complete, the app will display a list of cached files, temporary data, and other items that can be removed.

    Step 4: Clear the Cache

    After reviewing the scan results, you can choose to clear the cache and other unwanted data.

    • Select Items to Remove: Some apps allow you to select specific files to delete, while others offer an all-in-one clean option.
    • Tap Clean or Remove: Confirm your selection by tapping the “Clean” or “Remove button”. The app will then clear the selected cache and free up space on your iPad.

    Step 5: Regular Maintenance

    To keep your iPad running smoothly, it’s a good idea to use the cache management app regularly.

    • Schedule Regular Scans: Some apps offer the option to schedule scans. Set this up to automatically scan and clean your iPad every few weeks.
    • Update the App: Keep the app updated to ensure it works efficiently with the latest iOS version.

    By using a third-party app for cache management, you can easily keep your iPad free of unnecessary data, helping to maintain optimal performance.

    Why Clearing Cache is Important

    Regularly clearing your cache can keep your iPad running smoothly. It also helps protect your privacy by removing stored data from websites you’ve visited. If you notice any unusual behavior while browsing, clearing the cache is a quick and easy troubleshooting step.

    Conclusion

    Clearing cache on your iPad is essential for maintaining its performance and functionality. Make it a regular part of your device maintenance routine to avoid slowdowns and app issues. With these steps, you’ll ensure your iPad runs smoothly and efficiently.

    Frequently Asked Questions (FAQs)

    Why should I clear the cache on my iPad?

    Clearing the cache can free up storage space and improve the performance of your iPad. Cached data, while useful for speeding up app loading times, can accumulate over time and slow down your device if not managed regularly.

    How often should I clear cache on my iPad?

    It’s a good practice to clear cache every few months or whenever you notice that your iPad is running slowly or you’re running out of storage space. Regular maintenance helps keep your device running smoothly.

    Can I clear cache for all apps at once on my iPad?

    No, iPads don’t offer a built-in option to clear cache for all apps simultaneously. You’ll need to clear cache on a per-app basis or use third-party apps designed for cache management.

    Will deleting and reinstalling an app clear its cache?

    Yes, deleting and reinstalling an app can clear its cache. However, this will also remove app data, so make sure to back up any important information before proceeding.

    Can I clear the cache for specific apps without deleting them?

    Some apps offer built-in options to clear cache within their settings. Check the app’s settings or help documentation for this option. Otherwise, you may need to use a third-party app or delete and reinstall the app to clear its cache.

    Is it safe to use third-party apps for cache management?

    Yes, but choose reputable apps with good reviews to ensure safety and effectiveness. Always back up your iPad before using third-party tools to prevent accidental data loss.

    Also Check:

  • Samsung Galaxy Ring Setup Guide: How to Setup Your Samsung Galaxy Ring?

    Samsung Galaxy Ring Setup Guide: How to Setup Your Samsung Galaxy Ring?

    Setting up your Samsung Galaxy Ring is a straightforward process, but it involves several key steps to ensure proper functionality and compatibility. Follow this guide to get your Galaxy Ring up and running.

    Samsung Galaxy Ring Setup Guide: How to Setup Your Samsung Galaxy Ring?

    How to Setup Samsung Galaxy Ring 

    Setting up your Samsung Galaxy Ring is essential for unlocking its full potential in health tracking and convenience. Here’s a step-by-step guide to help you get started:

    1. Check Device Compatibility

    • Smartphone Requirements: Ensure your smartphone is compatible with the Galaxy Ring. The device should be a Samsung Galaxy phone running the latest version of Samsung’s operating system. For non-Samsung devices, check compatibility with the Galaxy Ring’s minimum requirements.
    • Operating System: Confirm that your phone’s operating system is updated to the latest version to avoid any potential compatibility issues.

    2. Charge Your Galaxy Ring

    • Initial Charge: Before setting up, make sure the Galaxy Ring is fully charged. Connect the ring to the provided charger or place it on its charging dock. Charging typically takes a few hours.
    • Charging Indicator: Check the charging indicator to confirm that the ring is charging properly.

    3. Download the Samsung Wearable App

    • App Store: On your smartphone, go to the Google Play Store (for Android devices) or the Samsung Galaxy Store (for Samsung devices) and search for the “Samsung Wearable” app.
    • Install the App: Download and install the Samsung Wearable app. This app is essential for managing and configuring your Galaxy Ring.

    4. Pair the Galaxy Ring with Your Phone

    • Enable Bluetooth: Ensure Bluetooth is enabled on your smartphone. This can usually be done from the quick settings menu or the Bluetooth settings section in your phone’s settings.
    • Open the Samsung Wearable App: Launch the Samsung Wearable app on your phone.
    • Start Pairing: Follow the on-screen instructions to start pairing your Galaxy Ring. This typically involves placing the ring into pairing mode, which may require holding down a specific button or performing a particular gesture.
    • Select the Device: In the Samsung Wearable app, select “Galaxy Ring” from the list of available devices. Tap to initiate the pairing process.
    • Confirm Pairing: Confirm the pairing request on both your phone and the Galaxy Ring if prompted.

    5. Configure Your Galaxy Ring

    • Set Up Preferences: After pairing, follow the setup wizard in the Samsung Wearable app to configure settings for the Galaxy Ring. This may include setting up health monitoring features, notifications, and personalization options.
    • Sync Data: Ensure that the Galaxy Ring is syncing correctly with your phone. The app will guide you through the process of syncing data and customizing your preferences.

    6. Troubleshoot Common Issues

    • Restart Devices: If you encounter issues during setup, restart both your smartphone and the Galaxy Ring. This can resolve connectivity problems and refresh the pairing process.
    • Reinstall the App: If problems persist, try reinstalling the Samsung Wearable app. Delete the app from your phone, then download and install it again.
    • Check for Updates: Ensure both your phone and the Samsung Wearable app are updated to their latest versions. Software updates can fix bugs and improve compatibility.

    7. Explore Features and Settings

    • Health Monitoring: Access the health monitoring features through the Samsung Wearable app. Customize settings for heart rate tracking, activity monitoring, and other health-related functions.
    • Notifications and Alerts: Configure notification preferences to receive alerts for calls, messages, and other important updates on your Galaxy Ring.

    8. Regular Maintenance

    • Update Software: Keep the Galaxy Ring’s firmware updated through the Samsung Wearable app. Regular updates can improve performance and add new features.
    • Charge Regularly: Maintain a regular charging routine to ensure the Galaxy Ring is always ready for use.

    By following these steps, you can set up your Samsung Galaxy Ring and begin enjoying its advanced features and seamless integration with your Samsung device.

    Also Check:

  • I Tested the Samsung Galaxy Ring with Non-Samsung Devices, and Here’s How It Went

    I Tested the Samsung Galaxy Ring with Non-Samsung Devices, and Here’s How It Went

    When it comes to wearable tech, the Samsung Galaxy Ring stands out with its advanced health tracking and smart features. But what if you’re not using a Samsung phone? Can this sleek piece of technology still deliver? In this post, I’ll dive into my experience using the Samsung Galaxy Ring with non-Samsung devices, exploring its compatibility, features, and overall performance.

    I Tested the Samsung Galaxy Ring with Non-Samsung Devices, and Here’s How It Went

    Samsung Galaxy Ring Compactibility with Non-Samsung Devices

    The Galaxy Ring is primarily designed to work seamlessly with Samsung devices, ensuring optimal performance and full feature access. However, it is also compatible with non-Samsung devices, although with some limitations. Understanding the basics of device compatibility and ensuring your phone meets the necessary requirements can save you from future frustrations.

    How to Connect Galaxy Ring to Non-Samsung Devices

    Connecting the Galaxy Ring to a non-Samsung device involves a few straightforward steps:

    1. Activate Bluetooth: Make sure Bluetooth is turned on your phone.
    2. Install the Samsung Health App: Available on your device’s app store, this app is essential for the Galaxy Ring’s functionality.
    3. Pair the Device: Open the Samsung Health app and follow the pairing instructions. This process can take a few minutes, and ensuring both devices are updated can help avoid connection issues.

    If you encounter problems during setup, common troubleshooting steps include restarting your devices, updating software, and ensuring Bluetooth connectivity is stable.

    Features Available on Non-Samsung Devices

    Using the Galaxy Ring with a non-Samsung phone allows access to core features like heart rate monitoring, sleep tracking, and basic activity tracking. However, some advanced features may be limited or inaccessible. This limitation can impact the overall user experience, but the primary health tracking functions remain robust.

    User Experience: What to Expect

    User feedback on connecting the Galaxy Ring to non-Samsung devices is mixed. Some users report a seamless experience, while others face challenges with connectivity and feature access. Common issues include intermittent Bluetooth connections and limited functionality of certain features. Keeping the Samsung Health app and your phone’s software up-to-date can help mitigate these issues.

    Alternatives to Samsung Galaxy Ring

    If you find the compatibility issues with the Galaxy Ring too limiting, consider exploring other smart rings like the Oura Ring or Motiv Ring. These alternatives offer similar health tracking features and might provide better compatibility with a wider range of devices. Comparing these options can help you find the best fit for your needs.

    Benefits of Using Samsung Galaxy Ring with Samsung Devices

    Pairing the Galaxy Ring with a Samsung phone offers a more seamless experience. Users benefit from enhanced features, smoother integration with Samsung Health, and overall better performance. This synergy between devices can significantly enhance the usability and functionality of the Galaxy Ring.

    Future Updates and Compatibility

    Samsung frequently updates its software and devices, which could improve the Galaxy Ring’s compatibility with non-Samsung devices. Staying informed about these updates can help you maximize the ring’s potential and ensure you’re getting the best experience possible.

    Conclusion

    The Samsung Galaxy Ring is an impressive device that offers advanced health tracking and smart features. While it performs best with Samsung devices, it’s still a viable option for non-Samsung users, albeit with some limitations. Understanding these compatibility issues and exploring alternative options will help you make an informed decision. Whether you choose to stick with the Galaxy Ring or explore other smart rings, prioritizing compatibility will ensure you get the most out of your wearable tech.

    Also Check:

  • Is Samsung Galaxy Ring Compatible with All Samsung Phone Models? Here’s Everything You Need to Know

    Is Samsung Galaxy Ring Compatible with All Samsung Phone Models? Here’s Everything You Need to Know

    The Samsung Galaxy Ring represents a new frontier in wearable technology, integrating advanced health tracking into a sleek, discreet accessory. This high-tech smart ring is designed to monitor various health metrics and enhance the overall health tracking experience. Its functionality is closely tied to its compatibility with specific Samsung phone models. This guide aims to help you understand which Samsung phones are best suited for the Galaxy Ring, ensuring you can fully leverage its features and functionality.

    Is Samsung Galaxy Ring Compatible with All Samsung Phone Models? Here's Everything You Need to Know

    Samsung Galaxy Ring Compatibility Guide

    The Galaxy Ring is a smart ring that monitors health metrics such as heart rate, sleep patterns, and activity levels. It is targeted at fitness enthusiasts and tech-savvy users looking to integrate health monitoring into their daily lives seamlessly. The Galaxy Ring is compatible with a range of Samsung devices, requiring Bluetooth connectivity and the Samsung Health app to function effectively.

    Supported Samsung Phone Models

    The Samsung Galaxy Ring is fully compatible with the latest Samsung phone models, including the Galaxy S21, S22, Note 20, and the Fold series. These models offer seamless integration with the Galaxy Ring, ensuring users can access all its features without compatibility issues. These phones are equipped with the latest hardware and software enhancements that make the most of the Galaxy Ring’s capabilities, from accurate data tracking to quick, reliable syncing.

    Limitations with Older Models

    While the Galaxy Ring can connect to some older Samsung models, such as the Galaxy S8 or Note 8, users may face compatibility issues. These older devices might lack the necessary hardware capabilities or software updates to fully support the Galaxy Ring’s features. Users of older models may experience limited functionality, reduced accuracy in tracking, or connectivity problems, which can diminish the overall user experience.

    Software Requirements

    To ensure optimal performance of the Galaxy Ring, users must keep their Samsung phones updated with the latest software. This includes installing the most recent version of the Samsung Health app, which acts as the primary interface for interacting with the Galaxy Ring. Regular software updates ensure the ring can provide accurate health tracking and smooth data synchronization, minimizing any potential issues.

    User Experience and Feedback

    Feedback from Galaxy Ring users has been largely positive, with many praising its accuracy, convenience, and the wealth of health data it provides. However, some users have reported challenges when using the ring with older phone models, emphasizing the importance of compatibility. Users highlight the necessity of using newer, compatible Samsung devices to fully enjoy the Galaxy Ring’s capabilities without encountering connectivity or functionality problems.

    How to Connect the Galaxy Ring with Your Samsung Phone

    Setting up the Galaxy Ring is a straightforward process:

    1. Enable Bluetooth on your Samsung phone to allow for pairing.
    2. Open the Samsung Health app, navigate to the accessories list, and select the Galaxy Ring.
    3. Follow the on-screen instructions to complete the pairing process.
    4. If any issues arise, restart both your phone and the ring, and ensure the Samsung Health app and ring firmware are up-to-date.

    Future Compatibility Considerations

    As Samsung continues to innovate and release new phone models, future iterations are expected to enhance compatibility and performance with the Galaxy Ring. Staying informed about the latest software updates and device releases will ensure that you can maintain compatibility and access new features as they become available, keeping your health monitoring experience at the forefront of technology.

    Conclusion

    In conclusion, the Samsung Galaxy Ring is a powerful tool for health tracking, best experienced with compatible Samsung phone models. Potential buyers should carefully consider their current phone’s compatibility to fully benefit from the ring’s advanced features. By doing so, users can enhance their health monitoring and enjoy a seamless integration of technology into their daily routines, making the most of this innovative wearable device.

    Also Check:

  • What Devices Can the Samsung Galaxy Ring Connect to? Here’s Everything You Need to Know

    What Devices Can the Samsung Galaxy Ring Connect to? Here’s Everything You Need to Know

    The Samsung Galaxy Ring is a cutting-edge wearable designed to keep you connected and track your health seamlessly. But, what devices can the Samsung Galaxy Ring connect to? In today’s post, we’ll explore its standout features, focusing on its compatibility with various devices to enhance your daily life.

    What Devices Can the Samsung Galaxy Ring Connect to? Here's Everything You Need to Know

    Samsung Galaxy Ring Compatibility 

    The Samsung Galaxy Ring Compatibility with Smartphones, Smartwatches, and More

    The Samsung Galaxy Ring features advanced health and fitness tracking capabilities, including heart rate monitoring, sleep analysis, and activity tracking. Its sleek design and intuitive user interface make it an ideal companion for anyone looking to monitor their health with style and ease.

    1. Compatibility with Smartphones

    The Galaxy Ring is fully compatible with a wide range of Samsung smartphones, including the latest Galaxy S and Note series models. This compatibility ensures users can fully utilize the ring’s features and sync data effortlessly.

    Apart from Samsung devices, the Galaxy Ring also works with most Android smartphones. However, some features might be limited or require specific app installations for optimal performance.

    While the Galaxy Ring can connect to iOS devices, certain functionalities may be restricted due to platform limitations. Users can still access essential features, but some advanced integrations available on Android may not be fully supported on iOS.

    2. Connecting to Smartwatches

    The Galaxy Ring can sync seamlessly with Samsung smartwatches, allowing for synchronized health and fitness data. This integration enhances the overall user experience, providing a comprehensive view of your health metrics on both devices.

    Using the Galaxy Ring with a smartwatch offers several benefits, such as real-time notifications, detailed health insights, and convenient access to data. This combination creates a more holistic approach to health monitoring and daily activity tracking.

    The Galaxy Ring is also compatible with smartwatches from other brands, though the level of integration may vary. Users can still enjoy basic syncing features, but advanced functionalities might be limited depending on the smartwatch model.

    3. Integration with Smart Home Devices

    The Galaxy Ring can integrate with various smart home ecosystems, including Samsung SmartThings, Google Home, and Amazon Alexa. This connectivity allows users to control their smart home devices conveniently through the ring.

    Users can connect the Galaxy Ring to smart lights, thermostats, security systems, and other smart home devices. This integration enables seamless control of these devices, enhancing the convenience and efficiency of managing your smart home.

    Controlling smart home devices through the Galaxy Ring provides a hands-free, convenient way to manage your home environment. It simplifies daily tasks, enhances security, and offers personalized control of your smart home ecosystem.

    4. Syncing with Fitness Equipment

    The Samsung Galaxy Ring can connect to various gym equipment, such as treadmills, stationary bikes, and ellipticals. This connection ensures accurate tracking of your workouts, providing comprehensive data on your physical activity.

    Popular fitness apps compatible with the Galaxy Ring include Samsung Health, MyFitnessPal, Strava, and more. These apps enhance your fitness tracking by providing detailed insights and personalized recommendations based on your activity data.

    Tracking workouts and health metrics with the Galaxy Ring helps you stay on top of your fitness goals. It provides valuable data on your performance, helps identify areas for improvement, and keeps you motivated by tracking your progress.

    5. Compatibility with Health Apps

    The Galaxy Ring supports a variety of health and wellness apps, including Samsung Health, Google Fit, Apple Health, and other third-party apps. This wide compatibility ensures users can choose their preferred app for health monitoring.

    The ring allows seamless data sharing and tracking across different apps, providing a comprehensive view of your health metrics. This capability ensures you can access and analyze your health data from multiple sources in one place.

    App compatibility is crucial for effective health monitoring as it enables users to access a wide range of features and insights. The Galaxy Ring’s compatibility with various health apps ensures you can choose the best tools for your health management needs.

    6. Connecting to Other Wearables

    The Galaxy Ring can sync with other fitness trackers and wearables, allowing users to combine data from multiple devices. This compatibility ensures a more comprehensive and accurate view of your health and fitness metrics.

    Using multiple devices for health tracking provides a more detailed and holistic view of your physical condition. It allows you to leverage the strengths of different devices, ensuring you have accurate and comprehensive data on your health.

    Popular wearables that can sync with the Galaxy Ring include Fitbit, Garmin, and Apple Watch. These devices, when used alongside the Galaxy Ring, offer a robust health tracking ecosystem, providing detailed insights into your physical activity and overall health.

    Troubleshooting Connection Issues

    Users may encounter issues such as pairing problems, intermittent connections, or synchronization failures. These common problems can usually be resolved with simple troubleshooting steps.

    To resolve connectivity issues, ensure that all devices are updated to the latest software version, restart the devices, and reset the connections if necessary. Additionally, consulting the user manual or support resources can provide further guidance.

    For persistent issues, users can refer to the Samsung support website, user forums, or contact customer support for assistance. These resources provide comprehensive help and troubleshooting steps to ensure your Galaxy Ring functions smoothly.

    Conclusion

    The Samsung Galaxy Ring offers extensive connectivity options, enhancing its utility and user experience. By integrating with smartphones, smartwatches, fitness equipment, and health apps, it provides a comprehensive health tracking solution. Its robust connectivity features make it a valuable addition to any tech-savvy individual’s toolkit, ensuring a seamless and enriched wearable experience.

    Also Check: