The Google Pixel Watch is one of the best time-telling gadgets, it is not only stylish but a powerful extension of your smartphone. But for you to unlock its full potential, you need a reliable internet connection.
Wi-Fi provides a stable and secure way for your Pixel Watch to stay connected, offering a range of benefits and other features.
In this article will we show you How to Connect to the Wi-Fi Network on Google Pixel Watch for maximum potential and accessibility. All you need to do is read and follow the instructions carefully in this blog for positive results.
Why Connect to Wi-Fi Network on Google Pixel Watch?
When you are connected to a Wi-Fi network, your watch will have a Boost and unlock your Pixel it’s potential.
Apps will start to work better, you will be able to stream music smoothly, and Google Assistant is always on duty, all without draining your phone’s battery.
Plus, save mobile data and enjoy automatic updates. It is said to be able to fast charge if connected to Wi-Fi.
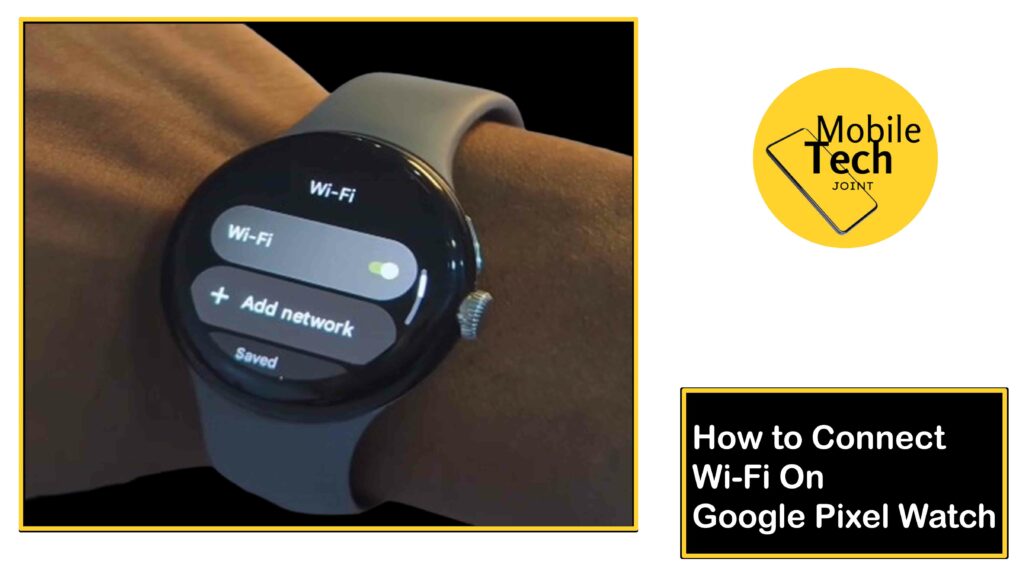
How to Connect to Wi-Fi Network on Google Pixel Watch
Below are the steps to successfully connect your Google Pixel watch to Wi-Fi Network. So go through the process carefully.
- First, wake your watch, either by tapping on the screen or pressing the Crown Button.
- Then Swipe down from the top of the watch face to access the Quick Settings menu.
- Next, click on the Settings icon, which is represented with a cogwheel symbol.
- After that, you will an option labeled Connectivity, it represented with the hotspot symbol. Click On it.
- Then, scroll down a bit to see the Wi-Fi option, and then, click on It to Proceed.
- If your Wi-Fi is not on, toggle on the switch to turn It on.
- Next, to add a new network click on + Add Network.
- Then select and connect to the network you want to connect to.
These are the required steps to take, to successfully to connect to Wi-Fi Network on your Google Pixel Watch.
Related: How to Turn On Mobile Data on Google Pixel Watch
Benefits of Connecting Google Pixel Watch to Wi-Fi
Here are some benefits you will get while your Google Pixel Watch is connected to a Wi-Fi network.
Enhanced Functionality
For some apps to be fully functional, like Fitness trackers music, News and weather apps that need to content real-time update to keeping you informed, greatly need Wi-Fi Network. To perfume fully and effectively.
Independent Google Assistant
When your Wi-Fi Network is connected, your Google Assistant on your Pixel Watch becomes more powerful. Ask questions, get directions, or control your smart home devices – all without needing your phone nearby.
Conclusion
Connecting your Pixel Watch to Wi-Fi unlocks its full potential. You’ll experience a wider range of functionalities, improved performance, and a more convenient and enjoyable user experience. So get close to your Wi-Fi network, and take advantage of it and see the difference it makes on your Google Pixel Watch.
How Do I Know if my Watch is Connected to Wi-Fi?
To ensure you are connected to a Wi-Fi Network, you will see an indicator at the upper-left of the Control Center screen.
Which displays in the place of the phone icon and the wireless signal icon is also highlighted if you are connected to a Wi-Fi.
Can I Make Calls with my Google Pixel Watch while Wi-Fi is On?
You can make and receive call, send and receive message., on your Google Pixel watch even if your Wi-Fi network is on or connected.
Can I Make Calls with my Google Pixel Watch?
Yes, it is possible to make call if you are with the 4G LTE option, you can make and receive calls without your phone.
For more insights on this article, check out these video tips across our social platforms: