Blog

  • EarFun Air Pro 4 Review: A New Standard for Affordable Premium Sound

    EarFun Air Pro 4 Review: A New Standard for Affordable Premium Sound

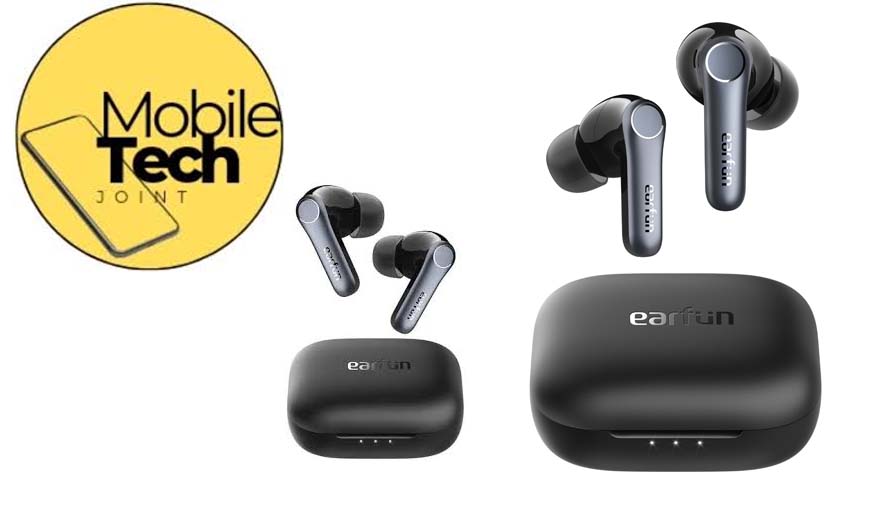
    Finding the perfect earbuds that balance price, sound quality, and advanced features can be tricky. The EarFun Air Pro 4 steps into the spotlight as a game-changer in the budget-friendly wireless earbuds market. With a price under $90, these earbuds promise powerful noise cancellation, superb battery life, and premium audio quality.

    EarFun Air Pro 4 Review
    EarFun Air Pro 4 Review

    But do they deliver? This detailed review explores everything you need to know about the EarFun Air Pro 4, from sound performance to comfort, durability, and more.

    Whether you’re an audiophile or just looking for reliable earbuds, this guide will help you decide if they’re worth your investment.

    Key Features of the EarFun Air Pro 4

    Before diving into specifics, let’s look at the standout features:

    • Adaptive Hybrid Active Noise Cancellation (ANC)
    • Bluetooth 5.4 and multipoint connectivity
    • Up to 52 hours of battery life with the case
    • IPX5 water resistance rating
    • LDAC and aptX Lossless audio codec support

    EarFun Air Pro 4 Review

    These earbuds are designed to cater to a wide range of users, from audiophiles to casual listeners.

    Design and Comfort

    The EarFun Air Pro 4 maintains a lightweight design, similar to its predecessor, the Air Pro 3. This ensures comfort during extended use. With five different sizes of silicone ear tips included, users can achieve a secure fit, enhancing both comfort and sound isolation. The earbuds boast an IPX5 water resistance rating, making them suitable for use in the rain or during workouts.

    Audio Performance

    These earbuds deliver a well-balanced sound profile, with a focus on clarity and detail. The bass is present without overpowering the mids and highs, providing an enjoyable listening experience across various genres. Support for high-resolution audio codecs, including LDAC and aptX Lossless, ensures that users can enjoy high-quality audio streaming from compatible devices.

    Active Noise Cancellation (ANC)

    The EarFun Air Pro 4 features Adaptive Hybrid Active Noise Cancellation, effectively reducing ambient noise and allowing for an immersive listening experience. The ANC performance is notable, especially considering the earbuds’ price point, making them a competitive option in the market.

    Connectivity and Features

    Equipped with Bluetooth 5.4, the EarFun Air Pro 4 offers a stable and efficient connection. The inclusion of multipoint connectivity allows users to connect the earbuds to two devices simultaneously, such as a smartphone and a laptop, facilitating seamless switching between devices. The EarFun app enhances user experience by providing customizable touch controls, sound presets, and equalizer settings, enabling users to tailor the audio output to their preferences.

    Battery Life

    Battery performance is impressive, with the earbuds providing up to 11 hours of playback on a single charge. The charging case extends this to a total of 52 hours, depending on the audio codec and ANC settings used. The case supports both USB-C wired and wireless charging, offering flexibility in recharging options. A quick 10-minute charge can yield approximately 2 hurs of playback, ensuring minimal downtime between listening sessions.

    Call Quality

    Featuring multiple built-in microphones enhanced by an AI algorithm, the Air Pro 4 ensures clear and intelligible voice calls. This setup effectively reduces background noise, making the earbuds suitable for professional calls and virtual meetings.

    User Experience and App Integration

    The EarFun app enhances user experience by offering customizable touch controls, sound presets, and equalizer settings. Users can also adjust ANC modes and toggle in-ear detection through the app. The intuitive interface ensures that both novice and experienced users can navigate and personalize their settings with ease.

    FAQs

    What should I do if one earbud is silent or has low volume?

    If an earbud’s LED is lit but there’s no sound or low volume, carefully clean the dirt from the speaker mesh using a toothpick or cotton swab.

    How can I reset my EarFun Air Pro 4 earbuds?

    To reset the earbuds, place them back into the charging case with the lid open. Unpair both earbuds from your device. Hold the button on the case for 8 seconds, then check your device for a single pairing option and select it.

    What should I do if the earbuds don’t work out of the box?

    If the earbuds don’t function upon first use, try rebooting your Bluetooth device and resetting the earbuds. Delete the old connection from your device, place both earbuds into the charging case, close the lid, and wait for 30 seconds before attempting to reconnect.

    Conclusion

    The EarFun Air Pro 4 earbuds deliver exceptional value, combining premium features such as Adaptive Hybrid ANC, high-resolution audio support, extensive battery life, and customizable controls—all at an accessible price point.

    Whether you’re an audiophile seeking quality sound or a professional needing reliable call performance, the Air Pro 4 caters to a diverse range of user needs, solidifying its position as a top choice in the budget-friendly wireless earbuds market.

    CHECK THESE OUT:

    Nothing Ear (a) Wireless Earbuds: Are Nothing Ear (a) Earbuds compatible with all devices?

    The Noise Buds N1 Pro Experience: What I Loved and What Could Be Better

    7 Best Samsung Earbuds for Small Ears

  • The Ultimate Guide to Charging Your EarFun Earbuds: Fast, Simple, and Hassle-Free!

    The Ultimate Guide to Charging Your EarFun Earbuds: Fast, Simple, and Hassle-Free!

    EarFun earbuds are designed to deliver premium audio experiences, but keeping them charged is key to enjoying uninterrupted listening.

    How to Charge EarFun Earbuds
    How to Charge EarFun Earbuds

    This guide will explain how to charge your EarFun earbuds and the charging case, provide charging tips, and troubleshoot common issues.

    Charging EarFun Earbuds for the First Time

    When you get new EarFun earbuds, it’s essential to charge them fully before using them for the first time. Follow these steps:

    • Open the charging case.
    • Remove the protective film from the charging connectors on each earbud.
    • Place the earbuds into the charging case. Ensure each earbud fits snugly and the charging pins align with the connectors.
    • Close the lid of the charging case.

    Once the earbuds are inside the case, they will begin to charge automatically if the case itself has power.

    Charging the EarFun Charging Case

    To charge the earbuds effectively, the charging case must have enough power. Here’s how to charge it:

    • Use the USB-C cable that came with your EarFun earbuds.
    • Connect one end of the cable to the charging port on the back or side of the charging case.
    • Plug the other end into a USB wall charger or a computer’s USB port.
    •  Wait for the case’s LED indicator to show the battery status:

    Red light: Low battery.

    Green or white light: Fully charged.

    Blinking light: Charging in progress.

    Some models also support wireless charging. Place the case on a wireless charging pad if your model includes this feature.

    Charging Indicators on EarFun Earbuds

    EarFun earbuds and their case use LED indicators to show charging status:

    Earbuds’ LEDs:

    Solid red light: Charging.

    No light: Fully charged.

    Charging case LEDs:

    Flashing or solid green/white light (depending on model): Indicates charging progress.

    Check your EarFun earbuds manual for specific LED color meanings if your model differs.

    Charging Time

    EarFun earbuds and their case generally take about 1-2 hours to charge fully, depending on the model. Once fully charged, most models provide:

    • 4-7 hours of playtime on a single charge.
    • 28+ hours of additional playtime with the fully charged case.

    Tips for Efficient Charging

    Use the original charging cable: Using third-party cables may not provide efficient charging.

    Clean the connectors regularly: Dust or debris on the charging pins can prevent charging. Use a soft cloth or dry brush to clean them.

    Avoid extreme temperatures: Charging in very hot or cold environments can damage the battery.

    Troubleshooting Common Charging Issues

    If your EarFun earbuds or case are not charging, here’s how to fix it:

    Issue 1: Earbuds won’t charge in the case.

    Solution:

    • Ensure the earbuds are placed correctly.
    • Remove any dirt from the charging contacts on both the earbuds and case.
    • Check that the case has enough battery power.

    Issue 2: Charging case not charging.

    Solution:

    • Use a different USB-C cable or wall charger.
    • Ensure the power source is working.
    • Inspect the case’s charging port for dust or damage.

    Issue 3: LED indicators not showing.

    Solution:

    • Reset the earbuds by following the manufacturer’s instructions.
    • Verify the case’s battery level.

    FAQs

    How Do I Charge My EarFun Earbuds?

    Charging your EarFun earbuds is simple and straightforward:

    • Open the charging case and place the earbuds inside, ensuring each fits snugly.
    • Make sure the charging pins on the earbuds align with the connectors in the case.
    • Close the case. The earbuds will begin charging automatically if the case has power.

    How Do I Charge My Earbuds Charging Case?

    To charge the case itself:

    • Step 1: Connect a USB-C cable to the charging port on the back of the case.
    • Step 2: Plug the other end into a USB wall charger or a computer USB port.
    • Step 3: Some models support wireless charging. If yours does, place the case on a wireless charging pad compatible with Qi technology.

    How Do I Know My Earbuds Are Fully Charged?

    You can check the charging status by observing the LED indicators:

    • Earbuds’ LEDs: Solid red light means they are charging. No light indicates that they are fully charged.
    • Charging Case LEDs: Blinking light shows the case is charging. Solid green or white light (depending on the model) means the case is fully charged.

    How Long Does It Take to Charge EarFun?

    Charging times may vary based on the model, but generally:

    • Earbuds: 1 to 1.5 hours for a full charge.
    • Charging Case: 1.5 to 2 hours when using a USB-C cable.

    Most models provide around 4-7 hours of playtime with a fully charged pair of earbuds and up to 28 hours using the case.

    Conclusion

    Charging EarFun earbuds is simple when you follow the proper steps. Always keep the case powered up, clean the charging connectors regularly, and use compatible charging accessories. If you experience issues, the troubleshooting tips provided will help you resolve most problems quickly. Enjoy your EarFun earbuds with optimal performance by keeping them fully charged and ready for use.

    CHECK THESE OUT:

    How to Connect Your AirPods Max After Forgetting the Device

    How to Find Airpods Pro Case: If You’ve Lost Your AirPods Pro Case, Here’s…

    What Are the Holes on the AirPods Pro Case? Here’s a Closer Look

  • Google Pixel 10 Rumors and Features We’re Excited About

    Google Pixel 10 Rumors and Features We’re Excited About

    The excitement for Google’s next flagship smartphone, the Pixel 10, is building up, and I can’t help but feel curious about the new possibilities it might bring. Technology fans and everyday users alike are eagerly awaiting what this next evolution of the Pixel series will offer.

    Google Pixel 10 Rumors and Features We’re Excited About
    Google Pixel 10 Rumors and Features We’re Excited About

    From groundbreaking AI advancements to enhanced camera systems and refined hardware. There’s a lot of buzz about what Google might pack into the Pixel 10. Over the years, Google has set a reputation for innovation in photography. Software integration, and unique features that make their smartphones stand out.

    While we wait for official announcements, the rumors and leaks offer us a sneak peek into the future — and the features we’re most excited to see.

    Google Pixel 10 Rumors and Features We’re Excited About

    Advanced AI Integration

    Google is set to enhance the Pixel 10 with significant AI capabilities. Leaked documents suggest the inclusion of features like “Video Generative ML” for AI-powered video editing and “Sketch-to-Image,” which converts drawings into images. These tools are expected to leverage the new Tensor G5 chipset. Enabling on-device processing for tasks such as running AI models like Stable Diffusion. Thereby enhancing the AI image generation capabilities in Pixel Studio.

    Goggle Pixel 10: Camera Enhancements

    The Pixel series is renowned for its camera prowess, and the Pixel 10 aims to elevate this reputation. Reports indicate the introduction of “Ultra Low Light video” for improved low-light video recording, likely utilizing the enhanced capabilities of the Tensor G5 chip. Additionally, the device is expected to support 4K HDR video recording at 60 frames per second, providing users with high-quality video capture.

    Tensor G5 Chipset

    Central to the Pixel 10’s advancements is the Tensor G5 chip, marking Google’s transition to TSMC’s 3nm process technology. This chipset is anticipated to feature a 1-5-2 CPU core configuration, including one high-performance Cortex-X4 core, five Cortex-A720 cores, and two Cortex-A520 cores, all supporting ARMv9.2. The GPU is expected to be a dual-core unit from PowerVR Imagination Technologies, clocked at 1,100 MHz, supporting ray tracing and GPU virtualization, aimed at delivering improved graphics performance.

    Google Pixel 10: Design and Display

    While specific design details remain under wraps, Google is known for its focus on sleek and functional aesthetics. The Pixel 10 is expected to feature a 6.2-inch OLED display with a resolution of 1080 x 2400 pixels, providing vibrant colors and sharp visuals. The device is also anticipated to include an ultrasonic fingerprint scanner for enhanced security.

    Google Pixel 10: Battery and Charging

    While there haven’t been any rumors about the Pixel 10’s battery life yet, expectations are high. After the significant improvement in battery life with the Pixel 9 series, it’s safe to assume that Google will continue to prioritize longevity, especially with the new Tensor G5 chip potentially offering better power efficiency.

    We’re also hoping for advancements in charging speed. Currently, the Pixel 9 Pro XL boasts the fastest charging in the series at 37W wired, but with Google’s recent release of a 45W charging brick, we’d love to see all three Pixel 10 models approaching this figure.

    Another area we’d like to see improvements is wireless charging. The second-generation Pixel Stand was discontinued after the Pixel 9 launch. Making it harder for users to achieve optimal charging speeds. A third-generation Pixel Stand could address this, offering faster wireless charging. Ideally with Qi2 support, a MagSafe-like magnetic ring, and speeds topping 30W.

    Google Pixel 10: Outlook

    There’s still a lot we don’t know about the Google Pixel 10, making it hard to picture what the phone will actually be like. Google will need to keep what worked well with the Pixel 9 and find ways to improve on those features in ways that matter to users.

    So far, the news about the Tensor G5 and upcoming AI features sounds promising. Suggesting that the Pixel 10 will be a significant upgrade over previous models. At the very least, we can expect improvements in AI and performance. Until we learn more, we’ll remain cautiously hopeful about the phone’s potential.

    Google Pixel 10 Pro Release Date      

    The Pixel 10 is projected to be released in late 2025, aligning with Google’s annual release cycle. This timing is expected to coincide with the launch of Android 16. Which Google has confirmed will be unveiled earlier than usual, on June 3, 2025. Pixel devices are typically the first to receive new Android updates, suggesting a synchronized release strategy.

    Pricing Expectations

    While official pricing has yet to be announced, the Pixel 10 is expected to be priced similarly to its predecessor, the Pixel 9.

    As with all leaks and rumors, it’s important to approach this information with cautious optimism. However, the consistent reports from credible sources provide a compelling glimpse into what Google has in store for the Pixel 10. As the release date approaches, more concrete details are expected to emerge. Further fueling excitement for this highly anticipated device.

    CHECK THESE OUT:

    Google Pixel Buds Pro 2 Design and Comfort

    How to Run Google Pixel Latest Update

    Pixel 9 Series Unfolds with Pro, Pro XL, and the Revolutionary Pro Fold: Google’s…

  • How to Use a Sony PS5 Headset: A Step-by-Step Guide

    How to Use a Sony PS5 Headset: A Step-by-Step Guide

    The Sony PS5 headset is an essential accessory for any serious gamer, offering high-quality audio and an immersive experience.

    How to Use a Sony PS5 Headset
    How to Use a Sony PS5 Headset

    Whether you’re playing action-packed games, engaging in online multiplayer, or just listening to your favorite music, a headset can enhance your experience. This guide will take you through how to use your Sony PS5 headset, from setup to troubleshooting.

    Sony PS5 Headset

    Sony’s PlayStation 5 (PS5) offers stunning graphics, immersive gameplay, and fantastic audio. The Sony PS5 headset, designed specifically for the console, brings your gaming experience to life with 3D audio, clear voice communication, and comfortable wear for hours. Whether you’re using a wired or wireless headset, following these easy steps will get you started in no time.

    Step-by-Step Guide on How to Set Up Your Sony PS5 Headset

    1. Unbox the Headset

    • Carefully remove your Sony PS5 headset from the packaging. Inside the box, you should find the headset, the charging cable (for wireless models), and possibly a USB dongle for wireless models.

    2. Charging the Headset (for Wireless Models)

    • For wireless headsets, make sure to fully charge your headset before using it. Plug the charging cable into the headset and connect the other end to a USB port on your PS5 or a wall adapter.

    3. Connecting Wired Headset to PS5

    • Simply plug the 3.5mm audio jack into the controller. If your headset supports a USB connection, plug the USB connector directly into the PS5 USB port.

    4. Connecting Wireless Headset to PS5

    • For wireless headsets, plug the USB dongle into one of the PS5’s USB ports. Ensure the headset is powered on and in pairing mode.
    • Follow the on-screen instructions to connect the headset wirelessly to your PS5.

    5. Adjusting Audio Settings

    • Go to the Settings menu on your PS5 home screen.
    • Select Sound > Audio Output and choose your headset as the preferred audio output device.
    • Adjust the sound settings, including volume, balance, and other features like 3D Audio, if supported by your headset.

    6. Using the Headset During Gameplay

    • Once connected, the headset should automatically work during gameplay. You can adjust the volume directly on the headset or via the PS5’s settings.

    Troubleshooting Tips for Sony PS5 Headset

    While using a headset with your PS5 is usually a smooth process, there might be some common issues you face. Here are some troubleshooting tips to help:

    No Sound

    • Connect the headset properly to the PS5 (via USB or 3.5mm jack).
    • Set the audio output to the headset in the PS5 sound settings.
    • Turn up the headset’s volume if it’s down or muted.

    Poor Audio Quality

    • Make sure the headset is fully charged (for wireless models) or securely connected (for wired headsets).
    • If you’re using 3D audio, make sure it’s supported by your headset model and enabled in the PS5 settings.
    • Try disconnecting and reconnecting the headset.

    Microphone Issues

    • If the microphone isn’t working, ensure that it’s properly plugged in (for wired models) or that the wireless connection is stable.
    • Check the microphone mute button on the headset and make sure it’s not muted.
    • Go to the Sound settings on the PS5 to test the microphone.

    Headset Not Connecting

    • For wireless headsets, make sure the USB dongle is plugged into the PS5 and the headset is in pairing mode.
    • Restart your PS5 and try reconnecting the headset.
    • Make sure the headset’s firmware is up-to-date, as outdated firmware can cause connectivity issues.

    Conclusion

    Using the Sony PS5 headset is straightforward, whether you’re enjoying single-player experiences or engaging with others online. From initial setup to troubleshooting, this guide covers everything you need to know to get the most out of your headset. With immersive sound and comfortable design, your gaming sessions will feel more engaging than ever. Happy gaming!

    FAQs

    How do I set up the Sony PS5 headset?

    To set up a Sony PS5 headset, simply plug it into the PS5 (via USB or 3.5mm audio jack), charge it if necessary, and adjust the audio settings on your PS5 to recognize it as the output device.

    Why is there no sound from my Sony PS5 headset?

    Make sure you connect the headset properly to the PS5, set the audio output correctly in the PS5 settings, and turn up the volume on both the headset and the PS5.

    How do I fix microphone issues with my Sony PS5 headset?

    Check that you haven’t muted the microphone, ensure you’ve connected it properly, and test it through the PS5 sound settings. If you’re using a wireless model, make sure you’ve connected the headset correctly and that it’s not in pairing mode.

    PS5 Pro Rumors: Everything We Know About Specs, Release Date & More

    Must Have PS5 Pro Accessories to Elevate Your Gaming Experience

    What the PS5 Pro Teardown Tells us about Sony’s Latest Gaming Console

  • How to Connect Your AirPods Max After Forgetting the Device

    How to Connect Your AirPods Max After Forgetting the Device

    How I connect my Airpod Max after I forget my device? If you’ve forgotten your AirPods Max from your device’s Bluetooth settings and now want to reconnect them, it’s essentially like pairing them as a new device again. Here’s a detailed step-by-step guide on how to reconnect your AirPods Max after you’ve selected “Forget This Device.”

    How to Connect Your AirPods Max After Forgetting the Device

    How to Connect Your AirPods Max After Forgetting the Device

    If you’ve forgotten your AirPods Max from your device’s Bluetooth settings, reconnecting them requires a few easy steps to pair them again.

    Step 1: Reset the AirPods Max

    Before reconnecting, you’ll need to reset your AirPods Max. Press and hold both the Digital Crown and the Noise Control button on the right ear cup for about 15 seconds, until the LED light near the charging port flashes amber and then white. This puts the AirPods Max in pairing mode.

    Step 2: Open Bluetooth Settings on Your Device

    On your iPhone, iPad, or Mac, head to the Bluetooth settings. If you’re using an iPhone or iPad, go to Settings > Bluetooth. For a Mac, click the Bluetooth icon in the menu bar or access it through System Preferences.

    Step 3: Reconnect the AirPods Max

    Now that your AirPods Max are in pairing mode, they should appear under available devices in your Bluetooth settings. Select AirPods Max from the list, and follow any prompts to reconnect them.

    Step 4: Confirm the Connection

    Once connected, your AirPods Max should automatically pair with your device every time you turn them on. You can confirm the connection by playing some audio or checking the Control Center on your iPhone or iPad for the AirPods Max icon.

    Troubleshooting Tips

    • If the AirPods Max don’t appear in the Bluetooth settings, try moving them closer to your device.
    • Ensure that the AirPods Max are charged.
    • Restart your device if the issue persists.

    By following these steps, your AirPods Max will seamlessly reconnect after being forgotten from your device.

    Also Check:

  • I Use These iPhone 16 Pro Hidden Features to Get More Done Every Day, Here’s why they should be on your radar, too

    I Use These iPhone 16 Pro Hidden Features to Get More Done Every Day, Here’s why they should be on your radar, too

    The iPhone 16 Pro isn’t just about flashy hardware—its hidden features have made a huge difference in my daily productivity. From time-saving shortcuts to multitasking tools, this device is packed with features that help me get through my day more efficiently. Here’s how these hidden gems elevate my workflow and why they should be on your radar, too.


    I Use These iPhone 16 Pro Hidden Features to Get More Done Every Day, Here's why they should be on your radar, too

    Multitasking with the Enhanced App Switcher

    One of the standout features on the iPhone 16 Pro is the improved App Switcher, which allows for faster and more intuitive multitasking. When working on multiple tasks at once, I can quickly swipe between open apps without losing momentum. The updated interface feels more fluid and ensures that I spend less time hunting for apps and more time getting things done.

    For example, if I’m drafting an email and need to switch to my calendar to check availability, the process feels seamless and fast, thanks to the Pro’s advanced hardware and intuitive software design. This fluid multitasking system has dramatically sped up my work processes.

    Using Back Tap for Quick Actions

    Back Tap is another incredible feature I use to streamline my productivity. With a double or triple tap on the back of the iPhone, I can set up shortcuts for common tasks like taking a screenshot, opening specific apps, or even controlling the volume.

    For instance, I set a triple tap to quickly access my Notes app. This saves me time when I need to jot down quick thoughts or reminders without navigating through my home screen. It’s an underrated feature that reduces friction in daily tasks.

    Supercharged Siri Shortcuts

    Siri Shortcuts have come a long way, and on the iPhone 16 Pro, they are more powerful than ever. I use them to automate repetitive tasks, like sending a daily status update to my team or logging my workouts. Instead of doing these manually, I’ve created custom voice commands and shortcuts that execute these tasks in seconds.

    For example, I can just say, “Hey Siri, start my workday,” and Siri will automatically open my calendar, play my productivity playlist, and launch my task manager app. It’s like having a personal assistant that simplifies my routine.

    Dynamic Island Notifications

    Dynamic Island, a unique feature exclusive to the iPhone 16 Pro series, has been a game-changer for managing notifications without interrupting my focus. Dynamic Island subtly displays incoming calls, messages, and app notifications in a minimal and interactive format.

    The feature allows me to glance at notifications without fully stopping my current task. For instance, when I’m working on a presentation, Dynamic Island will display a small banner when a new email comes in, and I can respond later without losing focus on the task at hand.

    Widgets on the Lock Screen

    Widgets have transformed the iPhone home and lock screen experience. On the iPhone 16 Pro, they are even more dynamic, allowing me to access information at a glance without unlocking the device. I’ve customized my lock screen to show my task manager, calendar, and weather updates.

    This simple feature keeps me on track, especially during a busy day when I need instant updates on deadlines and meetings. It’s one of those things that seems small but drastically improves how I manage my time.

    Focus Modes for Maximum Productivity

    The Focus Modes in iOS 18, running on the iPhone 16 Pro, are perfect for tailoring notifications and app access based on the time of day or what I’m working on. I have a dedicated “Work” mode that silences non-work apps and only allows critical notifications through, ensuring I stay focused during important tasks.

    During meetings or deep work sessions, this feature helps me tune out distractions and focus on what matters most. And once I’m done, the iPhone automatically shifts back to normal mode, letting me reconnect with everything I’ve missed.

    Conclusion: Why the iPhone 16 Pro’s Hidden Features Elevate Productivity

    The iPhone 16 Pro’s hidden features aren’t just gimmicks—they genuinely help streamline daily tasks and improve productivity. Whether it’s the effortless multitasking, powerful shortcuts, or smarter notifications, these features ensure that I spend less time managing my phone and more time getting things done. The iPhone 16 Pro is more than just a powerhouse device; it’s a true productivity tool.

    Also Check:

  • I Held a Fake Pair of AirPods Max, and the Difference Was Surprisingly Obvious—Here’s What I Discovered

    I Held a Fake Pair of AirPods Max, and the Difference Was Surprisingly Obvious—Here’s What I Discovered

    When I got my hands on a fake pair of AirPods Max, I expected some differences, but the reality was more shocking than I imagined. From the moment I unboxed them, it became clear that these knockoffs were trying hard to look the part, but they couldn’t compete with Apple’s real deal. Here’s what stood out:

    I Held a Fake Pair of AirPods Max, and the Difference Was Surprisingly Obvious

    Design and Build Quality

    At first glance, the fake AirPods Max seemed convincing. They had the same sleek, over-ear design, with similarly shaped ear cups and headbands. However, once I took a closer look, it became clear that the materials were subpar. The genuine AirPods Max are crafted with high-end aluminum, stainless steel, and memory foam, offering a premium feel. In contrast, the fake pair felt flimsy and lightweight, as if made with cheaper plastic.

    The ear cushions on the fake version were a major giveaway too. Unlike Apple’s soft memory foam, which comfortably forms around your ears, the fakes were stiffer and less comfortable for long listening sessions. It wasn’t just the comfort that suffered—the fake ones didn’t create the same sound-isolating seal, which impacted their overall performance.

    Sound Quality: A Huge Letdown

    This is where the gap between real and fake became painfully obvious. The real AirPods Max are renowned for their balanced, immersive sound profile, with deep bass, crisp mids, and clear highs. Apple’s spatial audio technology creates an almost cinematic experience.

    But the fakes? The sound was flat, muddied, and completely lacked the bass that makes the AirPods Max so enjoyable. I noticed a lot of distortion when the volume was high, and any attempt at noise cancellation was practically nonexistent. While the real AirPods Max actively block out background noise, the fakes barely reduced the hum of nearby chatter.

    Noise Cancellation: Apple vs. Cheap Imitations

    The Active Noise Cancellation (ANC) is one of the AirPods Max’s standout features, offering a serene listening experience. With the real AirPods Max, the ANC is near-perfect—it cuts out city noises, coffee shop chatter, and airplane engines. You’re cocooned in sound.

    The fake pair, however, seemed to have ANC in name only. I could still hear surrounding noises clearly, and instead of smooth noise cancellation, there was an odd, faint static sound in the background. It was far from the immersive experience Apple promises.

    Features: Fake Shortcuts

    The Digital Crown on the real AirPods Max is a handy control tool for adjusting volume, skipping tracks, and activating Siri. On the fake ones, the Digital Crown felt sluggish and unresponsive, lacking the smooth precision of Apple’s engineering. Siri, or any voice assistant for that matter, was non-functional.

    The Transparency Mode, which allows outside sound in when needed, was also a failure in the fake pair. While Apple’s version transitions seamlessly between noise cancellation and ambient sound, the fake AirPods Max simply didn’t have this capability, further reinforcing their inferiority.

    Battery Life and Charging

    Genuine AirPods Max boast an impressive battery life of up to 20 hours with ANC on. However, the fake version died after only a few hours, even with minimal usage. The charging case also felt cheaper, and I wasn’t confident that it would last over time without breaking or malfunctioning.

    Conclusion: The Real vs. Fake Experience

    The differences between real and fake AirPods Max were glaring, from design flaws to audio quality. The fakes may look similar at first glance, but when it comes to performance and quality, they’re miles behind. For anyone considering buying AirPods Max, my advice is to steer clear of imitations. If you want the genuine experience of immersive sound and top-tier noise cancellation, it’s worth investing in the real deal.

    Also Check:


  • How Long to Charge AirPods Pro Case: Here’s Everything You Need to Know

    How Long to Charge AirPods Pro Case: Here’s Everything You Need to Know

    When it comes to charging your AirPods Pro case, the process is relatively straightforward, but understanding the how long it takes to fully charge is essential for maximizing the efficiency of your listening experience.
    How Long to Charge AirPods Pro Case

    How Long to Charge AirPods Pro Case

    Charging your AirPods Pro case is a quick and straightforward process, whether you choose wired or wireless charging. Typically, you can expect the case to be fully charged within one to three hours, depending on the method you use.

    Charging Times

    The AirPods Pro case generally takes about 1 hour to fully charge when using a standard Lightning cable. This duration applies whether you’re using the wireless charging case or the standard version. The AirPods Pro themselves, when inside the case, can reach a full charge in around 20-30 minutes, meaning that in just half an hour, both the case and the AirPods can be ready for extended use.

    If you’re using wireless charging with a Qi-certified charger, the charging time for the case can be slightly longer, depending on the power output of the wireless pad.

    However, this method is often more convenient, as you can set the case down and charge it without worrying about cables.

    Fast Charging Feature

    One of the standout features of the AirPods Pro is the fast charging capability. In just 5 minutes of charging the AirPods inside the case, you can get up to 1 hour of listening time. This is particularly useful when you’re in a rush and need a quick boost to keep your music, podcasts, or calls going.

    Battery Life After a Full Charge

    A fully charged AirPods Pro case can provide multiple full recharges for the AirPods. Typically, you’ll get around 24 hours of listening time or 18 hours of talk time from a fully charged case when combined with the AirPods Pro. This is ideal for users who are on the go and may not always have immediate access to a charging port.

    Tips to Optimize Charging

    1. Use the Right Charger: For optimal charging times, ensure you’re using an Apple-certified Lightning cable or a high-quality wireless charging pad.
    2. Keep the Case Clean: Dust and debris in the charging port or inside the case can interfere with efficient charging. Regularly clean the case to maintain charging speed.
    3. Avoid Overcharging: While the case is designed to manage its battery life, try not to leave it on the charger for extended periods once fully charged.

    Charging the AirPods Pro Case with a Lightning Cable

    Using the Lightning cable that comes with your AirPods Pro is the fastest and most reliable method to charge the case. When connected to a USB power adapter, the case can typically reach a full charge in about one to two hours. This time frame allows the case to fully recharge itself and the AirPods Pro inside, ensuring that you have up to 24 hours of listening time or more, depending on your usage.

    If your AirPods Pro case is nearly depleted, it might take closer to the full two-hour mark to reach 100% charge. During this time, the status light on the front of the case will glow amber, indicating that the charging process is underway. Once fully charged, the light will turn green, signaling that both the case and AirPods Pro are ready for use.

    Charging the AirPods Pro Case Wirelessly

    Wireless charging is a convenient option, especially if you have a Qi-compatible charging mat. The time it takes to fully charge your AirPods Pro case wirelessly can vary depending on the power output of your charging mat. On average, it might take slightly longer than wired charging—around two to three hours—to achieve a full charge.

    To charge the case wirelessly, place it on the charging mat with the status light facing up. The light will briefly turn on, indicating that the case is charging. Just like with wired charging, the status light will show amber during charging and green once the case is fully charged.

    Conclusion

    The AirPods Pro case offers quick and convenient charging, taking around 1 hour for a full charge. With fast charging features and the ability to provide up to 24 hours of listening time, the case is designed to keep up with even the busiest schedules. Whether you’re using a Lightning cable or wireless charging, understanding these charging times ensures you can maximize the performance of your AirPods Pro.

    Also Check:

  • How to Charge Airpods Pro Case: You have only two ways to charge your AirPods Pro case, and both are Easy

    How to Charge Airpods Pro Case: You have only two ways to charge your AirPods Pro case, and both are Easy

    Your AirPods Pro are a fantastic piece of technology, offering high-quality audio, noise cancellation, and seamless integration with your Apple devices. But to keep them performing at their best, it’s essential to ensure they’re always charged and ready to go. The charging case is an integral part of this process, not only keeping your AirPods Pro safe when not in use but also providing multiple charges on the go.
    How to Charge Airpods Pro Case
    Whether you’re new to AirPods Pro or just need a refresher, this guide will walk you through the detailed steps on how to charge your AirPods Pro case and ensure that your earbuds are always ready when you need them.

    How to Charge AirPods Pro Case

    Charging your AirPods Pro case is essential to keeping both the case and the AirPods inside ready for use. Here’s a detailed guide on how to charge your case, ensuring your AirPods Pro always have power when you need them.

    The charging case is designed to charge in two ways: via a Lightning cable (wired) or through a wireless charging mat (wireless). The case also features a status light on the front, which indicates the charging status of both the case and the AirPods Pro inside it.

    Step 1: Choose Your Charging Method

    You have two ways to charge your AirPods Pro case: wired or wireless charging. Apple designed the AirPods Pro case to accommodate both methods, giving users flexibility.

    Wired Charging

    To charge your AirPods Pro case using a wire, follow these steps:

    • Use the Lightning to USB-C cable provided in the box or any Apple-certified Lightning cable.
    • Insert the Lightning end of the cable into the charging port on the bottom of the AirPods Pro case.
    • Plug the USB-C end of the cable into a power adapter or a USB-C port on your laptop or another compatible charging source.
    • Plug the power adapter into a wall outlet.

    You should see the status light on the case briefly illuminate to indicate that it’s charging. If it lights up amber, the case is charging. If it lights up green, the case is fully charged.

    Wireless Charging

    For wireless charging:

    • Place your AirPods Pro case on a Qi-compatible wireless charging pad with the status light facing upward.
    • Ensure that the case is centered on the pad for proper alignment.

    The status light will glow amber while charging and green when fully charged. Wireless charging is a convenient method that eliminates the need for cables, but it may take longer than wired charging.

    Step 2: Monitor Charging Progress

    You can easily monitor the charge status of your AirPods Pro case through various methods:

    1. Check the Status Light:
      • Amber Light: Indicates that the case is still charging.
      • Green Light: Shows that the case is fully charged.
    2. Use Your iPhone:
      • Open the AirPods Pro case near your iPhone, and a pop-up window will appear, showing the battery percentage of both the AirPods and the case.
    3. Use the Batteries Widget:
      • You can add the Batteries widget to your iPhone’s home screen or Today View to monitor the battery levels of all connected devices, including your AirPods and the case.

    Step 3: Ensure Proper Charging

    To ensure that your AirPods Pro case is charging efficiently:

    • Make sure the Lightning cable is properly inserted into the port, and the adapter is securely connected to a power source.
    • For wireless charging, ensure the case is correctly placed on the pad.
    • If the status light doesn’t show any indication of charging, try cleaning the Lightning port with a soft brush to remove any dust or debris that could interfere with charging.

    Step 4: Troubleshooting Charging Issues

    If your AirPods Pro case isn’t charging:

    • Try using a different Lightning cable or power adapter to eliminate the possibility of faulty accessories.
    • For wireless charging issues, ensure your pad is Qi-compatible and try repositioning the case on the charger.
    • If the case still doesn’t charge, try resetting your AirPods Pro by pressing and holding the setup button on the back of the case until the status light flashes amber.

    The AirPods Pro charging case is more than just a storage solution; it’s the powerhouse that keeps your AirPods Pro charged throughout the day.

    The case itself holds a significant amount of battery power, which can recharge your AirPods Pro multiple times before the case itself needs to be recharged. This makes the case an essential accessory for anyone using AirPods Pro on a daily basis.

    Conclusion

    Charging your AirPods Pro case is simple, whether you opt for wired or wireless methods. By keeping an eye on the status light and checking your battery levels on your iPhone, you can ensure your AirPods and case are always ready for use. Regular charging and proper care will help prolong the battery life and efficiency of your AirPods Pro.

    Also Check:

  • How to Find Airpods Pro Case: If You’ve Lost Your AirPods Pro Case, Here’s How to Find It Fast

    How to Find Airpods Pro Case: If You’ve Lost Your AirPods Pro Case, Here’s How to Find It Fast

    Losing your AirPods Pro case can be stressful, especially since it’s essential for keeping your earbuds charged and protected. Whether it’s slipped between couch cushions or been left behind in a public place, the good news is that there are several methods to help you locate it quickly.
    How to Find Airpods Pro Case
    In this guide, we’ll walk you through the most effective tools and ways to find your AirPods Pro case so you can get back to enjoying your music without the stress.

    How to Find Your AirPods Pro Case

    Losing your AirPods Pro case can be frustrating, but there are a few methods to locate it quickly.

    Here’s how to find your AirPods Pro case using available tools and techniques:

    Step 1: Use the Find My App

    Apple’s Find My app is the most efficient way to locate your AirPods Pro and its case, but note that the feature primarily tracks the AirPods themselves rather than the case. If your AirPods are inside the case, you might still be able to find both.

    • Open the Find My app on your iPhone or iPad.
    • Tap on the Devices tab at the bottom.
    • Select your AirPods Pro from the list of devices.

    If your AirPods Pro are near you and out of the case, you’ll see a location or an “In Range” status on the map. The app won’t show the precise location of just the case without AirPods, but if the AirPods are inside, you can use this method to narrow it down.

    Step 2: Play a Sound to Find Your AirPods

    If your AirPods Pro are not in the case or nearby, you can play a sound to help locate them:

    • In the Find My app, select your AirPods Pro.
    • Tap Play Sound to emit a chirping sound from each AirPod, helping you track them down.

    However, this feature only works if the AirPods are out of the case. If they’re inside the case, unfortunately, no sound will be emitted.

    Step 3: Check Last Known Location

    If your AirPods Pro case is lost with the AirPods inside, the Find My app will show the last known location where they were connected. This can help you retrace your steps to the last place you used them.

    • Open Find My, tap your AirPods Pro, and check the map.
    • Look for the last location recorded by the app before the connection was lost.

    This is especially helpful if you were using your AirPods at work, home, or while out and about.

    Step 4: Visually Search Common Areas

    If the Find My app isn’t working or your AirPods Pro case isn’t near enough to be located, manually searching common areas might help. Think about places where you typically use or charge your AirPods, such as:

    • On your desk
    • In your bag or pockets
    • Near your bedside table
    • In car compartments

    Checking these spots carefully might turn up the case.

    Step 5: Consider a Bluetooth Tracker for Future Use

    Since finding just the case using Find My can be difficult if the AirPods aren’t inside, consider attaching a Bluetooth tracker like Tile or AirTag to your AirPods Pro case. These devices can provide more accurate tracking for the case itself, giving you an easy way to locate it if misplaced.

    Conclusion

    Losing your AirPods Pro case can be inconvenient, but by using tools like Apple’s Find My app and retracing your steps, you stand a good chance of recovering it. While the app mainly tracks the AirPods themselves, the last known location feature and sound cues can help you locate both the case and the AirPods.

    For future protection, using a Bluetooth tracker attached to the case can be a lifesaver.

    Also Check: